Getting started with Quarkus and InfluxDB to ingest sensor data from a Particle device — Part 1


Deciding which programming language and framework to use for your next backend application is not trivial. There are a lot of variables involved in the process. What is the learning curve of a new framework? What is the end goal of what you are about to develop? A prototype? A full-scale production web server? What is the computing infrastructure that you will be using for the deployment? These are just a few examples, but there could be a lot more to explore before making the final decision.
This tutorial is composed of two articles. In the first one, we are going to explore the Quarkus framework and we will deploy a backend application that ingests and processes data coming from a Particle controller. In the second one, we will see how to store the data received in an Influx database.
“Quarkus is an open source, Kubernetes-native JavaTM framework tailored for GraalVM and OpenJDK HotSpot. It offers a full-stack framework, using top Java libraries and standards. With Quarkus, Java can be a leading platform in Kubernetes and serverless environments, while offering developers a unified reactive and imperative programming model to address a wider range of distributed application architectures.”
Characteristics like fast startup time and low memory footprint are just some of the reasons why we love Quarkus at Wepo and why, in brief, Quarkus can be a good choice for most applications that need a scalable backend that runs on a cloud infrastructure.
So, let’s get started and remember that you can find all the code for this tutorial on GitHub (the code for part 1 of the tutorial can be found in the branch part-1).
Setup a new Quarkus project
We will use Quarkus quick-start and download a project template. First of all, we need to set a Group and Artifact name of our choice and leave Maven as Build tool.
We can use Quarkus quick-start also to add the extensions that we will be using:
- SmallRye OpenAPI: we will use it to document our APIs with the OpenAPI standard and the SwaggerUI
- YAML Configuration: we will use YAML files to configure our Quarkus application
- Quarkus Extension for Spring Web API: we will use Spring Web annotations to create our REST services

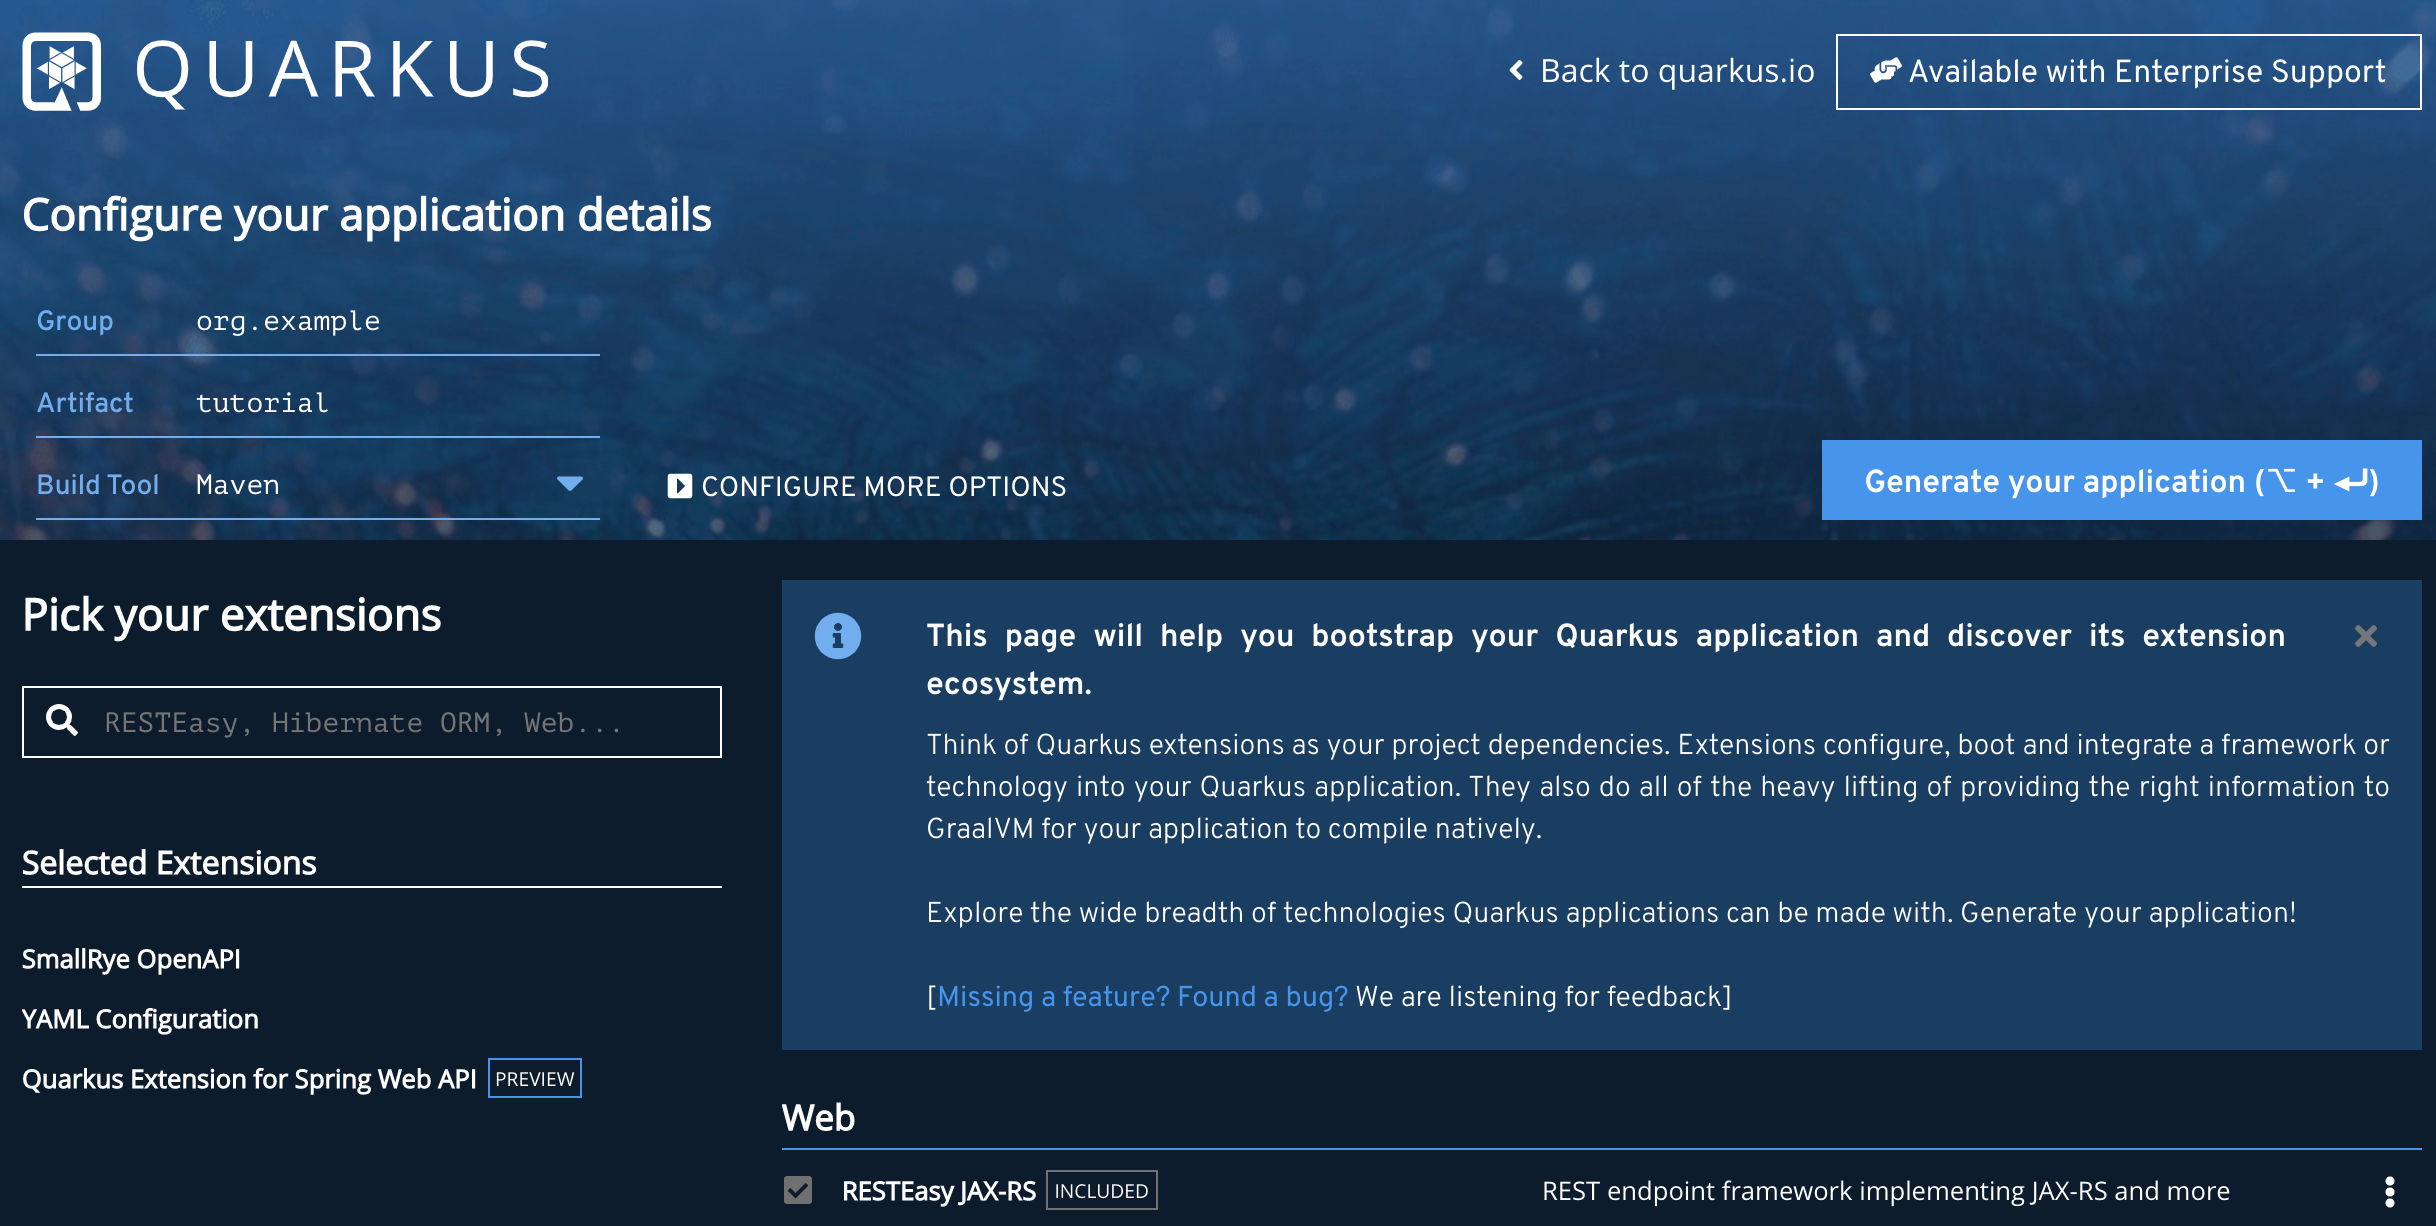
Once we have selected all the extensions, we can click “Generate your application” to start the download of our Quarkus project template.
In these tutorials, we will be using IntelliJ IDEA, but feel free to use the IDE that you are most used to.
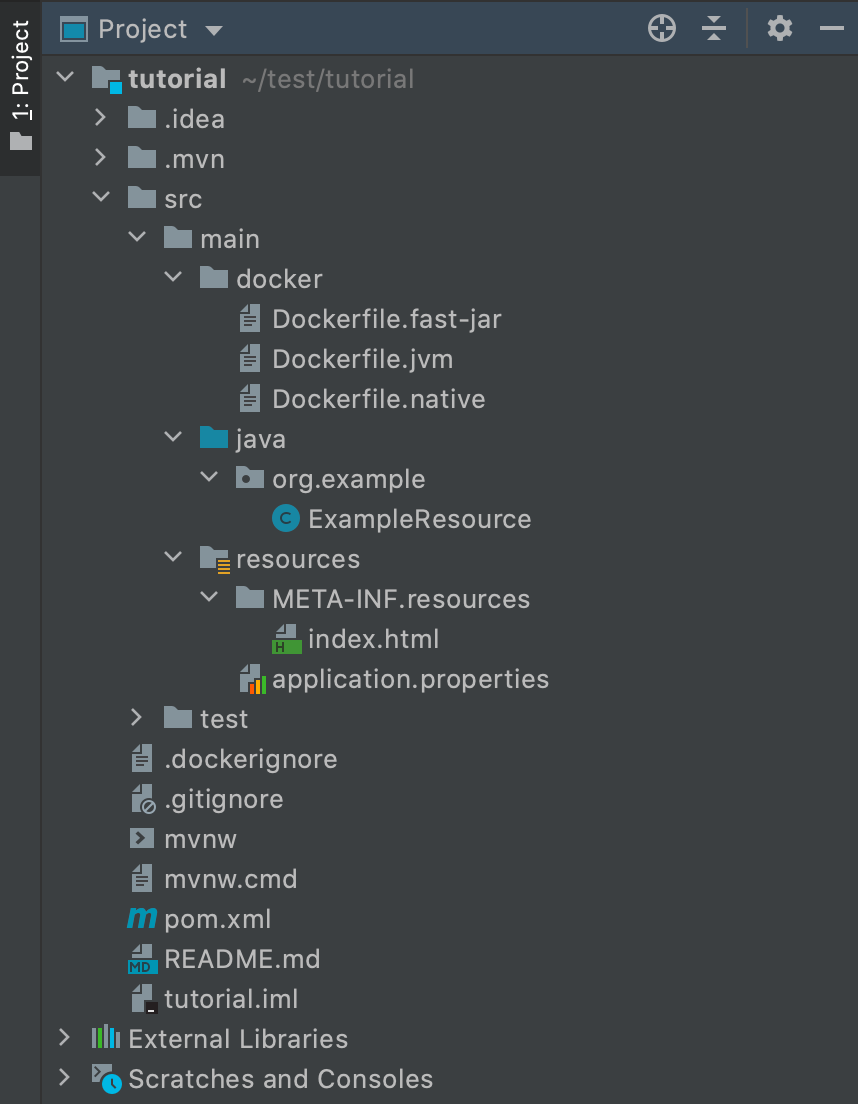
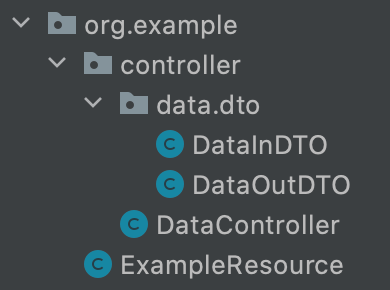
To import the project in IntelliJ, extract the project folder from the ZIP archive → click “Open or import” → click on the project folder → click “Open”. We are going to wait until IntelliJ loads all the folders of the project and once it does that, we will see the project structure like the one in the picture below.

At the time we are writing this tutorial, Quarkus latest release is 1.7.0.Final. So our pom.xml looks like this:
Now, let’s create an application.yaml file inside the resources folder and set some properties.
By setting these properties, we are setting a format style for our logger and enabling the Swagger User Interface.
Test /hello endpoint
Quarkus’ templates with a simple hello world endpoint. The next steps will be to build our project, run it, and test this endpoint with Postman and the Swagger UI.
Build
We are going to use ./mvnw, the Maven wrapper that comes with the project template, to build the project. We have to open a terminal in the root folder of the project and run this command:
$ ./mvnw clean package -DskipTests=trueRun
After building our project, we will add a Run configuration in IntelliJ to run our code.
- Click “Add configuration…” in the top-right corner of the window
- Click “+” in the top-left corner of the “Run/Debug configuration” dialog
- Choose “JAR application”
- Set “runner” as the configuration name
- Locate and set the JAR path to /tutorial/target/tutorial-1.0.0-SNAPSHOT-runner.jar
- Click “Apply” and “OK”
We are now ready to run our project. Click the play symbol in the top-right corner of the window and here you go! You got your first Quarkus project up and running.

If you are not using IntelliJ, you can run your Quarkus project with this command from the project root folder:
$ java -Dfile.encoding=UTF-8 -jar target/tutorial-1.0.0-SNAPSHOT-runner.jarTest
Now, we are ready to test our hello endpoint using Postman and the Swagger UI.
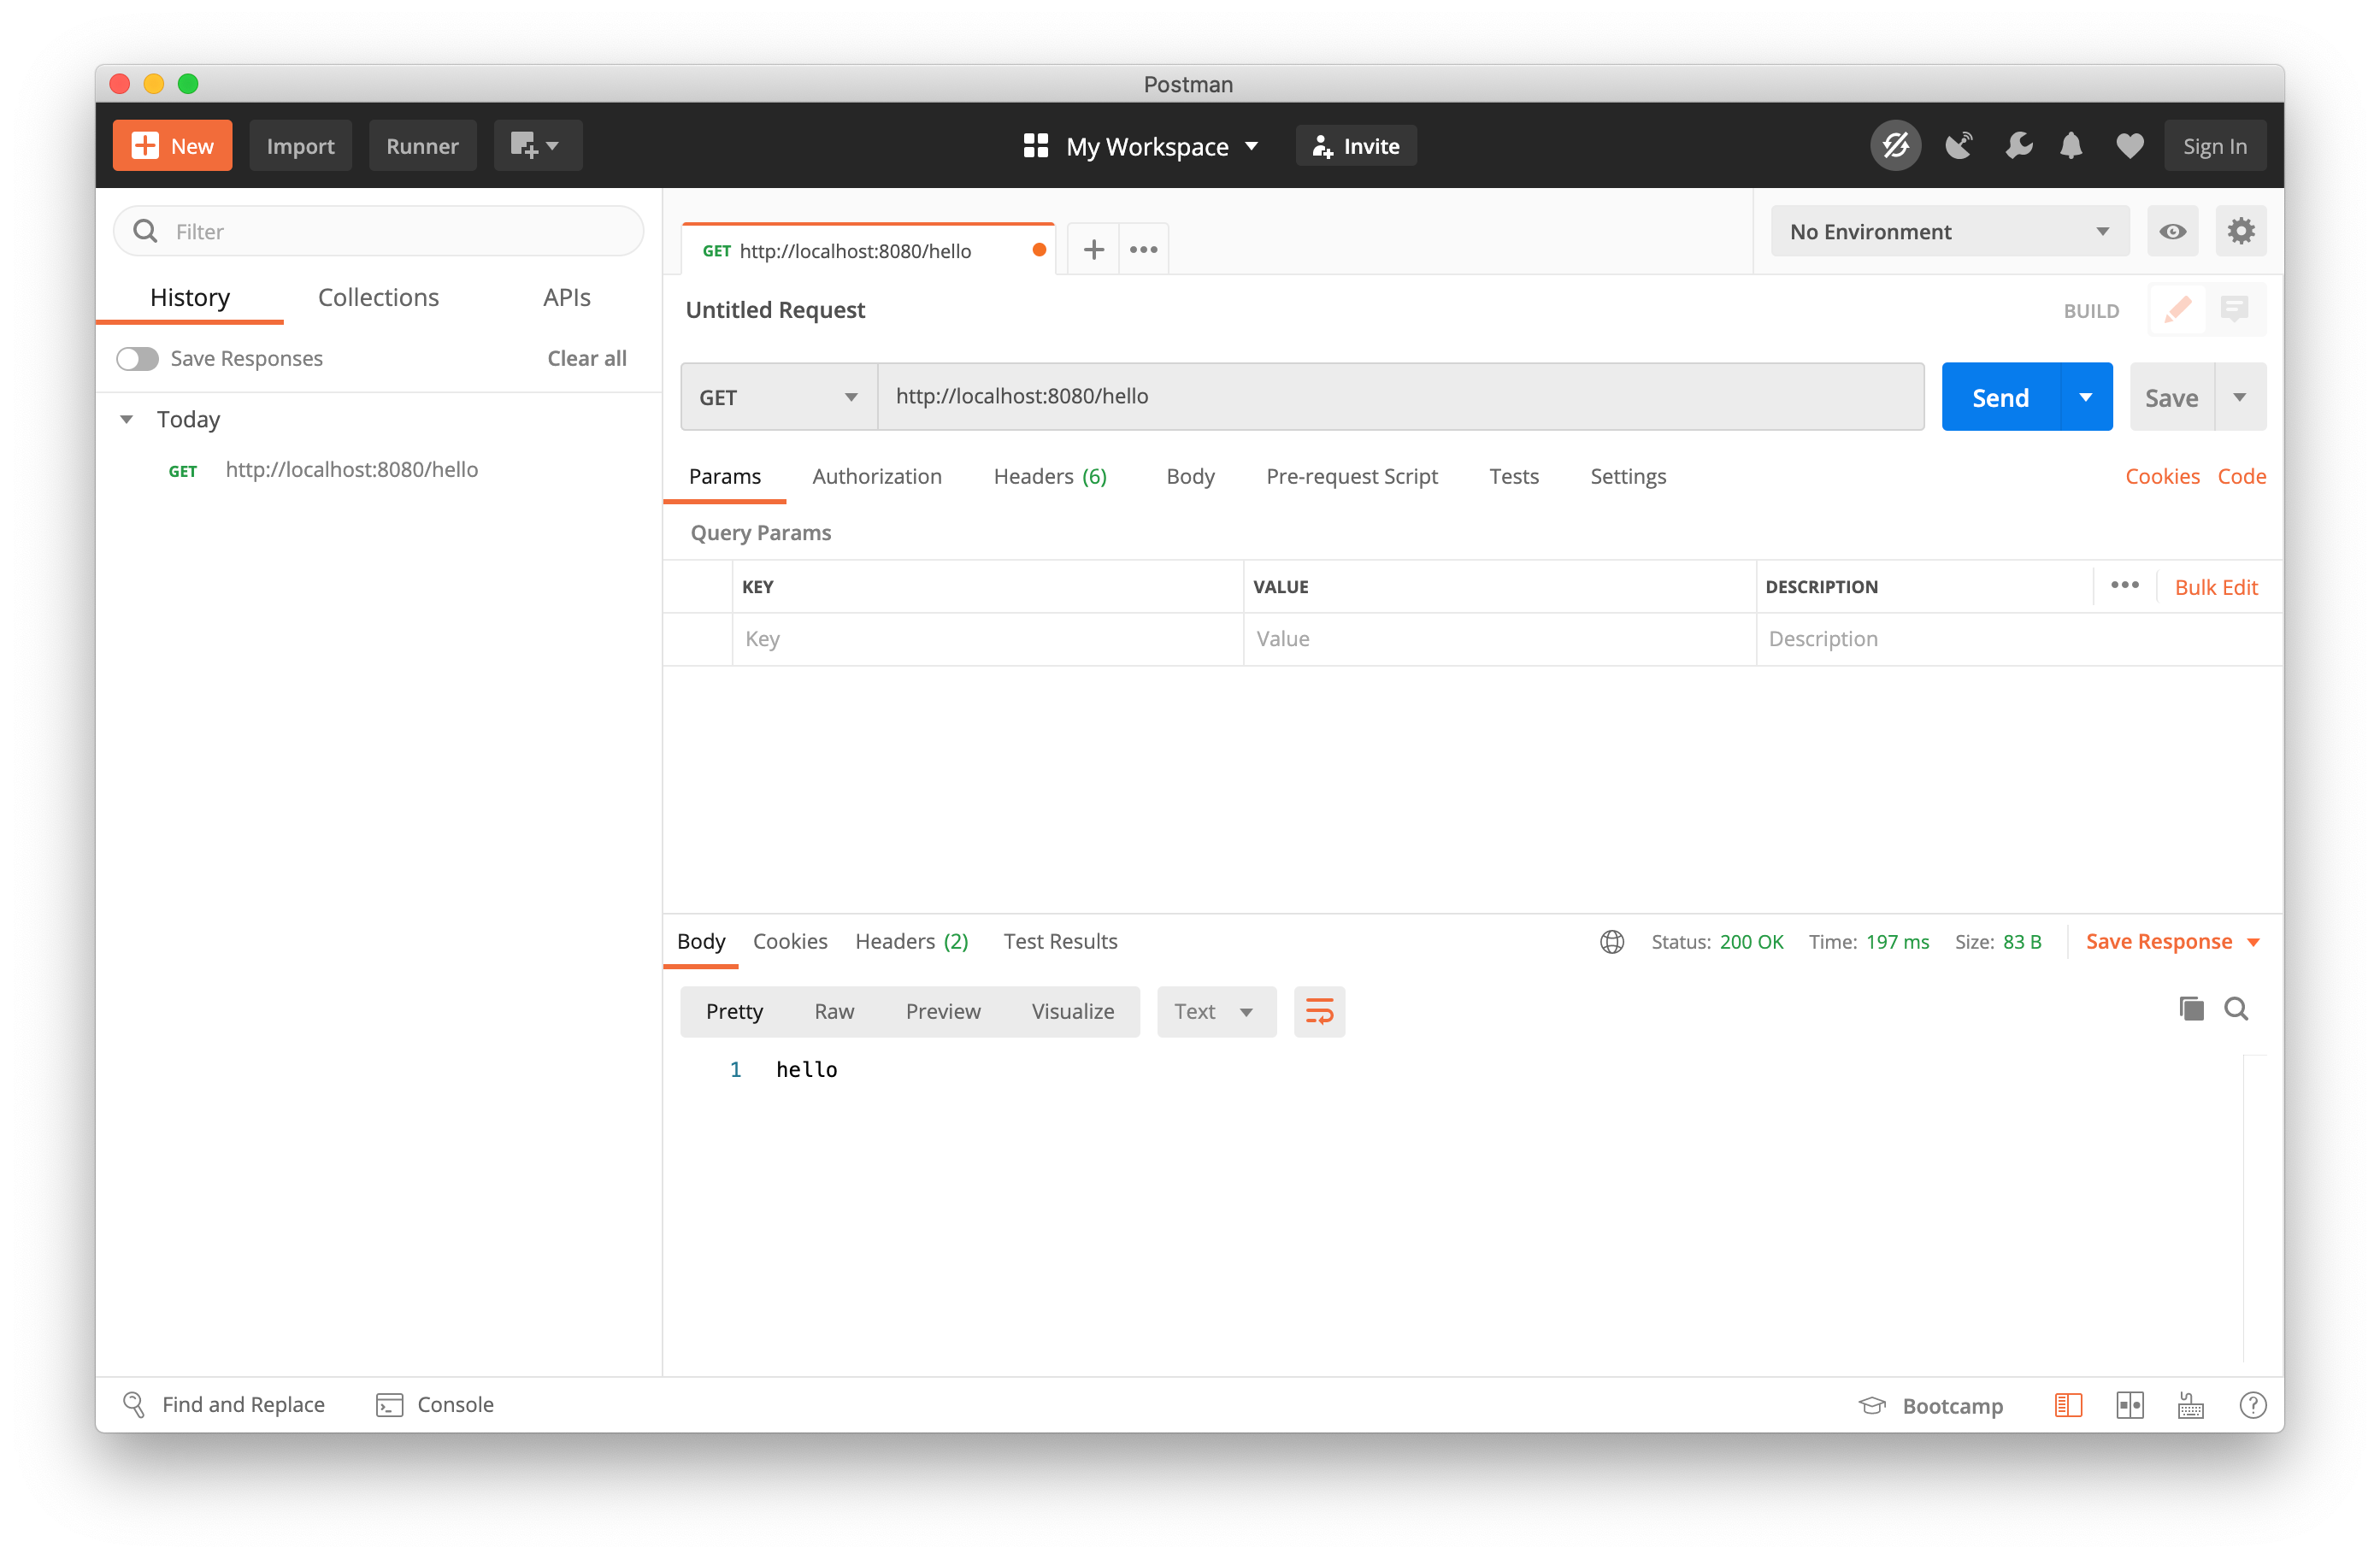
Postman
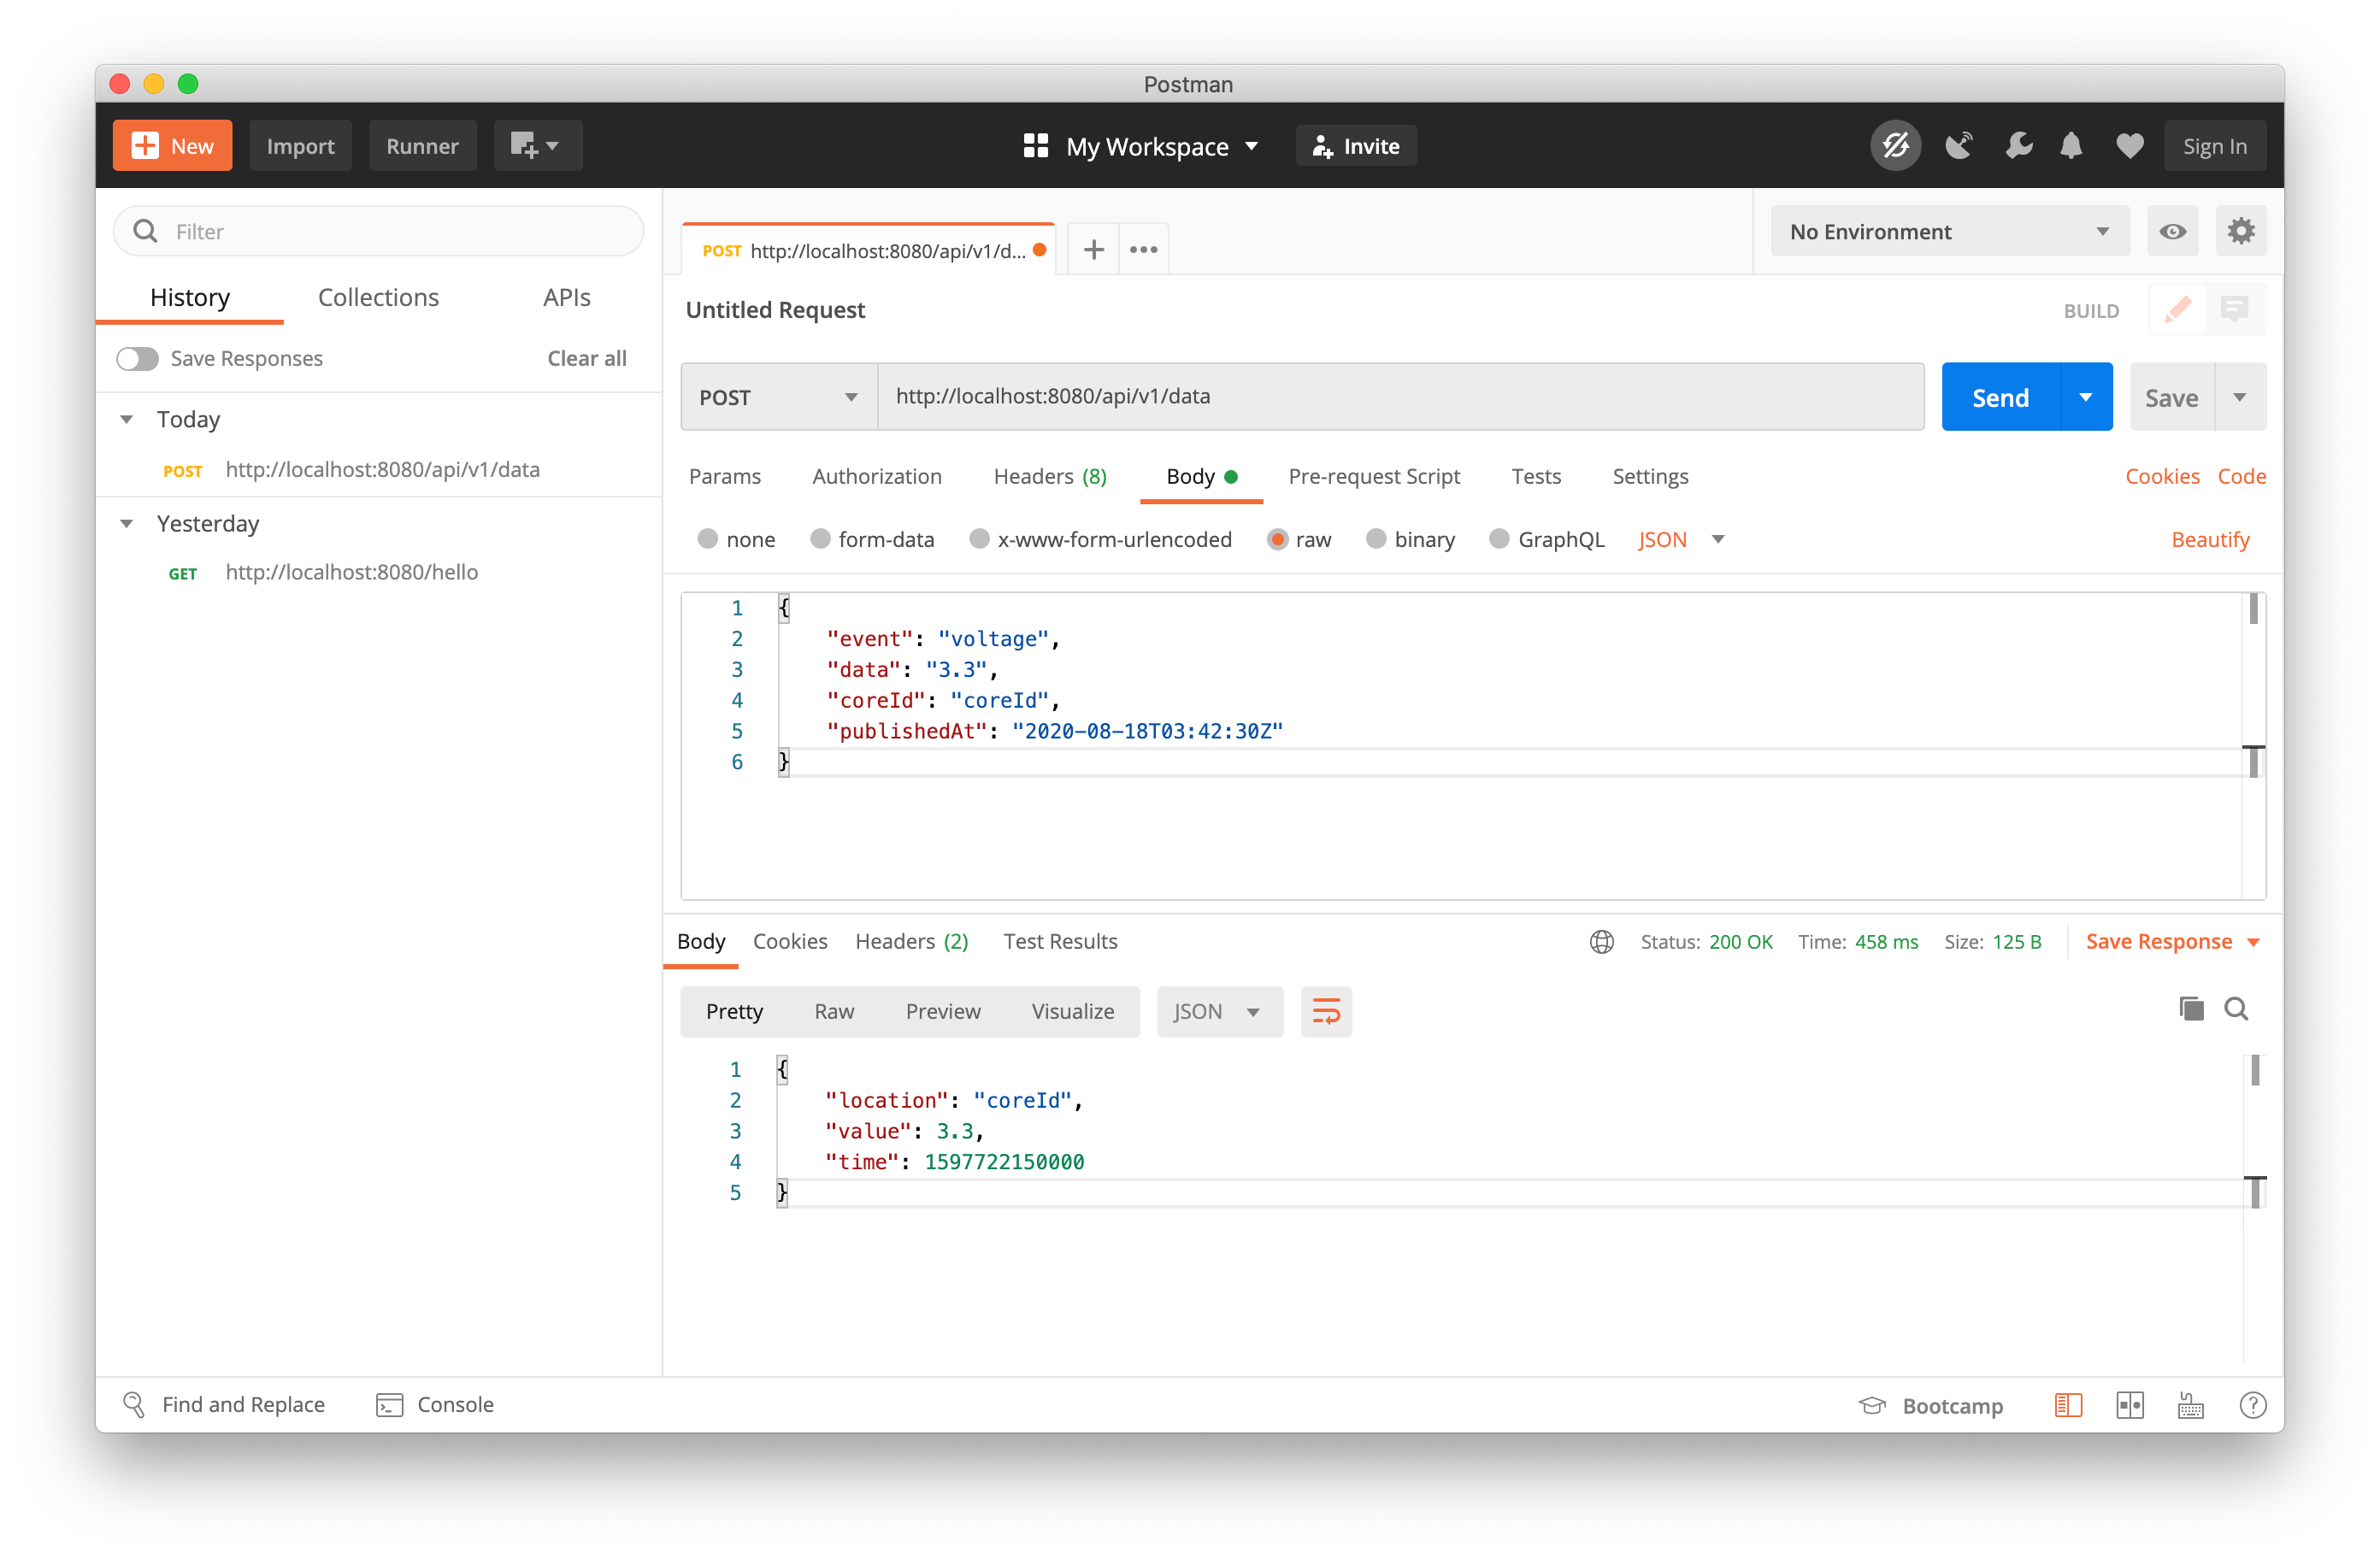
The project template exposes by default the hello endpoint from http://localhost:8080/hello. We can test it with Postman like this:

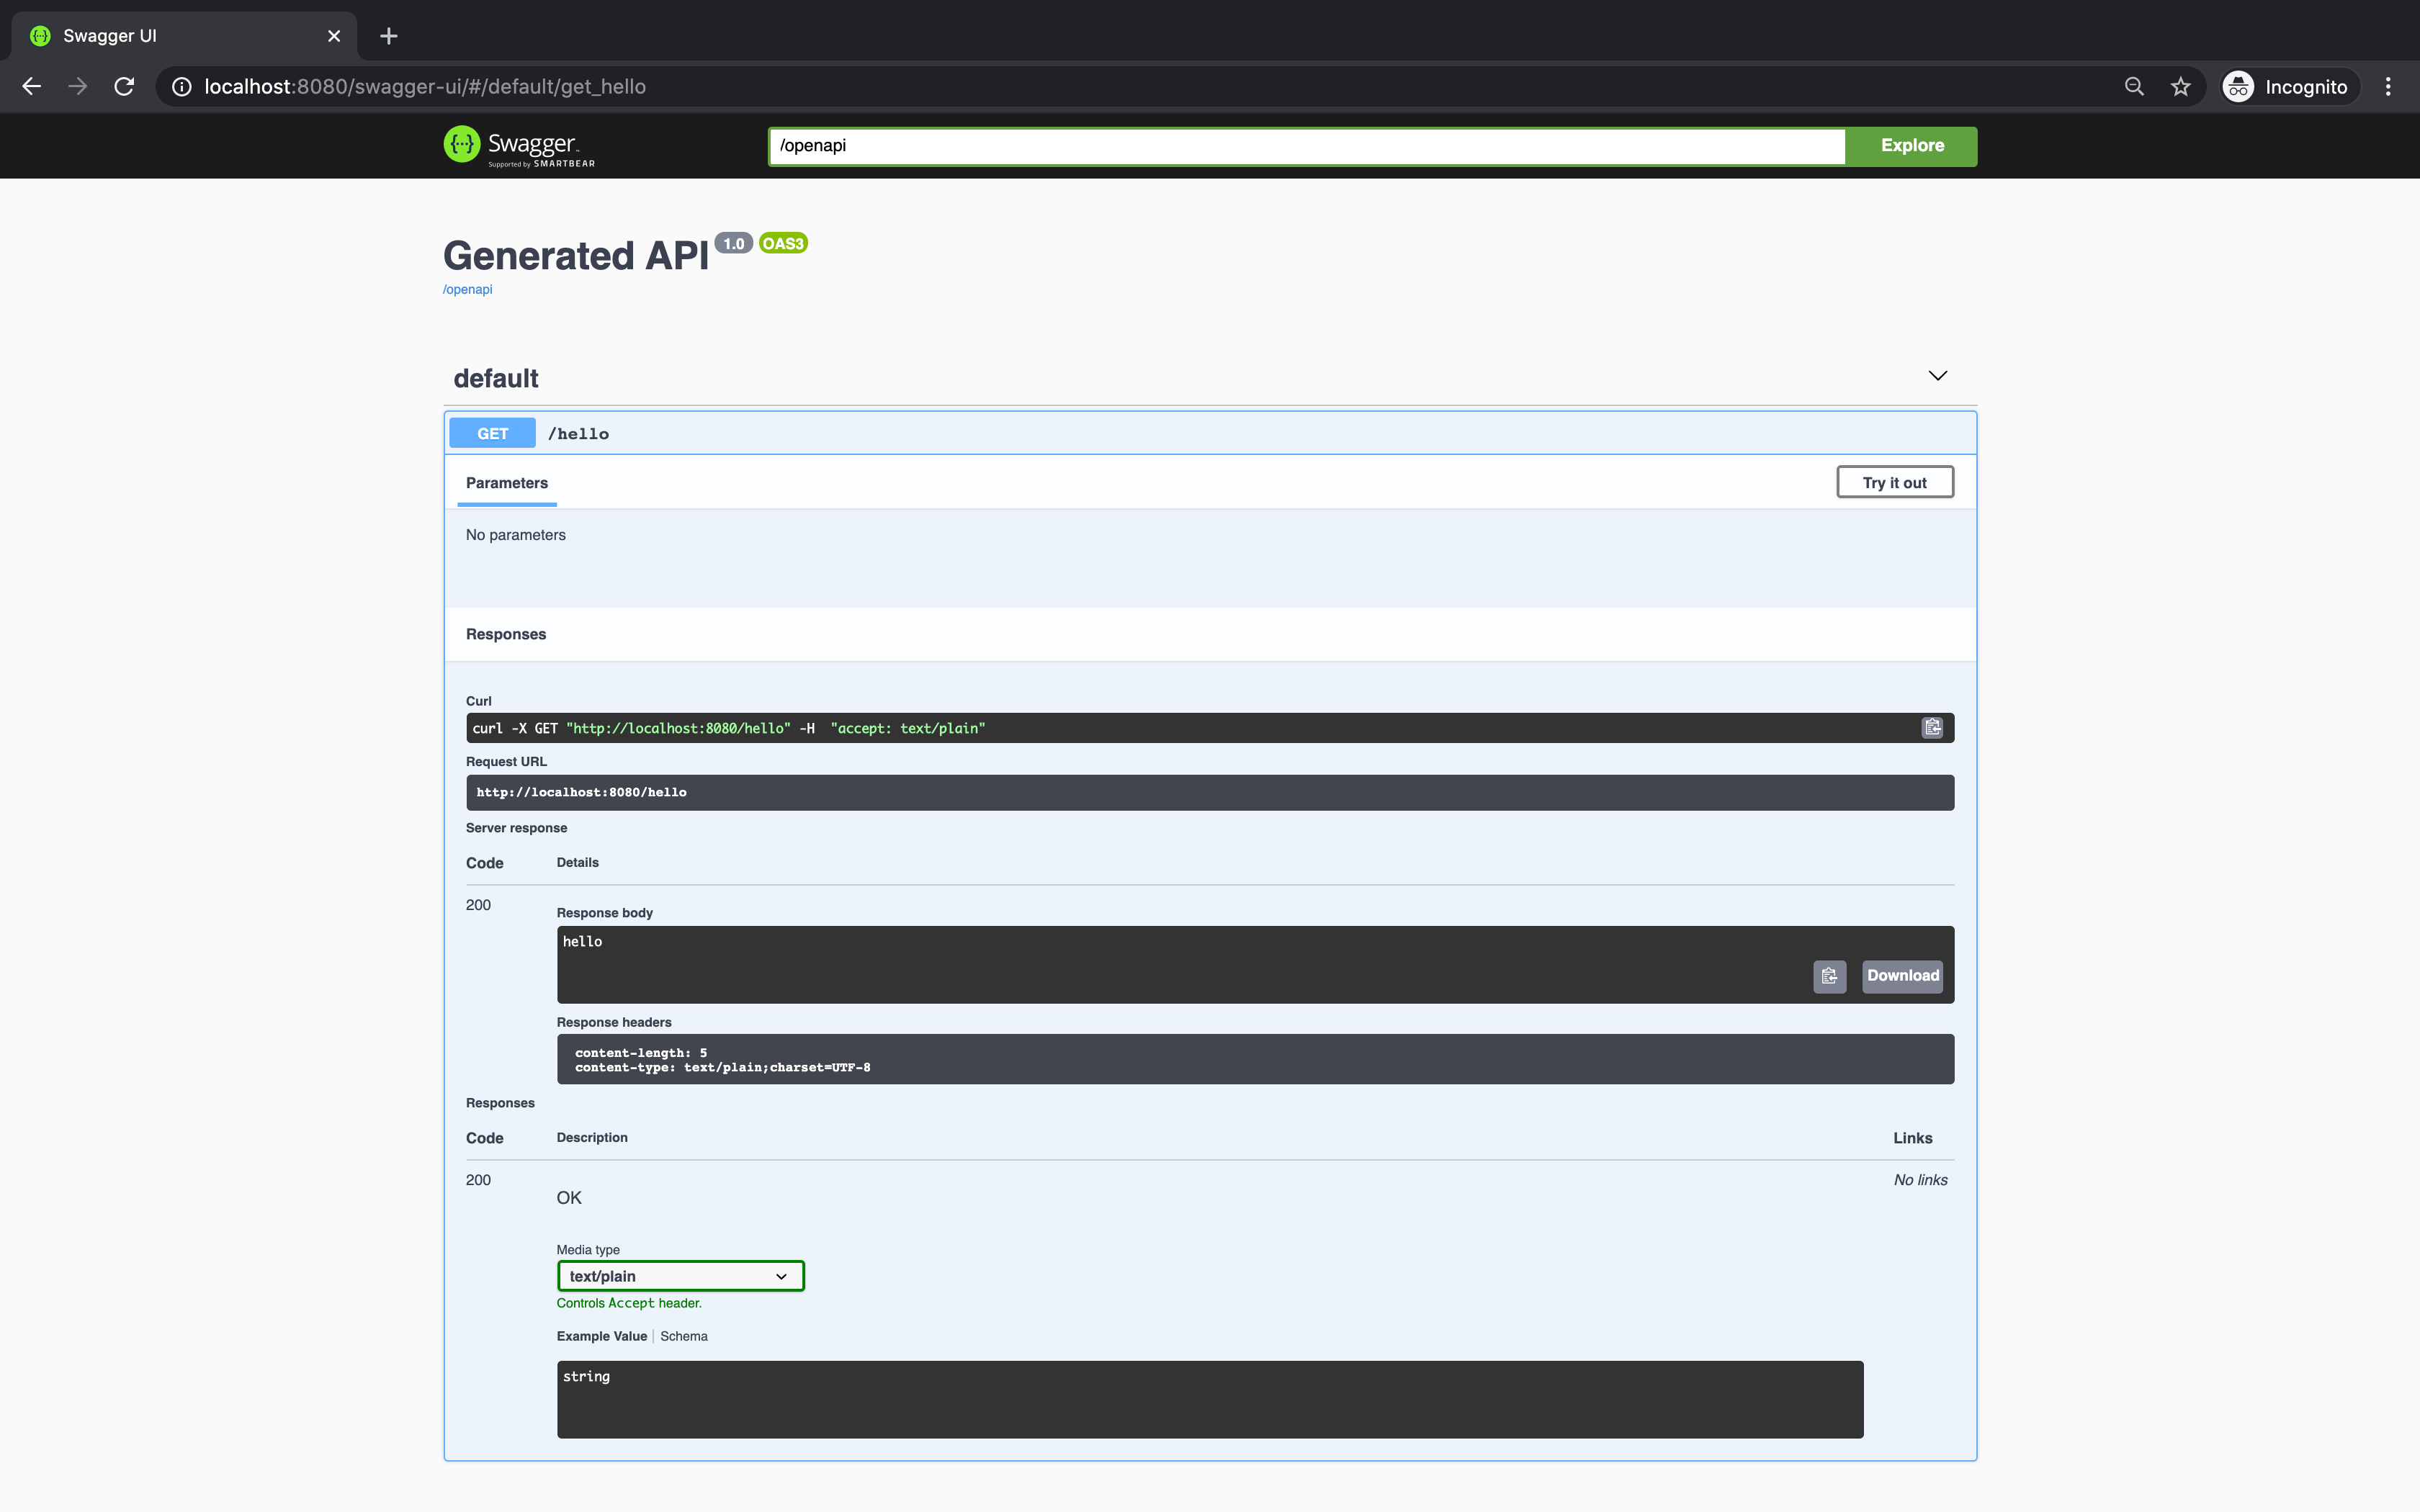
Swagger UI
Our Quarkus project has already set up an endpoint for us to access the Swagger UI at http://localhost:8080/swagger-ui. Click here to learn more about Swagger and the Swagger UI.
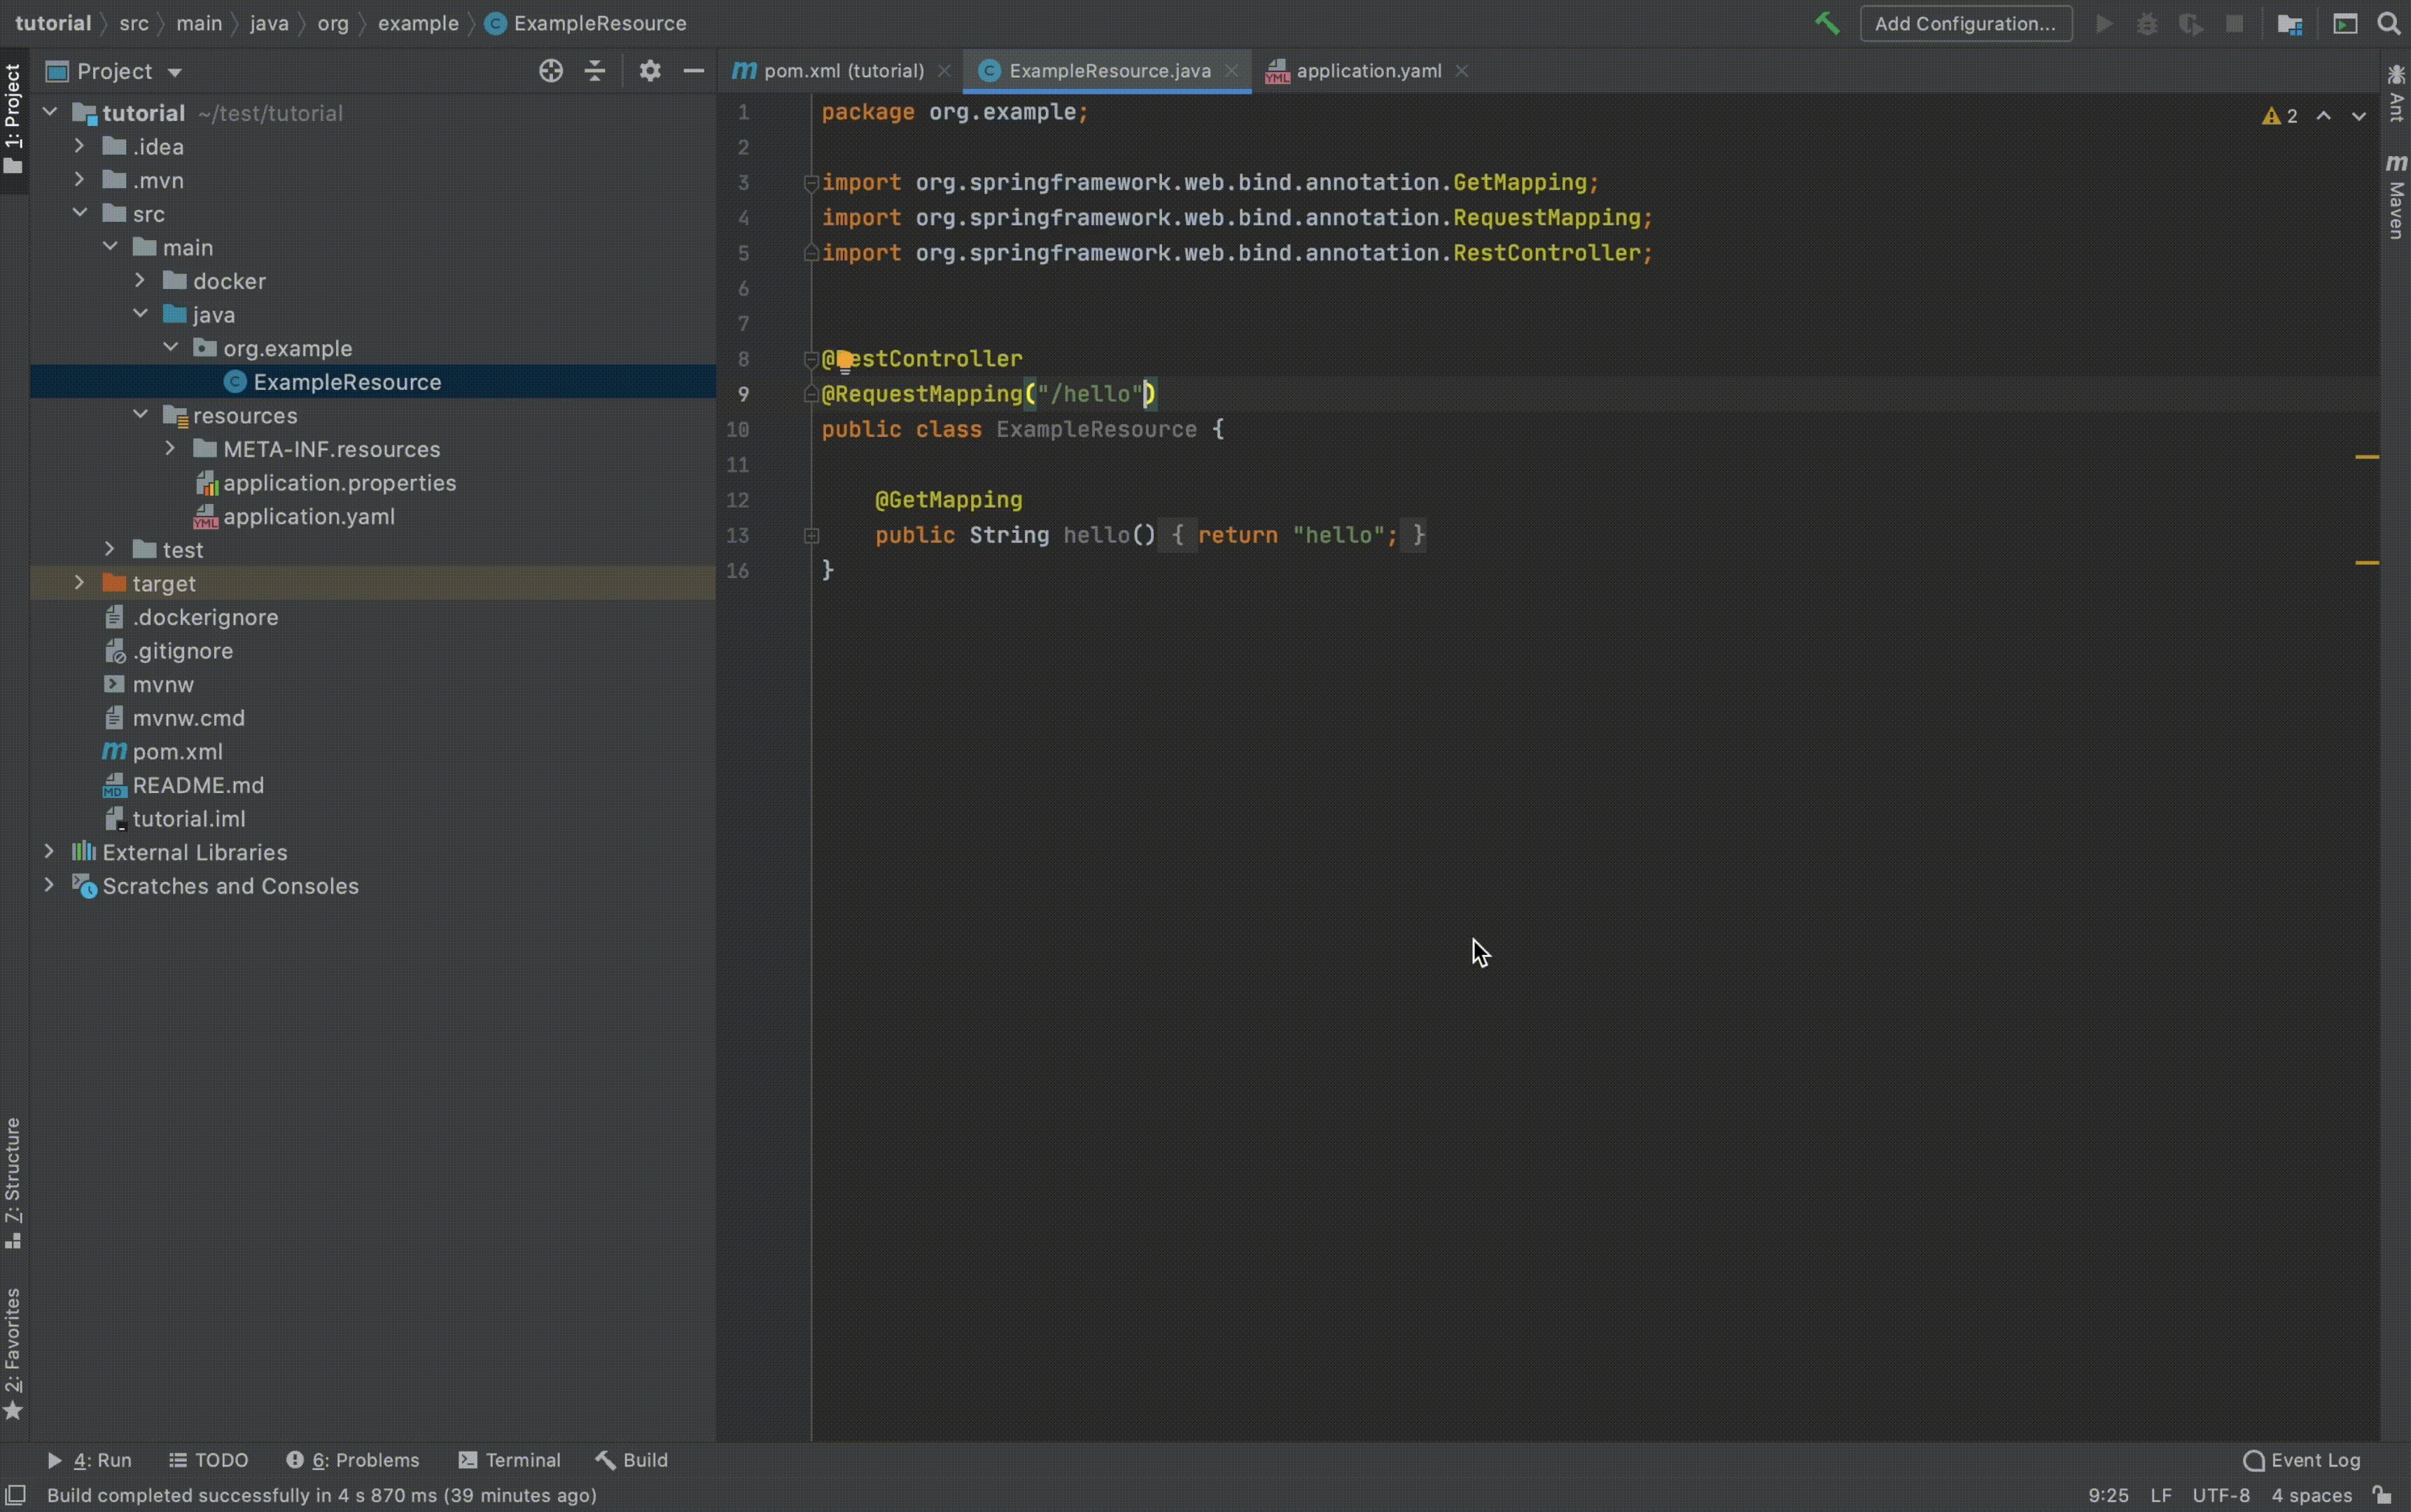
To visualize the response of the /hello endpoint provided by the Quarkus template we need to do a quick edit to the ExampleResource file and tell the endpoint that we want our response in a text/plain format.
After doing that we are ready to test our /hello endpoint with the Swagger UI.

POST endpoint
In this tutorial, we will show how to collect data from a Particle controller that uploads data to Particle Cloud and then send it to our Quarkus application using a webhook. To do this, we need to write a POST endpoint that the webhook will call when new data is available.
First, we need to describe the data format that our controller will expect to receive, and what it will respond when called. To do this, we will define two POJO: DataInDTO and DataOutDTO. Then, we will write the code for our DataController. At the end of this section, the code structure will look like this:

This is the code for our DataInDTO:
The fields that the Particle webhook will send are:
- event: name of the event, it represents the description of the value we are receiving
- data: value associated with this specific event
- codeId: the unique identifier of the controller that is sending the data
- publishedAt: timestamp of when the data has been collected
In our case, we will send the value of our controller battery’s voltage. The name of the event will be voltage, while the data field will be the value of the batter’s voltage (e.g. 3.3). All the fields sent by the controller will be strings that we will have to convert in our DataController.
This is the code of our DataOutDTO:
Here we have the code for our DataController:
As you can see we are going to expose a POST endpoint using the @POST annotation. Our endpoint both consumes a payload and produces a response in JSON format. We use the @Operation tag to add information that will be showed in the Swagger UI. For now, our endpoint will just create a DataInDTO from the JSON payload and parse the value field as a Double and the publishedAt field as a Long milliseconds timestamp.
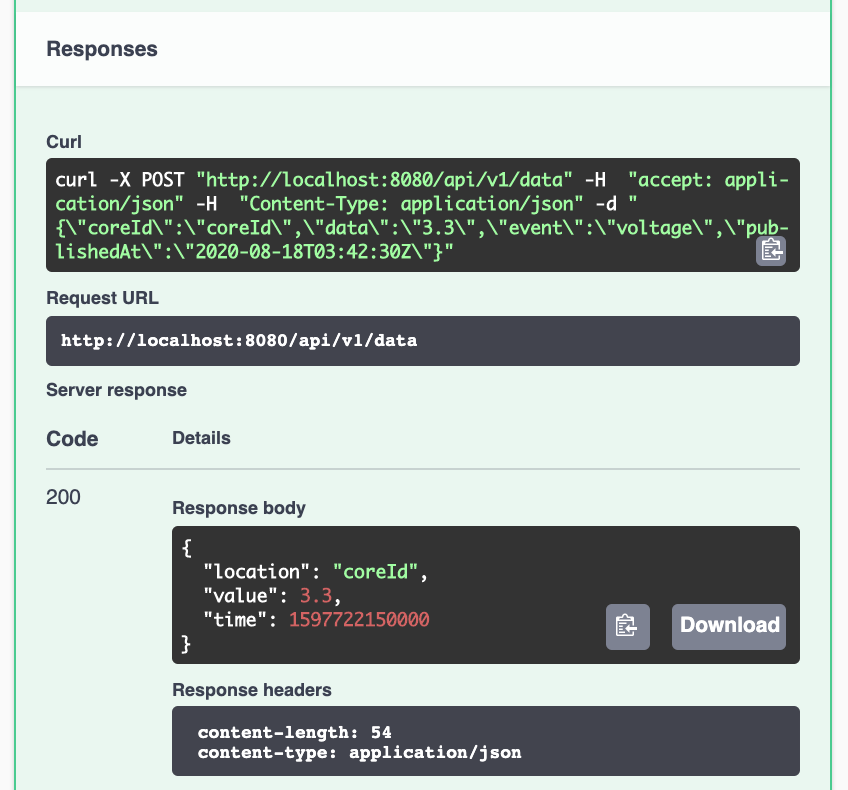
Now, we can build, run the project as shown before, and test the new endpoint at http://localhost:8080/api/v1/data using Postman.

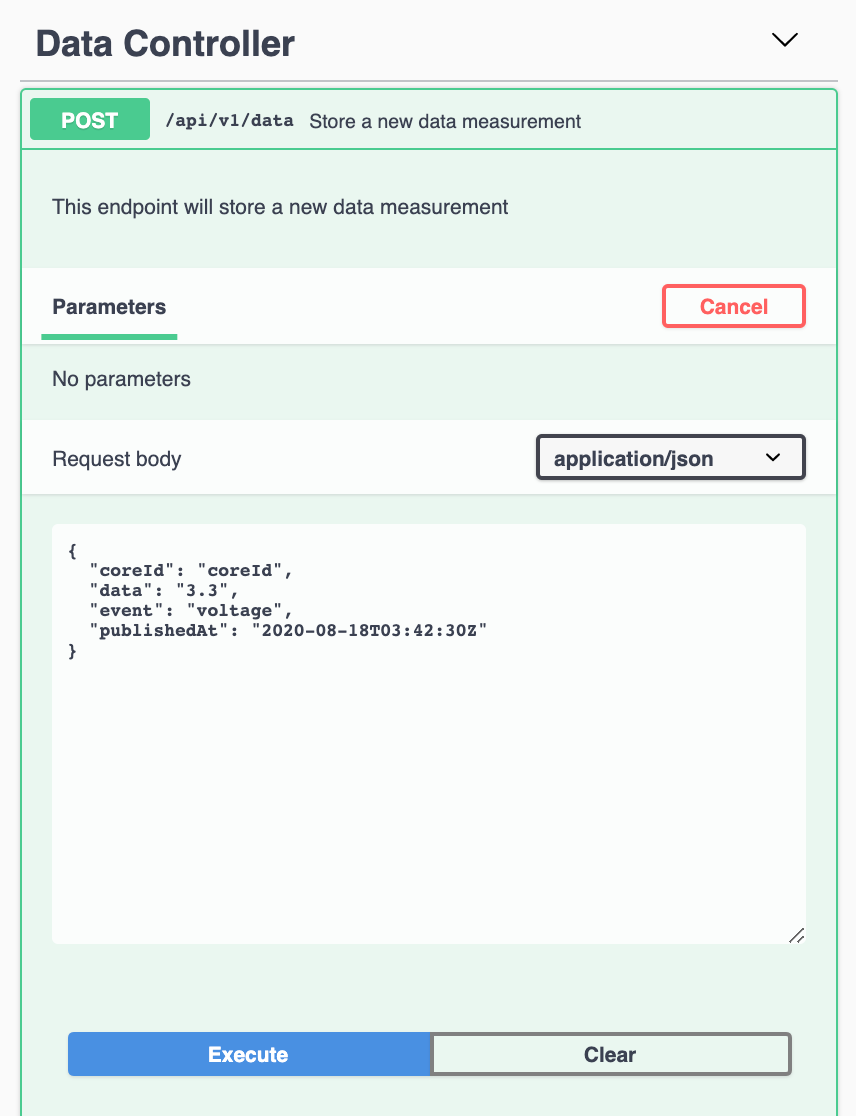
Or, the Swagger UI:


Particle controller setup
In this section, we are going to cover the steps to configure a webhook to send data from a Particle device to our Quarkus application. If you don’t have a Particle device at hand, we will show how to run a script to simulate a webhook calling your POST endpoint.
Optional: Setup script to simulate a Particle controller
To simulate a sensor sending data every predefined interval, we will use k6. k6 is an open-source tool used to load test APIs. In our case, we will use it to send a request with a payload to our endpoint every 5 seconds.
Once you have installed k6, create a file called script.js in the root folder of the project with this code below:
k6 will run this script which is calling our POST endpoint every 5 seconds. We have set the data field with a random number between 2.8 and 3.8 and we are setting the publishedAt field with the current time.
You can run the script with k6 using the following command. This command will call your POST endpoint every 5 seconds for 60 seconds.
$ k6 run k6script.js --duration 60sYou can read more about how to use k6 and all its available options here:
Setup a webhook from the Particle Console
Now, let’s set up our Particle controller so that it will send the voltage value to our web server. If you want to know how to set up a Particle account and register a new controller, you can read about it in this Particle tutorial.
Once the controller is registered and powered on, we need to do two things:
- Program the controller so that it can send voltage data to our Quarkus application
- Configure a webhook (for this part we will use of ngrok to set up a secure URL to our localhost server)
First of all, let’s see how we can program our Particle device. There are a few ways to program a Particle device. We will use the Web IDE that you can access in the Particle console.
We are using an Argon controller. The Particle firmware has an API to retrieve the voltage of the LiPo battery and we are going to use it to send the value to our Quarkus application.
This is the code that we will use to program our Particle controller.
In brief, we set the D7 pin (built-in LED) as OUTPUT. Then, in the loop function:
- Read the voltage value
- Publish the value as a voltage event using the Particle’s publish API
- Signal the new message with the LED
- Wait 5 seconds and repeat
We can now compile and flash the code to our device.
The next step will be setting up a webhook in the Particle console. Before that, we have to create a URL that we can use to route the traffic to our web server exposed on localhost. To do that, we will use ngrok.
Ngrok’s mapping will only last 12 hours and is randomly generated for the free edition. Clearly this solution works just for a testing environment, but it will do the job for us.
To install ngrok, you follow their official guide. If you are a MacOS user, you can install ngrok by running the following command in your terminal:
$ brew cask install ngrokAfter that, we can generate a random URL typing the following command in our terminal:
$ ngrok http 8080This is what ngrok will print in our terminals:


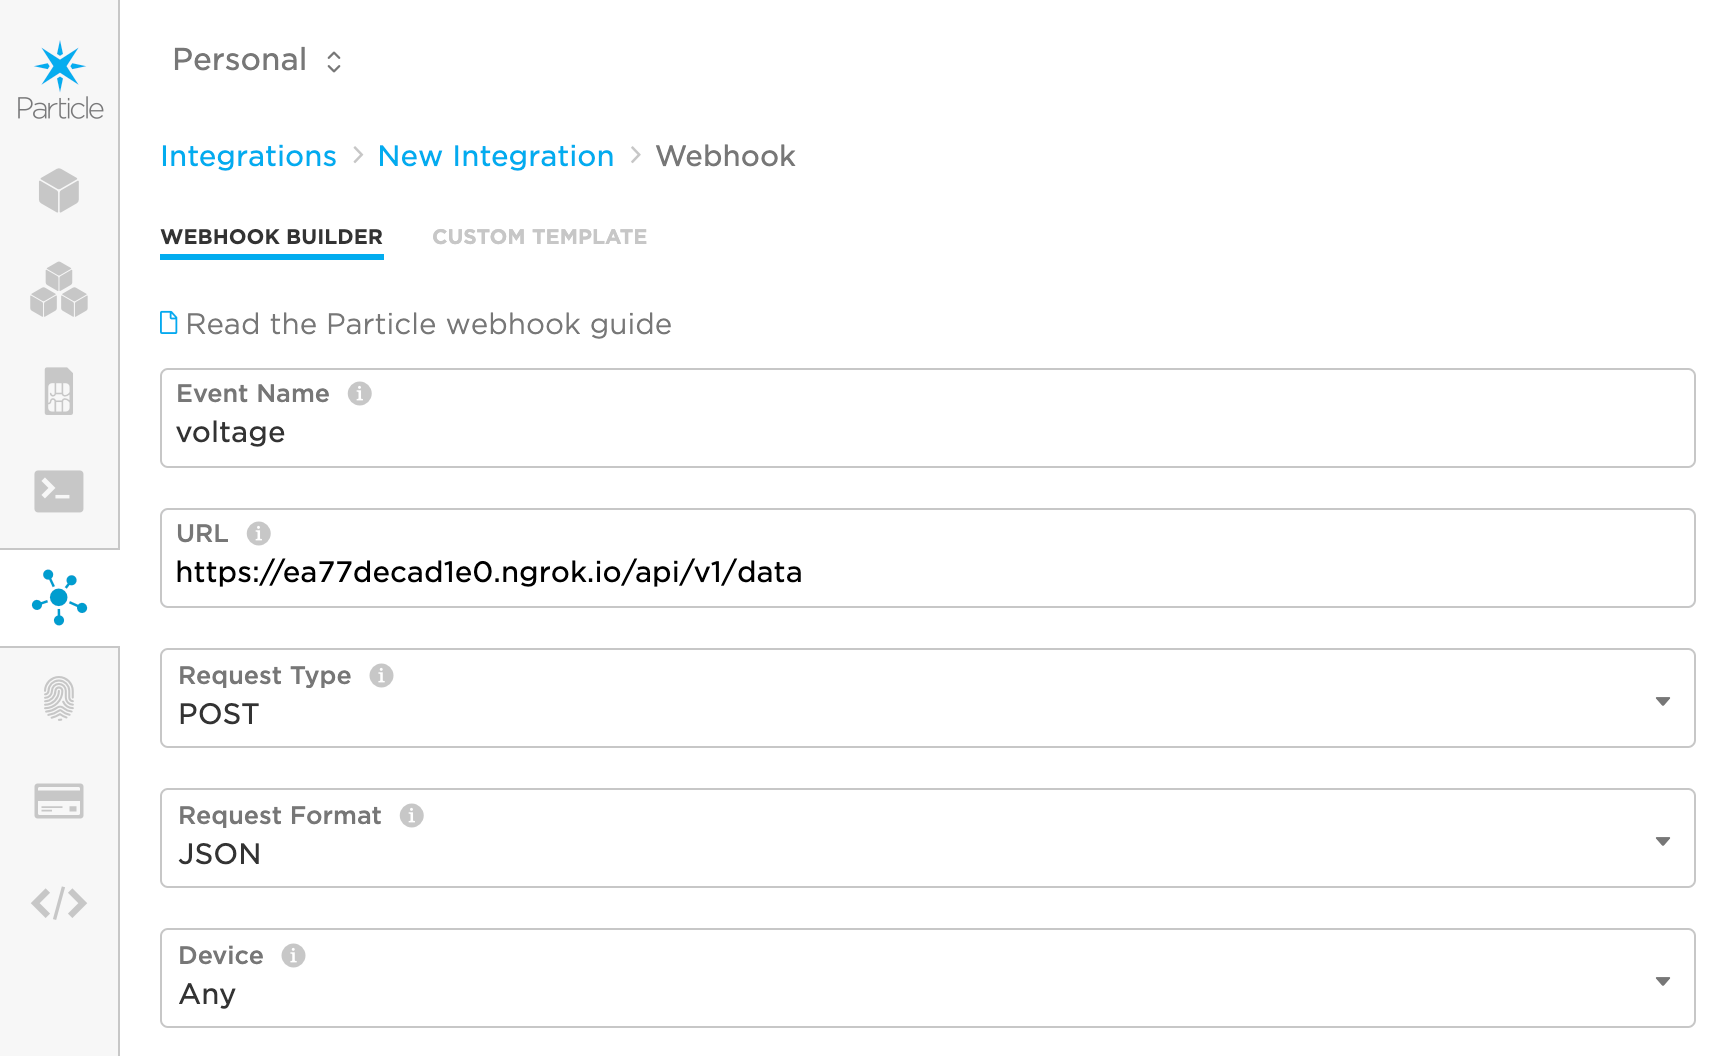
We can now copy and paste the exposed https URL into the Particle dashboard to configure a webhook (Integrations → Webhook). Set the name of the event to voltage, copy and paste the ngrok’s URL followed by the path of our endpoint (/api/v1/data), and set the request format to JSON.
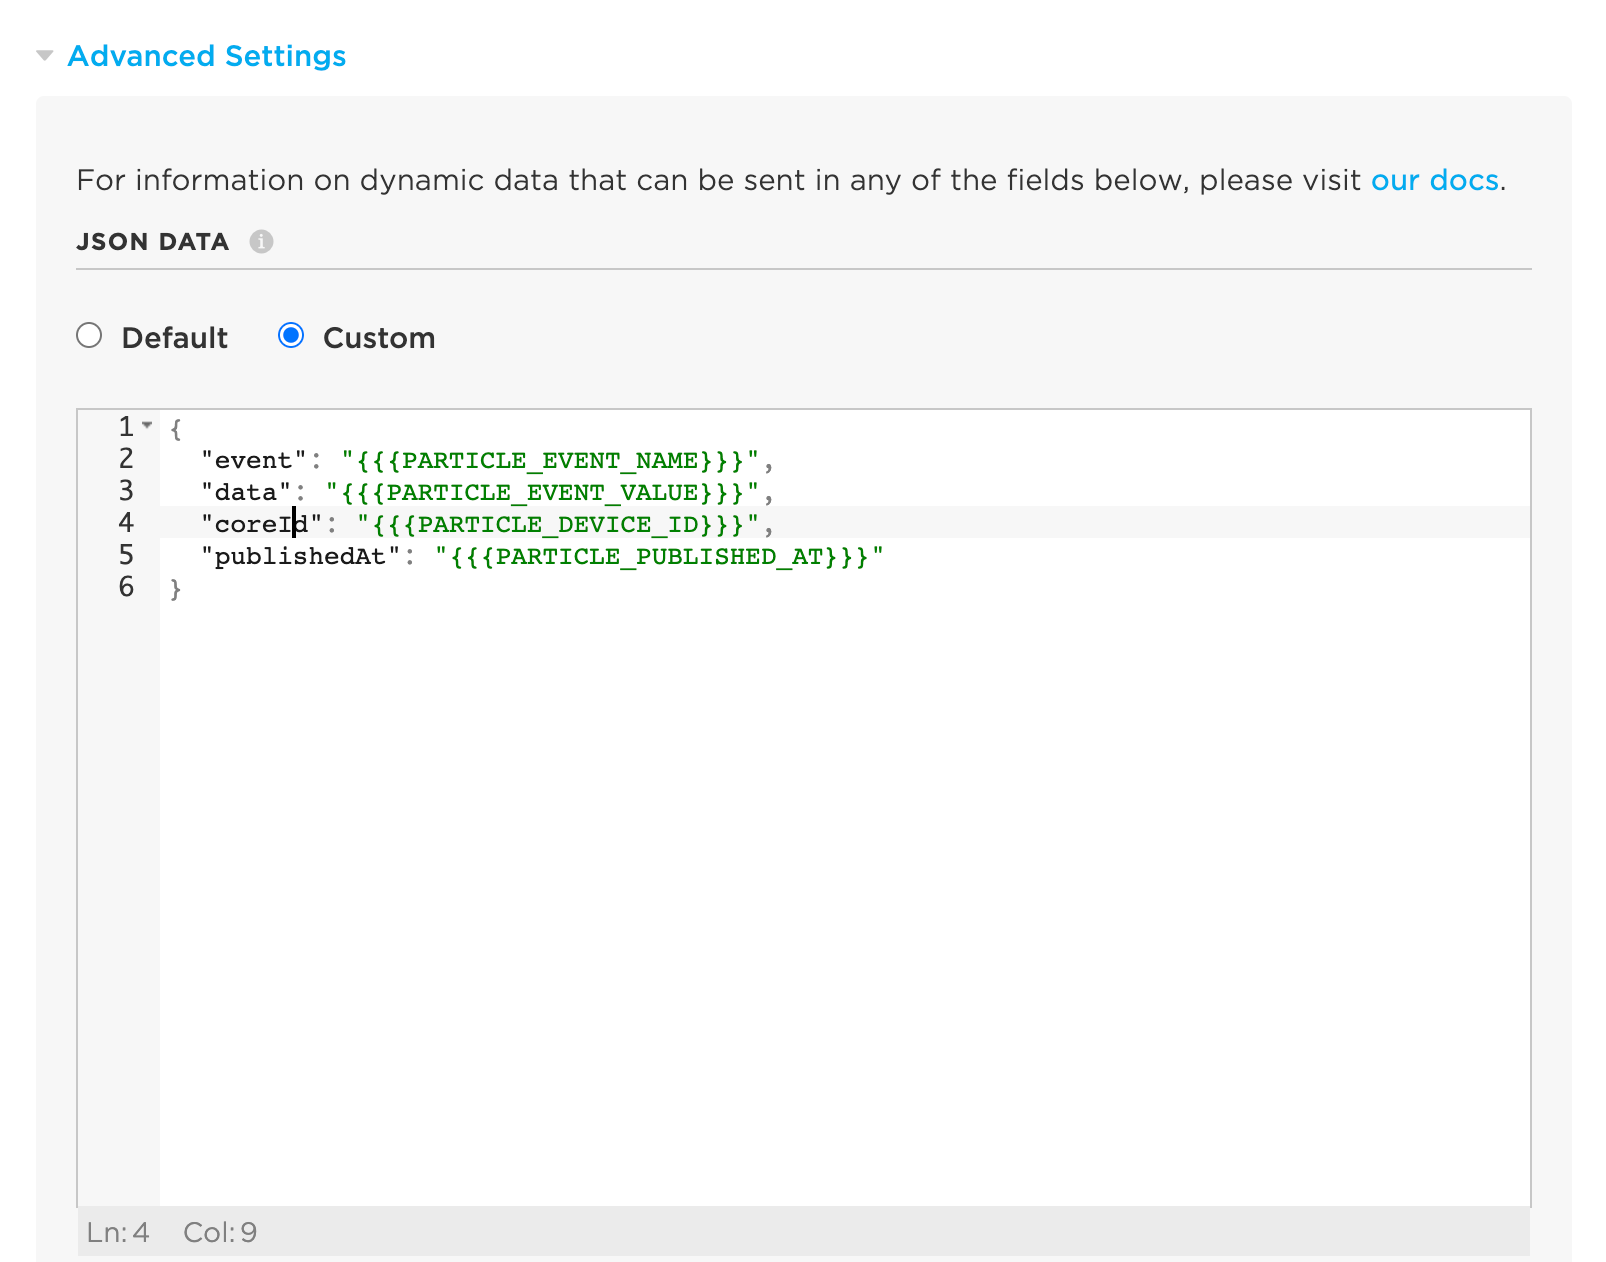
In Advanced Settings, make sure to set JSON Data to Custom and set the payload like the one below:
{
  "event": "{{{PARTICLE_EVENT_NAME}}}",
  "data": "{{{PARTICLE_EVENT_VALUE}}}",
  "coreId": "{{{PARTICLE_DEVICE_ID}}}",
  "publishedAt": "{{{PARTICLE_PUBLISHED_AT}}}"
}
It may seem the same as their default but look at our word capitalization. You can leave all the other fields to their default values.


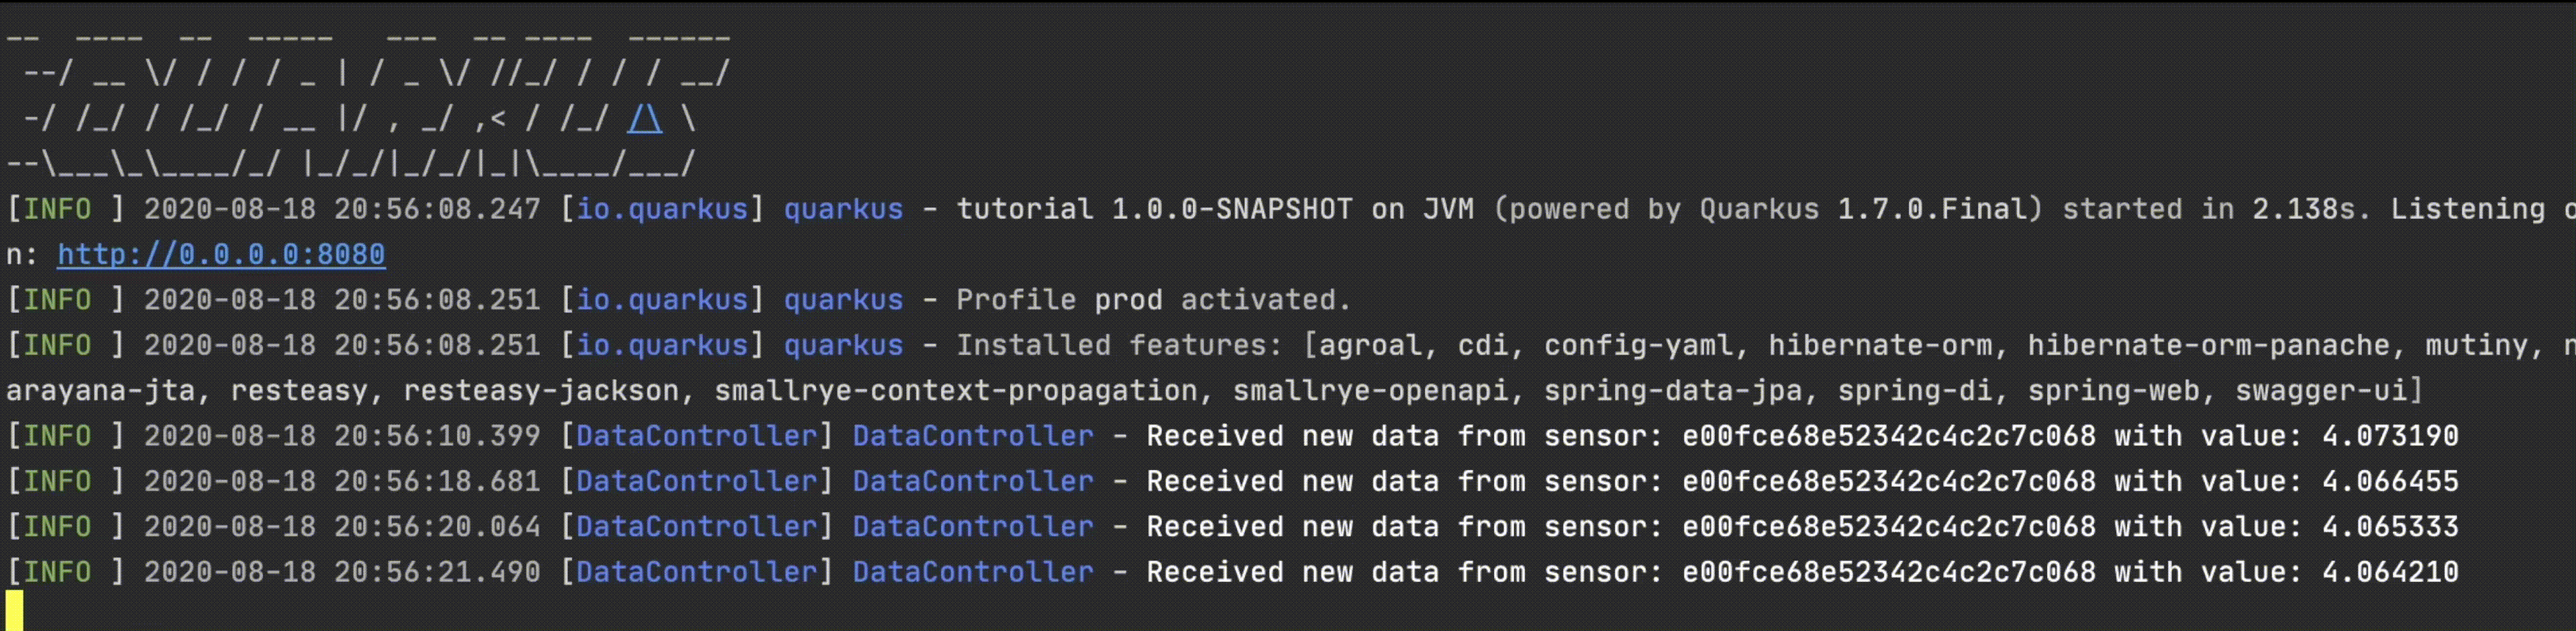
If your Quarkus code is running, your Particle controllers has been flashed and it is on, and the webhook has been set up correctly, we should now see that approximately every 5 seconds a new entry is printed on the console of our Quarkus application!

That’s it for this Part 1. We saw how to bootstrap a Quarkus project from code.quarkus.io. We built, run, and tested the /hello endpoint that comes with Quarkus’ template. We wrote our first controller to send data to our application. We saw how to use k6, and finally, we set up a webhook integration from the Particle console to send data from a Particle device to our application. We’ve come a long way together, but this is just the beginning!
Have a look at the second part of this tutorial where we will see how to send our data to a managed instance of InfluxDB using InfluxDB Cloud. We will dive into some details about Influx and write an Influx client for our Quarkus application.
Thanks for reading this tutorial, we hope it can be useful for your next project with Quarkus! Let us know what you think about it or if you had any issues in the comments below.
If you want to know more about how we use Quarkus and a lot of other cool tools at Wepo, don’t forget to visit our website and get in contact with us!