Building with the InfluxDB 3 MCP Server & Claude
By
Suyash Joshi
Jan 30, 2026
Developer
Navigate to:
InfluxDB 3 Model Context Protocol (MCP) server lets you manage and query InfluxDB 3 (Core, Enterprise, Dedicated, Serverless, Clustered) using natural language through popular LLM tools like Claude Desktop, ChatGPT Desktop, and other MCP-compatible agents.
The setup is straightforward. In this article, we will focus on setting up InfluxDB 3 Enterprise using Docker with Claude Desktop.
Prerequisites
Install InfluxDB 3 Enterprise using Docker (if you’re a new user, try out our free trial) on your machine by running the installer script:
curl -O https://www.influxdata.com/d/install_influxdb3.sh && sh install_influxdb3.sh enterpriseInfluxDB 3 Explorer UI will also make it easier to manage InfluxDB operations, so it’s recommended that you install it (using Docker) during initial setup or afterwards.
1. Create an InfluxDB 3 token for MCP server
The easiest way to create a scoped token is within InfluxDB 3 Explorer UI.
- Open Explorer at http://localhost:8888.
- Go to Manage Tokens.
- Create a Database (resource) token with read (and optional write) permissions for the databases you want your LLM to access.
- Copy the token string and store it securely; the MCP server will use it as
INFLUX_DB_TOKEN.
Alternatively, you can run the following command inside a Docker container to create the token.
docker exec -it YOUR_CONTAINER_ID influxdb3 create token \
  --permission "db:DATABASE1,DATABASE2:read,write" \
  --name "Read-write on DATABASE1, DATABASE2" \
  --token YOUR_ADMIN_TOKEN \
  --expiry 1y
Security Tip: Use resource tokens with the minimum required permissions and an expiration date, rather than providing a full admin token to the LLM MCP.
2. Configure the Claude Desktop MCP server (Docker) for InfluxDB 3 Enterprise
The InfluxDB 3 MCP server runs as a separate service and can be started using either Node.js or Docker. We will use Docker, as it’s already running InfluxDB 3 and Explorer UI.
- Open Claude Desktop.
- Navigate to Settings → Developers → Edit Config
- Open the Claude Desktop configuration file, add the following to the existing file, save, and restart Claude Desktop.
{
  "mcpServers": {
    "influxdb": {
      "command": "docker",
      "args": [
        "run",
        "--rm",
        "--interactive",
        "--add-host=host.docker.internal:host-gateway",
        "--env",
        "INFLUX_DB_PRODUCT_TYPE",
        "--env",
        "INFLUX_DB_INSTANCE_URL",
        "--env",
        "INFLUX_DB_TOKEN",
        "influxdata/influxdb3-mcp-server"
      ],
      "env": {
        "INFLUX_DB_PRODUCT_TYPE": "enterprise",
        "INFLUX_DB_INSTANCE_URL": "http://host.docker.internal:8181",
        "INFLUX_DB_TOKEN": "YOUR_RESOURCE_TOKEN"
      }
    }
  }
}
3. Use Claude with InfluxDB via MCP
Once restarted, verify that Claude can access the InfluxDB 3 MCP server by chatting with it.
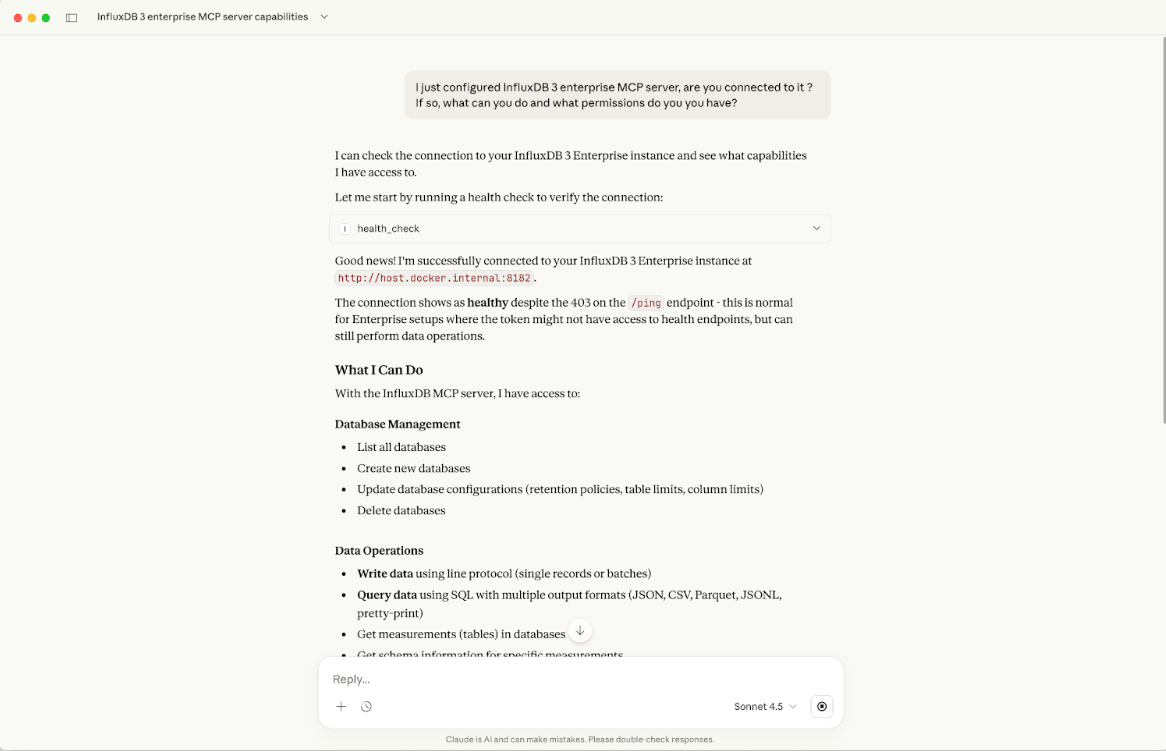
Finally, you can interact with the database however you’d like, such as performing operations, getting analytics, etc., using natural language. Try the following prompts:
- “List all the databases and permissions you have access to.”
- “Show me the schema for the
sensor_data table.” - “Analyze bitcoin sample data price in the last 30 days.” You can also see the actual SQL query that gets executed.

Connecting other LLMs
In this article we used Claude Desktop, but the InfluxDB 3 MCP server itself is generic. Any LLM agent that supports the Model Context Protocol can be used. For example, ChatGPT Desktop. In a follow-up article, we’ll cover how to run the MCP server and an LLM locally using other tools. We would love to hear your comments/questions, etc., on our community website, Slack, or Discord.
