Build a Data Streaming Pipeline with Kafka and InfluxDB
By
Jessica Wachtel
Sep 28, 2023
Product
Developer
Navigate to:
InfluxDB and Kafka aren’t competitors – they’re complimentary. Streaming data, and more specifically time series data, travels in high volumes and velocities. Adding InfluxDB to your Kafka cluster provides specialized handling for your time series data. This specialized handling includes real-time queries and analytics, and integration with cutting edge machine learning and artificial intelligence technologies. Companies like as Hulu paired their InfluxDB instances with Kafka. Implementing a Kafka cluster between a data source and InfluxDB can provide an extra layer of redundancy and more control over the data’s input and outputs.
You only need a few lines of TOML code to send data from Kafka to InfluxDB. Telegraf is an open-source plugin-based tool that connects your Kafka topic to InfluxDB in a few lines of easily understandable code. The following tutorial includes a full walk through on how to send data to a Kafka topic, connect to the topic via Telegraf, and send the data to InfluxDB Cloud Serverless. The sample data set simulates garden sensor data. Python code generates sample data that mimics sensor data and sends it to the Kafka topic.
Aykut Bulgu is the original creator of this project which has since been modified for InfluxDB Cloud Serverless. If you’d prefer to pull this code file directly from GitHub, you can find it here.
Prereqs:
- InfluxDB Cloud Serverless account
- Docker Desktop
- An IDE, such as VS Code
Building The Code File
This code file has a very low lift. The build will take place in stages. First, we’ll build the app section that includes the data generation function, the Dockerfile, and the instructions. Next, we’ll add the configuration files. The last thing we’ll do is connect the code file to InfluxDB Cloud Serverless.
Creating the app
Create a folder titled “app”.
The following files all belong inside the app folder.
app/garden_sensor_gateway.py
This file contains the data generation function. This dataset sent to InfluxDB includes monitoring details for a garden. The function creates random integers for temperature, humidity, wind, and soil. The function then converts the data to JSON format.
This file initializes the Kafka class and connects to the Kafka host to send messages to a Kafka topic, “garden_sensor_data”.
import time
import json
import random

from kafka import KafkaProducer

def random_temp_cels():
    return round(random.uniform(-10, 50), 1)

def random_humidity():
    return round(random.uniform(0, 100), 1)

def random_wind():
    ret
    data["temperature"] = random_temp_cels()
    data["humidity"] = random_humidity()
    data["wind"] = random_windurn round(random.uniform(0, 10), 1)

def random_soil():
    return round(random.uniform(0, 100), 1)

def get_json_data():
    data = {}
()
    data["soil"] = random_soil()

    return json.dumps(data)

def main():
    producer = KafkaProducer(bootstrap_servers=['kafka:9092'])

    for _ in range(20000):
        json_data = get_json_data()
        producer.send('garden_sensor_data', bytes(f'{json_data}','UTF-8'))
        print(f"Sensor data is sent: {json_data}")
        time.sleep(5)

if __name__ == "__main__":
    main()
app/Dockerfile
This file contains the instructions needed to convert ‘garden_sensor_gateway.py’ into a container.
FROM python:3.11

WORKDIR /app

COPY requirements.txt .
RUN pip install --no-cache-dir -r requirements.txt

COPY . .

CMD ["python", "garden_sensor_gateway.py"]
app/requirements.txt
This file includes the kafka-python library.
kafka-pythonresources
Create a new folder titled “resources”. This is not inside the app folder.
The following files belong inside the resources folder.
resources/docker-compose.yaml
docker-compose.yaml contains all the information needed to build the kafka, zookeeper, python garden_sensor_gateway, and telegraf containers.
version: '3.3'

services:
  kafka:
    container_name: kafka
    image: quay.io/strimzi/kafka:0.28.0-kafka-3.1.0
    command: [
      "sh", "-c",
      "bin/kafka-server-start.sh config/server.properties --override listeners=$${KAFKA_LISTENERS} --override advertised.listeners=$${KAFKA_ADVERTISED_LISTENERS} --override zookeeper.connect=$${KAFKA_ZOOKEEPER_CONNECT}"
    ]
    depends_on:
    - zookeeper
    ports:
    - "9092:9092"
    environment:
      LOG_DIR: "/tmp/logs"
      KAFKA_ADVERTISED_LISTENERS: PLAINTEXT://kafka:9092
      KAFKA_LISTENERS: PLAINTEXT://0.0.0.0:9092
      KAFKA_ZOOKEEPER_CONNECT: zookeeper:2181
    healthcheck:
      test: ["CMD", "nc", "-z", "kafka", "9092"]
      interval: 30s
      timeout: 10s
      retries: 5

  zookeeper:
    container_name: zookeeper
    image: quay.io/strimzi/kafka:0.28.0-kafka-3.1.0
    command: [
        "sh", "-c",
        "bin/zookeeper-server-start.sh config/zookeeper.properties"
      ]
    ports:
    - "2181:2181"
    environment:
      LOG_DIR: /tmp/logs

  garden_sensor_gateway:
    container_name: garden_sensor_gateway
    image: garden_sensor_gateway
    build: ../app
    # networks:
    #  - my_network
    # command: ["tail", "-f", "/dev/null"]
    depends_on:
      kafka:
       condition: service_healthy

  telegraf:
    container_name: telegraf
    image: telegraf:latest
    command: ["telegraf", "--debug", "--config", "/etc/telegraf/telegraf.conf"]
    volumes:
      - ./mytelegraf.conf:/etc/telegraf/telegraf.conf
    depends_on:
      kafka:
       condition: service_healthy
The Telegraf commands aren’t specific to this example. As with the majority of this project, you can use this container configuration for other projects. The first command is the “telegraf” command. The “—debug” flag provides the agent’s working details in the terminal. It’s then necessary to include the “—config” flag right before the configuration which is "/etc/telegraf/telegraf.conf”.
resources/mytelegraf.conf
mytelegraf.conf is the Telegraf configuration TOML file. Rather than offer a copy/paste solution like the other files, the Telegraf setup comes directly from your InfluxDB Cloud Serverless account.
Let’s hop over to our InfluxDB Cloud Serverless account. Once you’re logged into InfluxDB Cloud Serverless, the first step is to set up a bucket. Think of a bucket like a database within the database. Telegraf will read the data from the Kafka topic and send it to the specified bucket within InfluxDB Cloud Serverless.
Select “Manage Databases & Security” in the Resource Center or hover over the upward facing arrow in the icon menu on the left-hand side of the page.
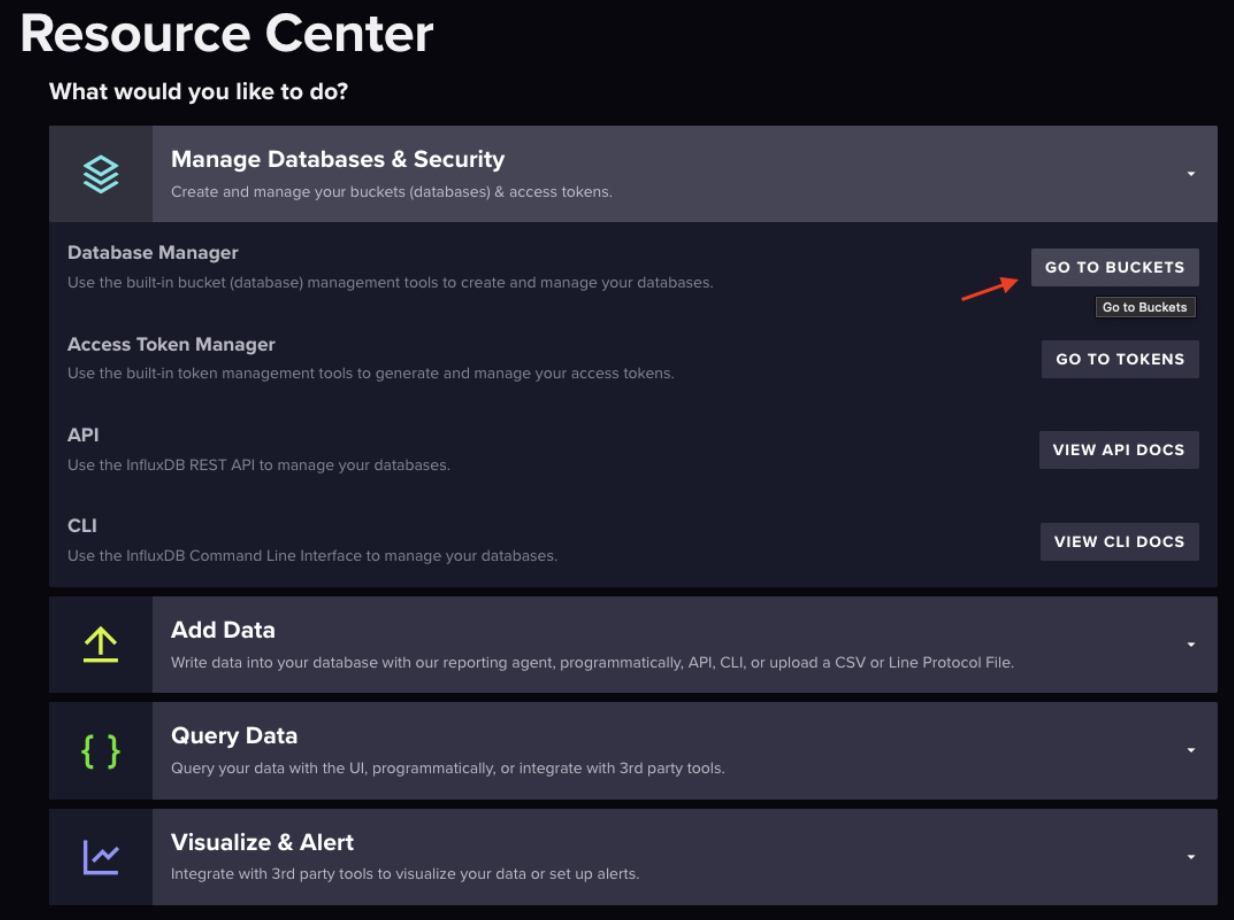
The blue “Create Bucket” button on the right-hand side of the page is where you can create your bucket. Create your bucket in the pop-up window.

After the pop-up window closes, “Telegraf” will appear next to the highlighted “Buckets” under the “Load Data” heading. Select “Telegraf”. This will begin mytelegraf.conf setup.
Part 1: InfluxDB Output Plugin
In the middle/right side of the page, you’ll see “InfluxDB Output Plugin”. This is how mytelegraf.conf connects to InfluxDB Cloud Serverless. Copy to clipboard and you can add the whole file into mytelegraf.conf.
The next step is to create a token. For the purposes of this tutorial, we’ll create an all access API token. Next to the “Telegraf” header is the “API Tokens” header. Generate an API Token. You can either create an environment variable or paste into the token string (which isn’t the most secure practice).
The urls connects you to your InfluxDB Cloud Serverless account.
The organization is the name of the organization. This was set up with the account.
The bucket is the bucket where you would like to send the data.
Part 2: Inputs
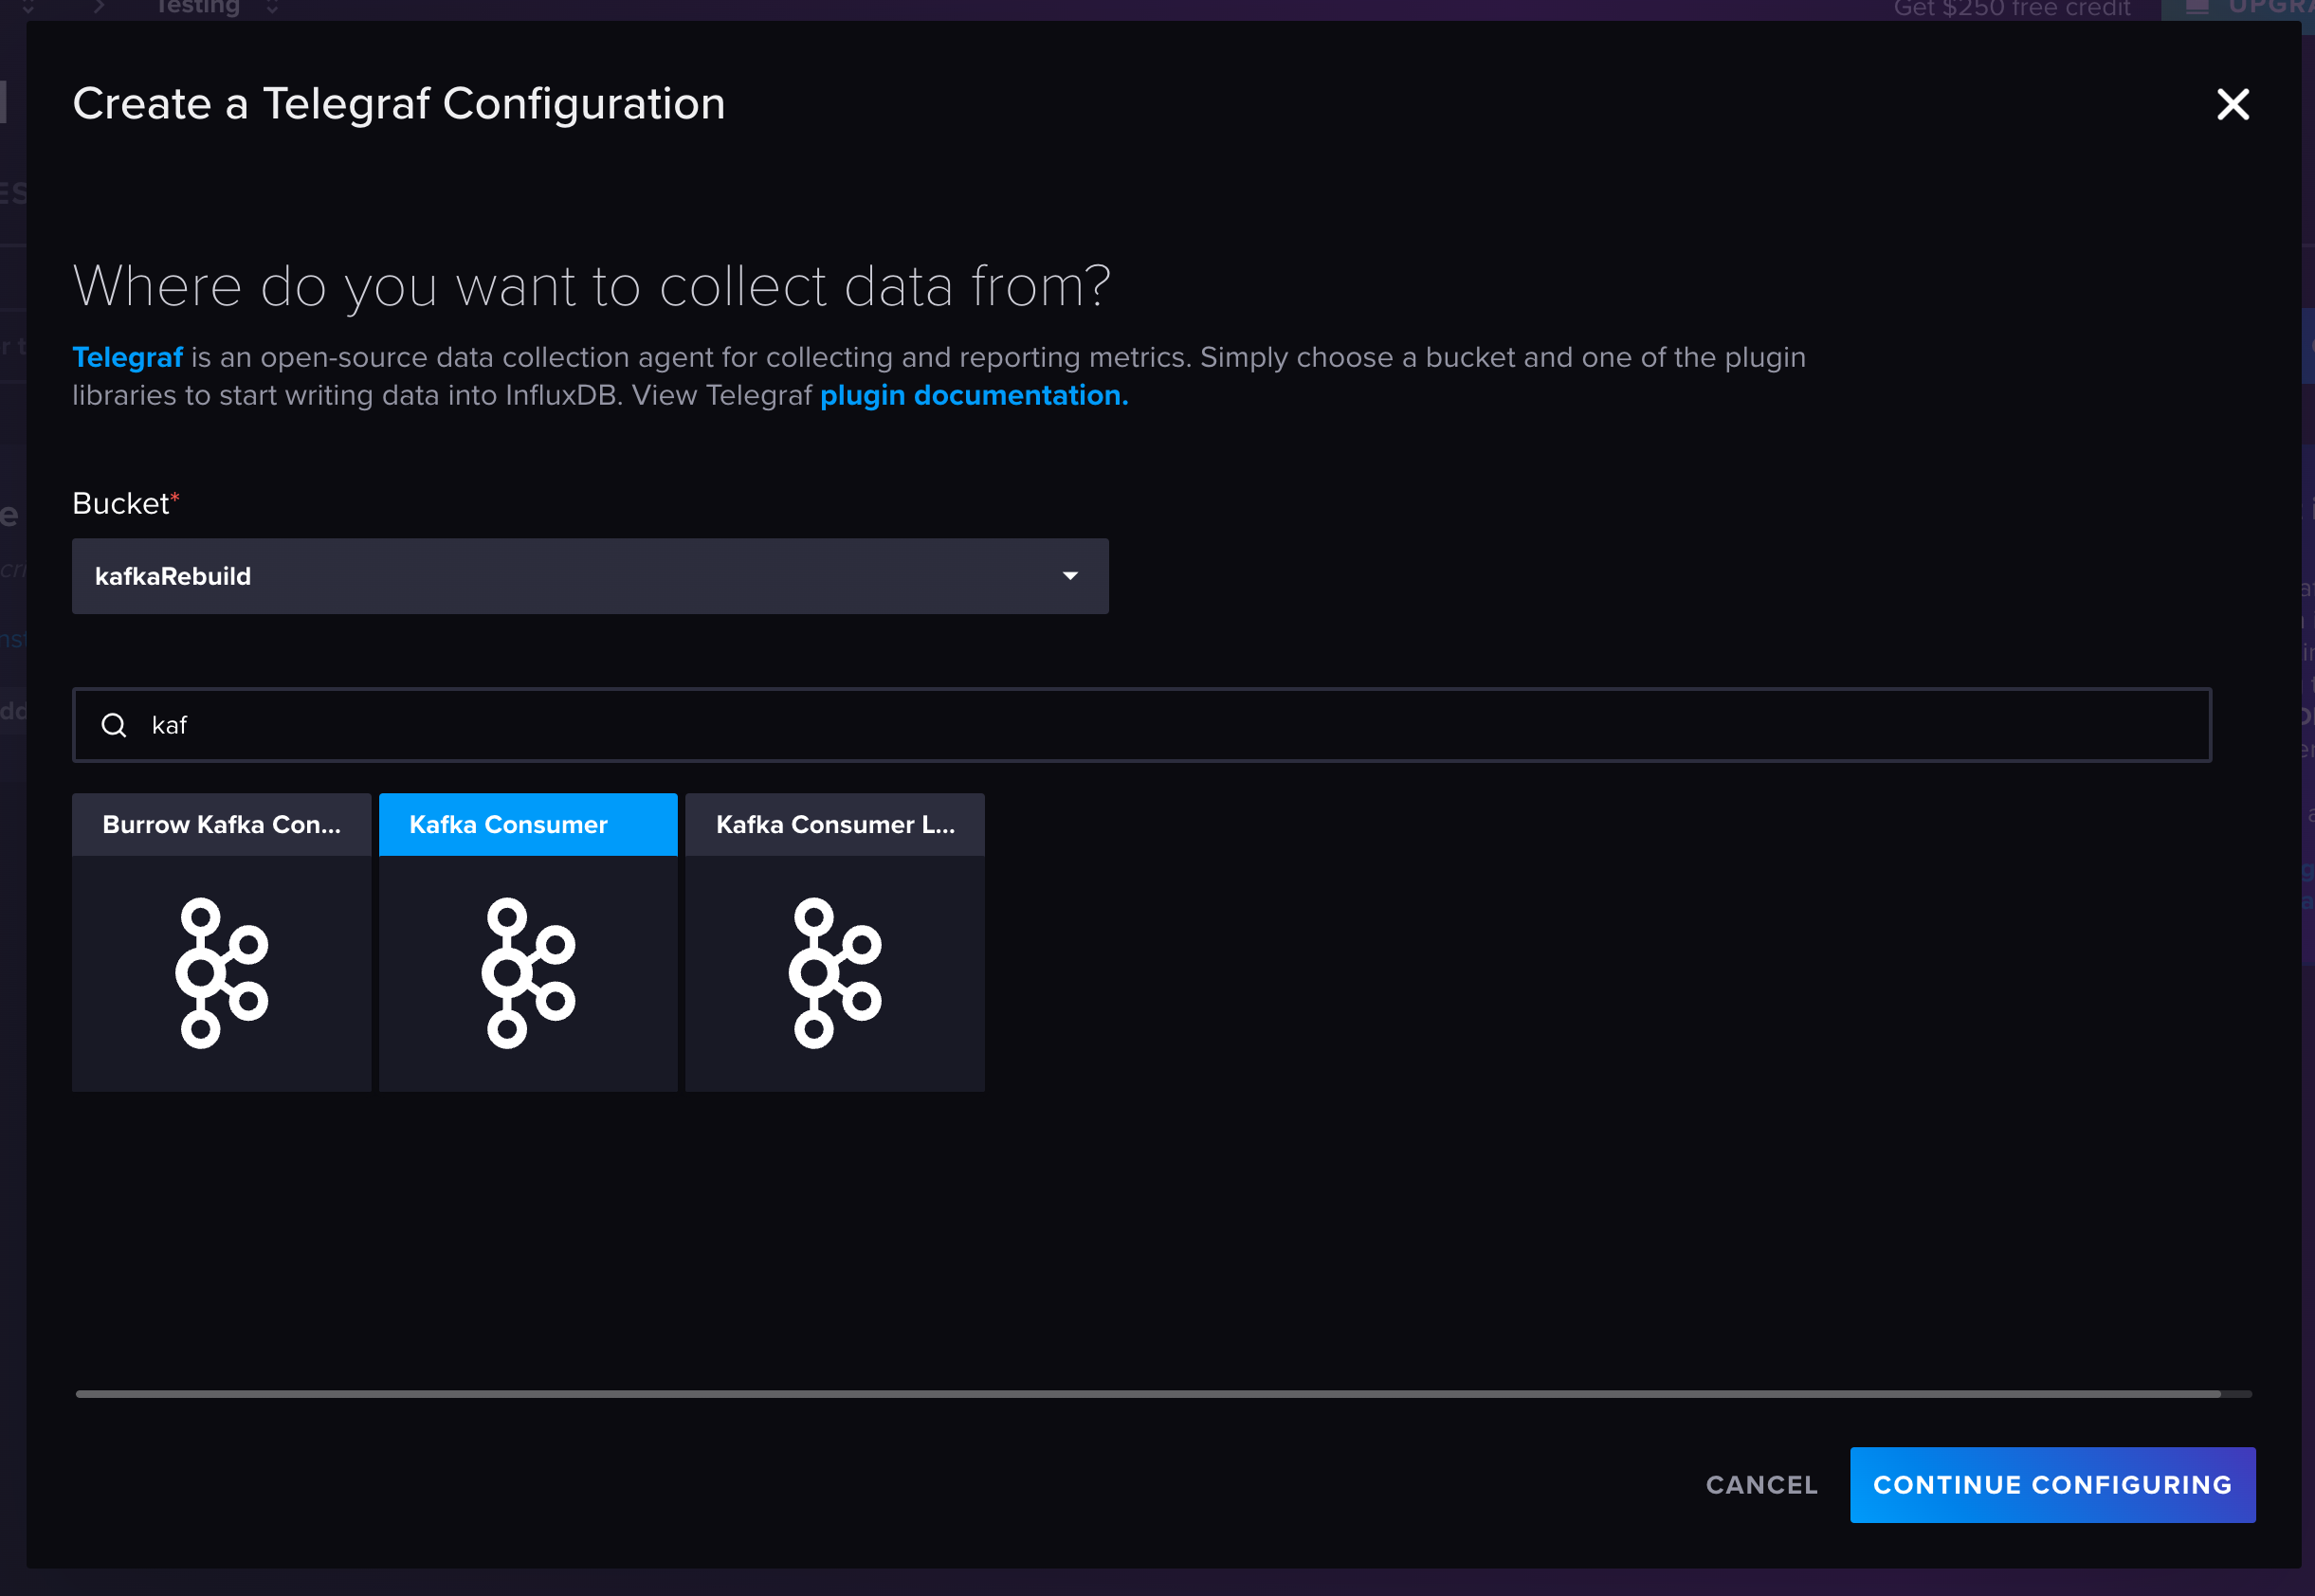
Navigate back to “Telegraf” in your InfluxDB Cloud Serverless account. Select the blue “Create Configuration” button. Select your bucket in the bucket drop-down menu. The data source option we’re looking for is “Kafka Consumer”. We’re not creating a configuration, rather copying the code and pasting it into the mytelegraf.conf file.
The code needs a few modifications. It’s imperative that the brokers line matches the broker where the python function sends the data. In this case, localhost:9092 needs to change to kafka:9092.
Next, adjust the topic to match the kafka topic in the code file. Lastly, the last line of code is data_format = “influx”. This means InfluxDB expects line protocol. However, the python function sends the data in JSON format. The fix here is to change data_format = “json”.
The final mytelegraf.conf file will closely resemble this:
[[outputs.influxdb_v2]]
  ## The URLs of the InfluxDB cluster nodes.
  ##
  ## Multiple URLs can be specified for a single cluster, only ONE of the
  ## urls will be written to each interval.
  ##   ex: urls = ["https://us-west-2-1.aws.cloud2.influxdata.com"]
  urls = ["https://your-cloud-url"]

  ## API token for authentication.
  token = "token here"

  ## Organization is the name of the organization you wish to write to; must exist.
  organization = "Testing"

  ## Destination bucket to write into.
  bucket = "kafkaRebuild"

# Read metrics from Kafka topics
[[inputs.kafka_consumer]]
  ## Kafka brokers.
  brokers = ["kafka:9092"]

  ## Topics to consume.
  topics = ["garden_sensor_data"]

  ## When set this tag will be added to all metrics with the topic as the value.
  # topic_tag = ""

  ## Optional Client id
  # client_id = "Telegraf"

  ## Set the minimal supported Kafka version.  Setting this enables the use of new
  ## Kafka features and APIs.  Must be 0.10.2.0 or greater.
  ##   ex: version = "1.1.0"
  # version = ""

  ## Optional TLS Config
  # tls_ca = "/etc/telegraf/ca.pem"
  # tls_cert = "/etc/telegraf/cert.pem"
  # tls_key = "/etc/telegraf/key.pem"
  ## Use TLS but skip chain & host verification
  # insecure_skip_verify = false

  ## SASL authentication credentials.  These settings should typically be used
  ## with TLS encryption enabled
  # sasl_username = "kafka"
  # sasl_password = "secret"

  ## Optional SASL:
  ## one of: OAUTHBEARER, PLAIN, SCRAM-SHA-256, SCRAM-SHA-512, GSSAPI
  ## (defaults to PLAIN)
  # sasl_mechanism = ""

  ## used if sasl_mechanism is GSSAPI (experimental)
  # sasl_gssapi_service_name = ""
  # ## One of: KRB5_USER_AUTH and KRB5_KEYTAB_AUTH
  # sasl_gssapi_auth_type = "KRB5_USER_AUTH"
  # sasl_gssapi_kerberos_config_path = "/"
  # sasl_gssapi_realm = "realm"
  # sasl_gssapi_key_tab_path = ""
  # sasl_gssapi_disable_pafxfast = false

  ## used if sasl_mechanism is OAUTHBEARER (experimental)
  # sasl_access_token = ""

  ## SASL protocol version.  When connecting to Azure EventHub set to 0.
  # sasl_version = 1

  # Disable Kafka metadata full fetch
  # metadata_full = false

  ## Name of the consumer group.
  # consumer_group = "telegraf_metrics_consumers"

  ## Compression codec represents the various compression codecs recognized by
  ## Kafka in messages.
  ##  0 : None
  ##  1 : Gzip
  ##  2 : Snappy
  ##  3 : LZ4
  ##  4 : ZSTD
  # compression_codec = 0
  ## Initial offset position; one of "oldest" or "newest".
  # offset = "oldest"

  ## Consumer group partition assignment strategy; one of "range", "roundrobin" or "sticky".
  # balance_strategy = "range"

  ## Maximum length of a message to consume, in bytes (default 0/unlimited);
  ## larger messages are dropped
  max_message_len = 1000000

  ## Maximum messages to read from the broker that have not been written by an
  ## output.  For best throughput set based on the number of metrics within
  ## each message and the size of the output's metric_batch_size.
  ##
  ## For example, if each message from the queue contains 10 metrics and the
  ## output metric_batch_size is 1000, setting this to 100 will ensure that a
  ## full batch is collected and the write is triggered immediately without
  ## waiting until the next flush_interval.
  # max_undelivered_messages = 1000

  ## Maximum amount of time the consumer should take to process messages. If
  ## the debug log prints messages from sarama about 'abandoning subscription
  ## to [topic] because consuming was taking too long', increase this value to
  ## longer than the time taken by the output plugin(s).
  ##
  ## Note that the effective timeout could be between 'max_processing_time' and
  ## '2 * max_processing_time'.
  # max_processing_time = "100ms"

  ## Data format to consume.
  ## Each data format has its own unique set of configuration options, read
  ## more about them here:
  ## https://github.com/influxdata/telegraf/blob/master/docs/DATA_FORMATS_INPUT.md
  data_format = "json"
Writing Data to InfluxDB Cloud Serverless
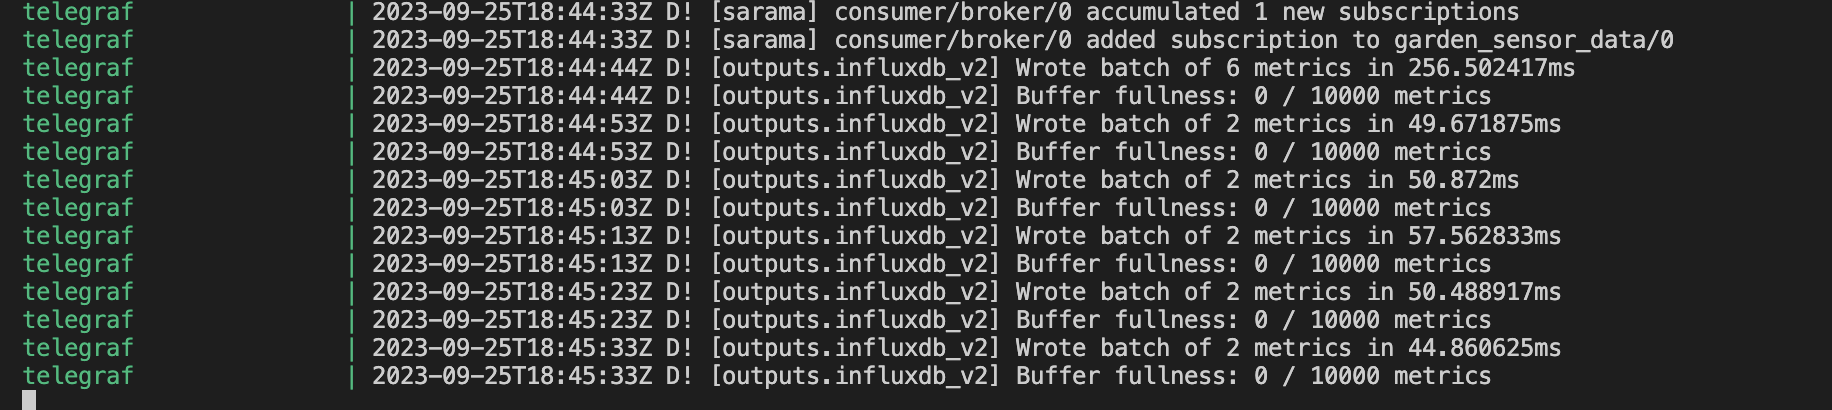
The last step in the code file is spinning up the containers and writing data to InfluxDB Cloud Serverless. In a new terminal window, cd into the resources folder and run the command docker compose up --build. The containers are dependent upon one another so allow a couple minutes to elapse before checking for data.
Telegraf displays the following messages inside the terminal if it’s reading and writing the data correctly to InfluxDB Cloud serverless.
Querying Data
Back in the InfluxDB Cloud Serverless account, you can access the Data Explorer by selecting the graph icon in the icon menu on the left-hand side. Select the bucket and measurement, along with the time window you’d like to query for and run the query.
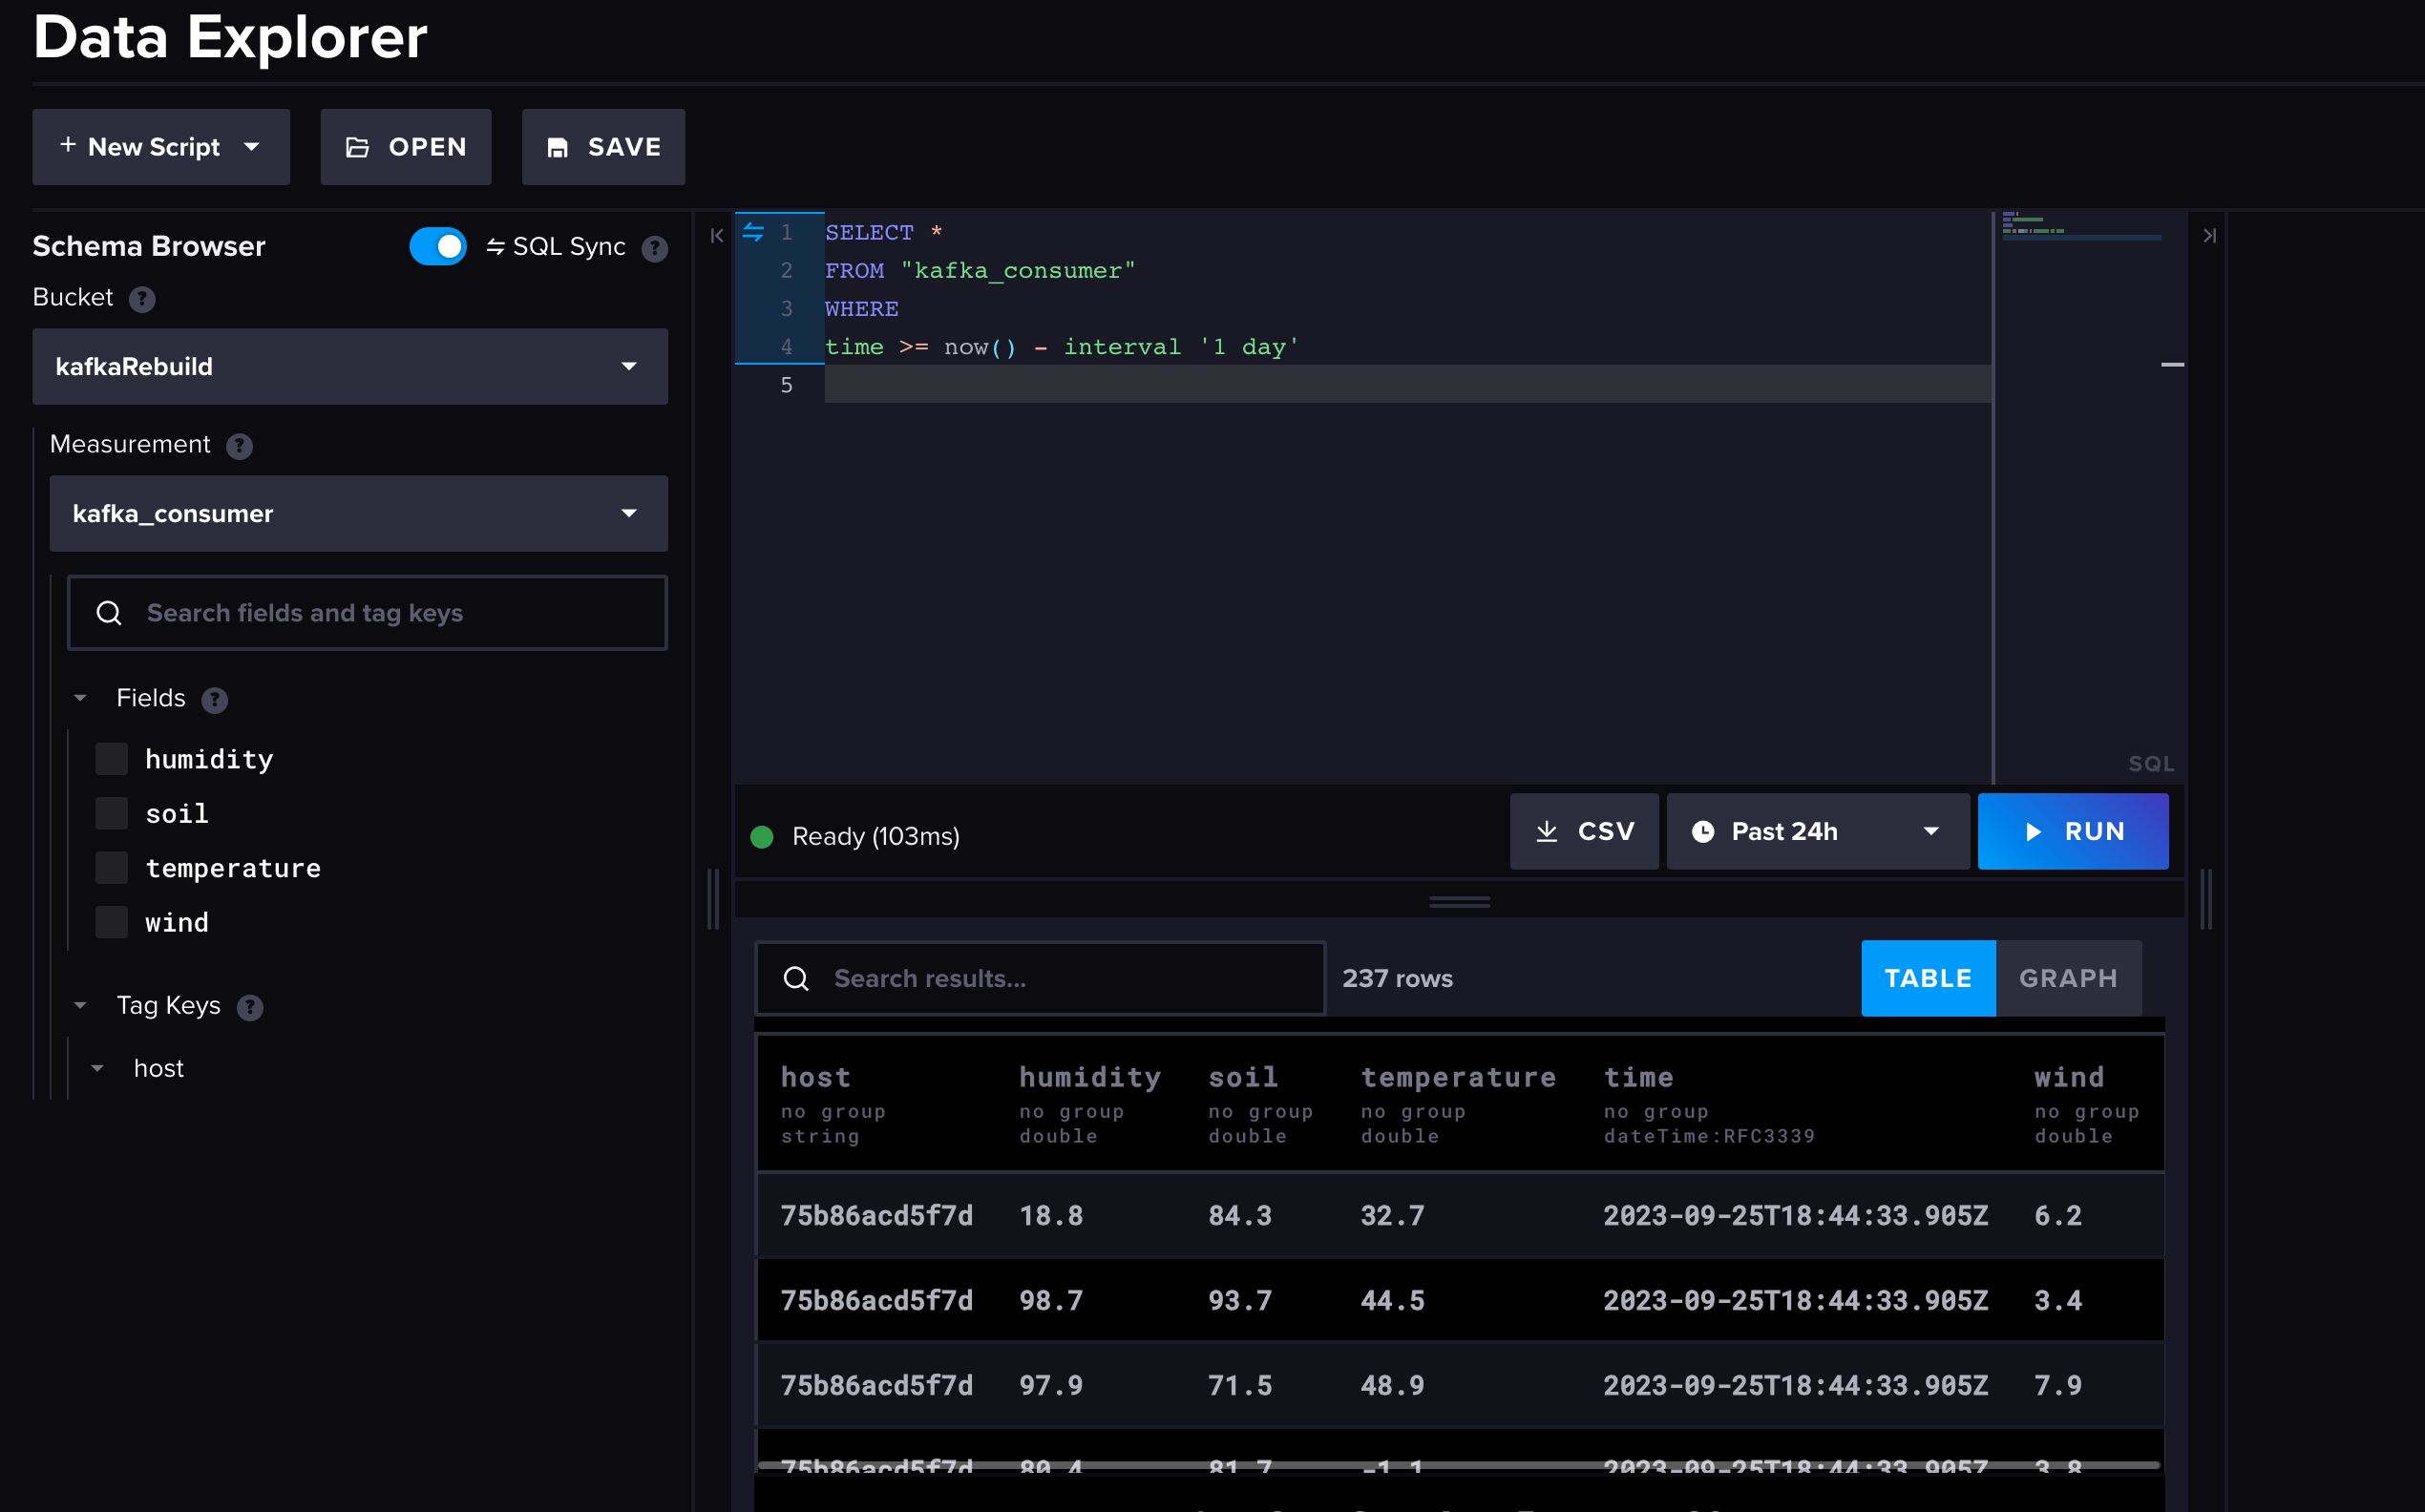
It really is that simple to connect your Kafka cluster to InfluxDB Cloud Serverless.
Continue working with time series data
This is just the beginning of what you can do with InfluxDB Cloud Serverless and Kafka. To keep working within our community, check out our community page. This page includes a link to our Slack workspace and more projects to help get you started.
If you’re ready to explore InfluxDB Cloud Serverless or one of our other product offerings, Cloud Dedicated or Clustered, you can contact someone on our sales team here.
