Summary
Use the Python Processing Engine within InfluxDB 3 Core or Enterprise to detect outliers, level shifts, and unusual patterns without ever leaving your database. MAD and ATDK plugins simplify your streaming data process and pipeline, right where the data lives.
Table of Contents
If you’re working with sensors, machines, or embedded systems, your primary goal is simple: no unplanned downtime and smooth operations. This means detecting errors and taking action before they become critical issues, ideally through predictive maintenance.
This is where anomaly detection becomes essential. In this blog, we’ll take a deep dive into anomaly detection using two ready-to-use Python plugins for real-world IoT use cases. We will leverage the Python Processing Engine within InfluxDB 3 Core or Enterprise, meaning you can detect outliers, level shifts, and unusual patterns without ever leaving your database. Follow along to simplify your streaming data process and pipeline, right where the data lives.
Understanding the anomaly detection landscape
Before diving into the plugins, let’s look at where these approaches fit in the broader anomaly detection ecosystem.
The Three Approaches to Anomaly Detection
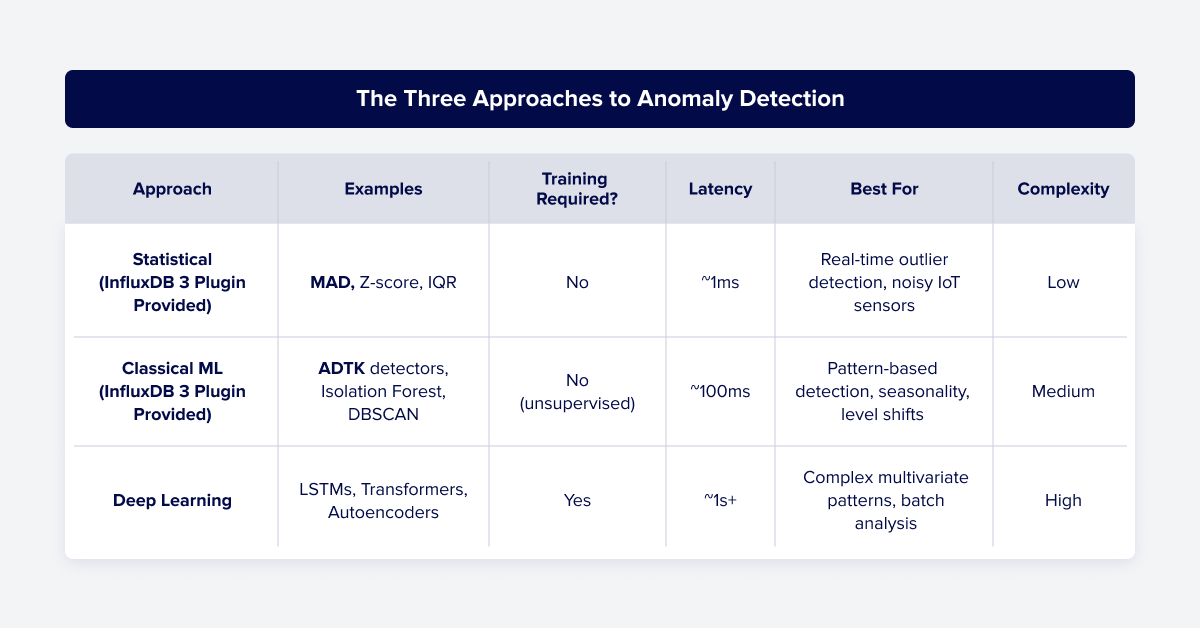
For most industrial IoT, infrastructure monitoring, and operational scenarios, proven statistical and classical ML methods are not just “good enough,” they’re often the better choice because they’re reliable, battle-tested in production for decades, explainable (engineers understand why alerts were fired), and they deploy and receive alerts right away without training ML models, etc.
How to use MAD and ADTK plugins in InfluxDB 3
1. Start InfluxDB 3 with the Processing Engine Enabled
Choose a directory for plugins and start the server with it:
influxdb3 serve \
  --plugin-dir ~/.influxdb3/plugins \
  # other flags...
2. Install Python Dependencies into the Processing Engine
# For notifications (optional)
influxdb3 install package httpx twilio

# For ADTK plugin
influxdb3 install package adtk
influxdb3 install package pandas

# For MAD plugin
influxdb3 install package requests
3. Add Plugins to the Plugin Directory
Clone the influxdb3_plugins GitHub repository and copy the plugin files you need. For example, copy them into your PLUGIN_DIR or use them directly from GitHub.
4. Access and Configure Plugins From the Plugin Library
Use InfluxDB Explorer or by following the steps below in your local console.

MAD plugin for real-time spike detection
The MAD-Based Anomaly Detection Plugin provides real-time anomaly detection for time series data in InfluxDB 3 using Median Absolute Deviation (MAD), which is a pure statistical approach.
Example use case: Get instant alerts when temperature suddenly spikes above the normal range.
Step 1: Set up notification handler (separate plugin for alerting purpose)
influxdb3 create trigger \

 --database sensors \

 --plugin-filename gh:influxdata/notifier/notifier_plugin.py \

 --trigger-spec "request:notify" \

 notification_trigger \

 --token YOUR_TOKEN

influxdb3 enable trigger --database sensors notification_trigger --token YOUR_TOKEN
Step 2: Create MAD detector (runs on every write)
influxdb3 create trigger \

  --database sensors \

  --plugin-filename gh:influxdata/mad_check/mad_check_plugin.py \

  --trigger-spec "all_tables" \

  --trigger-arguments \

    'measurement=environment,\

     mad_thresholds=temperature:2.5:20:5,\

\     senders=slack,\

     slack_webhook_url=https://hooks.slack.com/services/YOUR/WEBHOOK/URL,\

     influxdb3_auth_token=YOUR_TOKEN' \

  temperature_spike_detector \

  --token YOUR_TOKEN

influxdb3 enable trigger --database sensors temperature_spike_detector --token YOUR_TOKEN
What this does:
temperature:2.5:20:5= monitor temperature field, flag if 2.5× MAD away from median, use 20-point window, alert after 5 consecutive anomalies- Triggers on every write for instant detection
Step 3: Write test data
# Establish normal baseline (22°C)

for i in {1..25}; do

  influxdb3 write --database sensors --token YOUR_TOKEN \

    "environment,room=factory temperature=22.$((RANDOM % 5))"

done

# Simulate equipment failure (sudden spike to 45°C+)

for temp in 46 47 48 49 50; do

  influxdb3 write --database sensors --token YOUR_TOKEN \

    "environment,room=factory temperature=${temp}.0"

done
Expected result: You should see an “anomaly detected” alert in InfluxDB 3 Logs and also in the Slack channel after the fifth spike: “MAD count alert: Field temperature in environment outlier for 5 consecutive points”.
ADTK plugin for detecting sustained instability
This plugin is built on top of the popular time series machine learning library, Anomaly Detection Toolkit (ADTK).
Example use case: Detect when temperature becomes erratic/unstable (e.g., sensor malfunction causing wild swings).
Step 1: Create ADTK detector (scheduled every 30 seconds)
influxdb3 create trigger \

  --database sensors \

  --plugin-filename gh:influxdata/stateless_adtk_detector/adtk_anomaly_detection_plugin.py \

  --trigger-spec "every:30s" \

  --trigger-arguments \

    "measurement=environment,\

     field=temperature,\

     detectors=VolatilityShiftAD,\

     detector_params=eyJWb2xhdGlsaXR5U2hpZnRBRCI6IHsid2luZG93IjogMTV9fQo=,\

     window=600s,\

     senders=slack,\

     slack_webhook_url=https://hooks.slack.com/services/YOUR/WEBHOOK/URL,\

     influxdb3_auth_token=YOUR_TOKEN" \

  temperature_stability_detector \

  --token YOUR_TOKEN

influxdb3 enable trigger --database sensors temperature_stability_detector --token YOUR_TOKEN
What this does:
* Checks every 30 seconds (scheduled trigger)
* Analyzes last 10 minutes of data (window=600s)
* Detects when variance shifts (stable → erratic)
Step 2: Write Test Data
# Stable readings (±2°C variation)

for i in {1..15}; do

  influxdb3 write --database sensors --token YOUR_TOKEN \

    "environment,room=factory temperature=$((20 + RANDOM % 5)).5"

done

# Erratic readings (wild swings indicating sensor malfunction)

for temp in 5.2 35.8 8.5 40.3 12.1 38.7 7.9 42.4 6.6 44.3; do

  influxdb3 write --database sensors --token YOUR_TOKEN \

    "environment,room=factory temperature=${temp}"

done
Expected result: Within 30 seconds, you should get a Slack alert → “Volatility shift detected in environment.temperature.”
Why use these plugins together?
- MAD catches acute problems such as immediate dangers, hazards, etc.
- ADTK catches chronic problems such as sensor degradation over time.
Next steps
Customize this ready-to-use Anomaly Detection Plugin for your use case:
- MAD Plugin Documentation (adjust MAD multiplier (
k) for sensitivity) - ADTK Plugin Documentation (change ADTK window size for different time horizons)
You now have a production-ready anomaly detection system running in your database with no separate infrastructure. We invite you to clone/form the plugins in the GitHub repository, publish your own plugins for others to use, and share your questions and projects with our web community on our Slack and Discord channels.


