Monitoring Bitcoin and Cryptocurrencies with InfluxDB and Telegraf
By
Russ Savage
updated December 14, 2025
Product
Developer
Navigate to:
Monitoring Bitcoin
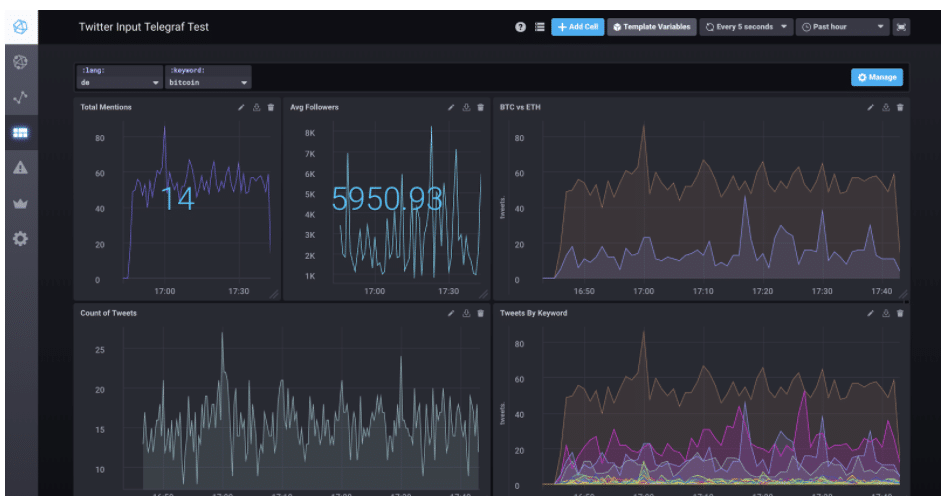
The cryptocurrency market is hotter than ever. Bitcoin and Ethereum are two of the most popular cryptocurrencies out there, and their price is heavily influenced by speculation fueled through news articles and public statements from thought leaders. To help you keep track of the ever-changing world of crypto, I’m going to walk you through how to build a custom service input plugin for Telegraf that will monitor keywords from a Twitter live stream and send them into InfluxDB. We’ll use Chronograf to explore the data and build a simple dashboard. Finally, we will end up with a dashboard that looks similar to the following.
Of course all of this is just for fun unless you are one of the lucky few that have access to the Twitter firehose, but it’s a good way to get introduced to writing a custom Telegraf plugin for whatever system or device you need to monitor.
Setting up InfluxDB and the TICK stack
The first thing we need to do is to get the TICK Stack up and running on our local machine. If you are just starting with the TICK stack, I recommend going through the latest Chronograf “Getting Started” guide. This will get you up and running with Telegraf, InfluxDB, Chronograf, and Kapacitor in no time.
Developer environment setup
Telegraf currently doesn’t ship with a plugin for monitoring tweets from Twitter. But the great thing about open source software is the ability to customize and extend it, so let’s head over to the Telegraf GitHub repo and get started.

This repository holds the code for Telegraf and all of the plugins available by default. If you haven’t already, now would be a great time to fork the Telegraf repository to your own GitHub account. Instructions on how to fork a repo can be found in the GitHub docs.
Telegraf is written completely in Go which means in order to contribute to it, you’ll need to install Go and get your development environment configured. I’m using a Mac, so I installed Go using Homebrewand setup Atom with the a href=”https://atom.io/packages/go-plus”>go-plus plugin for development (of course, you can use your favorite IDE).
If you develop in other languages with GitHub, you might be tempted to head over to your fork and clone that to your machine. This won’t work in Go due to the way package paths are set up. The way to do this in Go is by using git remotes. Scott Mansfield has a good blog posting on working with forks in Go that describes this process in more detail. In short, you’re going to run the following commands to get everything up and running with your fork.
go get github.com/influxdata/telegraf
cd $GOPATH/src/github.com/influxdata/telegraf
git remote rename origin upstream
git remote add origin https://github.com/[YOUR-GITHUB-ID]/telegraf
Instructions for building Telegraf from scratch can be found in the main README file, but it boils down to just running make in the telegraf directory. Make sure that you can successfully build Telegraf before you make changes. If you are having any trouble, a quick Google search can usually solve most issues. If not, feel free to request help on the InfluxData Community forum.
Adding the input plugin package to Telegraf
Adding an input plugin to Telegraf requires a few steps before writing the actual code. First, we need to add a directory into the plugins folder under the specific type of plugin we are building. Since we are building an input plugin, let’s add a folder named twitter in the plugins/inputs directory and then create a file inside of it, named twitter.go. This is the file where we will add our code for the plugin.
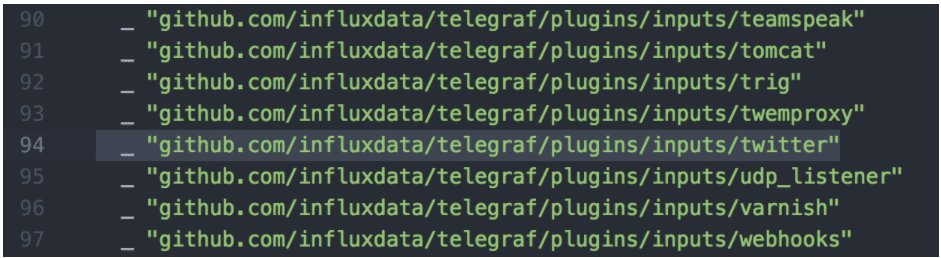
Next, we need to add a line to the plugins/inputs/all/all.go file so that Telegraf knows it needs to load the code for our twitter package. Add the line
_ "github.com/influxdata/telegraf/plugins/inputs/twitter"
to the import section of the file, in alphabetical order.
Input and service input plugins
Now we’re ready to get started writing the code for the plugin. There are two types of input plugins in Telegraf, implemented as Go Interfaces. The standard input plugin is used for polling a specific source at a regular interval. If we wanted to search Twitter for specific keywords every minute, this might be a good option. The second type is a service input plugin which starts a long running process to listen for data sent to it. Since we are interested in any new tweets related to our cryptocurrency, and we want to use the Twitter Streaming API, this option makes more sense for us.
The input.go file in the root of the project gives us the definition of the Go interface for a service input plugin. The only difference from a standard input plugin is the addition of two more functions: Start and Stop.
The CONTRIBUTING file in the Telegraf repo gives us the basic structure of an input plugin, so let’s copy that into our twitter.go file and get started. We will add the additional Start and Stop functions as we go.
Importing the correct Go library
A quick search for Go libraries for the Twitter API gives us three different libraries to look at. I chose Anaconda since it looked like the most popular repo. Let’s walk through each section of our service input plugin and make some changes.
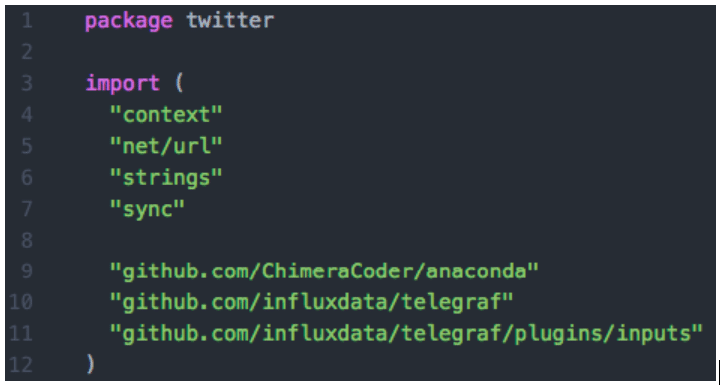
The first line in the file tells Go what package this source code is for. This needs to match the import line we added in all.go a little earlier, so let’s call this the twitter package.
Next is the import section where we can tell Go to pull in the Anaconda library that we are going to use later. Our plugin already depends on two Telegraf libraries, but we need to add the Anaconda library as well. Additionally, the common Go libraries called context, net/url, strings, and sync are required. Common libraries in Go typically have short or abbreviated names. Your IDE will most likely pull those in for you when you start to code.
Plugin configuration and Twitter API keys

The config struct is next and will be the object that holds all of the configuration options for our plugin. According to the Anaconda README file, we need four IDs to authenticate with the Twitter API: a Consumer Key, a Consumer Secret, an Access Token, and an Access Token Secret. You will get these values from Twitter when you create a new App. Notice that these names begin with a capital letter, indicating that the values can be set from another package. This is required to let Telegraf manage populating these values based on the user’s telegraf.conf file.
We will also need the list of keywords that the user is interested in tracking. I just used a simple comma-separated list that can be split into an array later.
Finally, you’ll notice some shorter, lowercased variables in our configuration. These internal variables are used to pass information between the different functions in our package. The names are lowercased since they should only be set by us in our package code. We are storing a reference to the TwitterApi library, and then three other variables used for managing our long running goroutine that we will discuss later.
The next two functions, Description and SampleConfig, are helper functions used to automatically generate a configuration for the plugin using the config option as seen in the Telegraf documentation. We can fill those in by returning simple strings with a description of what the plugin does and an empty config block containing all the options that a user can set for this plugin. Options can be commented out with a # so that the user is aware of the options and can uncomment them if needed.
Gather, Start, and Stop
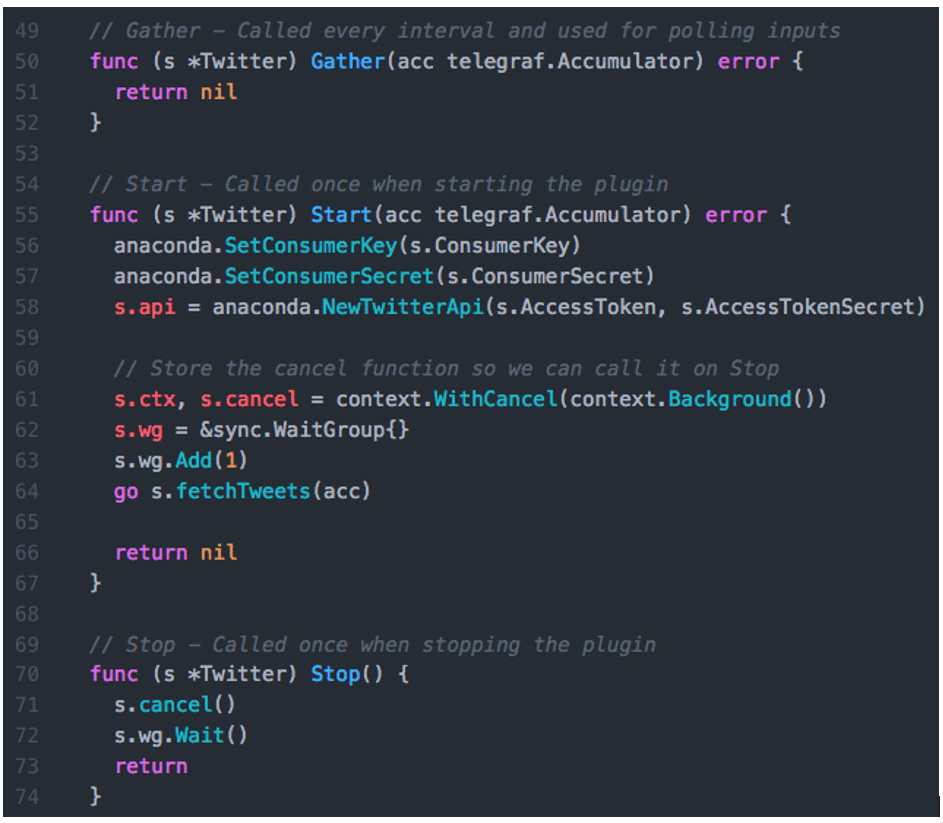
Finally, we are starting to get to the real meat of the plugin. For a normal input plugin, the Gather function is called once per interval by Telegraf and can be used to poll for metrics and send them to the output plugins via the Accumulator. Since we are writing a service input plugin, instead of the Gather function, we are going to focus on the Start and Stop functions. We can just have our Gather function return nil.
The Start function wasn’t part of our original template, but we can add it as well as the Stop function to turn this plugin into a service input plugin. The Start function has the same signature as the Gather function. In the Start function, we are going to set up our Anaconda library to authenticate the Twitter and then trigger a separate goroutine for the fetchTweets function since it is going to run continuously and listen for new tweets to arrive. Since the fetchTweets function is designed to run continuously, we need to set up some tools to help us kill it upon exiting Telegraf. The context object can be used to signal our goroutine to stop when the user stops Telegraf. Combined with the WaitGroup, this helps our plugin exit gracefully during a shutdown. The Stop function can then simply use the cancel function to notify the goroutine that it’s time to exit, then wait for it to shutdown gracefully. The Go concurrency model is out of scope for this article, but if you are going to write your own service input plugin, it is something you will need to be familiar with.
Fetching new tweets from the Streaming API
I was able to find a blog post with an example of how to read streaming tweets using Anaconda. The main loop of our code is based on that post along with some logic from other plugins for sending fields and tags to the accumulator. I’m not a Go expert so there may be more optimal ways to write this code.

First, we split the keywords list with commas so that we can search for each keyword in the tweet later. Next, we set up the URL parameters required by the Twitter Streaming API. In this case, we are just looking for a list of keywords, but you can leverage any available API options.
Finally, we connect to the streaming endpoint and loop continuously until we get a new tweet. The select clause is used here so that we can catch any attempts to shut down and exit gracefully. The default behavior is to loop until we get an event from the stream that matches a tweet. Then we can set up our fields and tags for the measurement, check the tweet for our keywords, and add some of the other tweet properties to our point. This will only insert the last keyword found in a tweet. This code could be easily modified to change that behavior if needed.
Last but not least, we need the init function for our plugin. This is what Telegraf will call to create the config object.

As you can see, this code is in need of a lot more error-checking, but it will do the trick for now. You can find a copy of the full code for this plugin in this Gist.
Building and running our new plugin
After completing our coding, let’s build our version of Telegraf and update our config. The build instructions can be found in the contributing.md file, but as of this writing, you only need to run make in the directory.
To create a config file to test your plugin, you can leverage the SampleConfig function we added earlier and use the sample-config flag to automatically create a config file.
>telegraf -sample-config -input-filter twitter -output-filter influxdb > telegraf.conf
Open up that newly created telegraf.conf file, add your Twitter application credentials, and then add your list of keywords to track. I used bitcoin,$btc,ethereum,$eth but you can add any other cryptocurrencies you want. Finally, start Telegraf using the following command.
>./telegraf --config telegraf.conf
If all goes well, you should now be listening for new tweets matching your keywords, and sending that information into InfluxDB under the default telegraf database.
Exploring the results in Chronograf
The easiest way to verify that everything is working is to jump into Chronograf and check that your data is in there. Click on Data Explorer, and find the tweets measurement in the telegraf.autogen database. Once you start seeing data, you can begin creating some dashboards.

Conclusion
This is just the bare minimum needed to get a service input Telegraf plugin up and running. We still need to add unit tests, verify that our tags and values are appropriate, and put together a nice README file based on the example in the repo.
Hopefully, this gives you a good starting point to building your own input plugin. And while you’re at it, why not become an open source developer and share your plugin with the world?
You can learn more about use cases in this video:
