Table of Contents
As part of the release of InfluxDB 1.7, we have provided integrated access to a technical preview of Flux. If you haven’t been keeping up with what we are up to, Flux is InfluxData’s new functional data scripting language designed for querying, analyzing, and interacting with data.
You might recall some of our recent blogs about the reasons behind this collaborative effort to build the Flux language:
- Why We're Building Flux, a New Data Scripting and Query Language
- Learning Flux (#fluxlang) is About As Difficult As Learning an API
And with the release of Chronograf 1.7, a user interface is now available for building queries using Flux. This is all great, but if you haven’t kept up with the Flux development announcements and the syntax, this post explains the key concepts and walks you through getting started with Flux and the steps required to create your first query.
Enable Flux
The Flux 0.7 technical preview is included within InfluxDB 1.7, but is disabled by default. Enable Flux by setting flux-enabled to true under the [http] section of your InfluxDB configuration file (typically: /etc/influxdb/influxdb.conf on Linux and /usr/local/etc/influxdb.conf for macOS users.)
[http]

 flux-enabled = true
Key Concepts
Before diving into the syntax, there are a few new concepts you should understand.
Buckets
A bucket is a named location where data is stored that has a retention policy. It’s similar to an InfluxDB v1.x “database” but is a combination of both a database and a retention policy. When using multiple retention policies, each retention policy is its own bucket.
Flux’s from() function, which defines an InfluxDB data source, requires a bucket parameter. With the technical preview, use the following bucket naming convention which combines the database name and the retention policy into a single bucket name:
Bucket naming convention
// Pattern
from(bucket:"<database>/<retention-policy>")

// Example
from(bucket:"telegraf/autogen")
Tables of Data
Flux returns data in a tabular format. That means that after each function or operation is evaluated a table or collection of tables containing data are returned. Flux uses the pipe-forward operator (|>) extensively to chain operations together. The pipe-forward operator pipes those tables into the next function or operation where they are further processed or manipulated.
Query Data from InfluxDB
The easiest way to write your first Flux script and see actual results is to use Chronograf’s Data Explorer. Open the Data Explorer, and to the right of the source dropdown above the graph placeholder, select Flux as the source type.
This modifies the user interface to provide access to the Schema, Script, and Flux Functions panes. The Schema pane allows you to explore your data schema via measurement, field, and tag. The Script pane is where you write your Flux script, and the Flux Functions pane provides a list of Flux functions available for use in your Flux script. Hovering over a function will display helpful information about using the function.
To build your Flux script, use either the Script Wizard, which allows you to quickly select a bucket, measurement, one or more fields, and a function to get you started, or just click into the Script pane. Type-ahead assistance provides syntax suggestions as you build your query.
Using the Script Wizard cuts down a bunch of the initial typing when creating a new query.
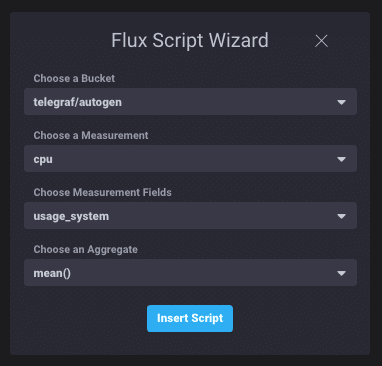
The selections above deliver the following Flux query into the script editor:
from(bucket: "telegraf/autogen")
  |> range(start: dashboardTime)
  |> filter(fn: (r) => r._measurement == "cpu" and (r._field == "usage_system"))
  |> window(every: autoInterval)
  |> mean()
  |> group(except: ["_time", "_start", "_stop", "_value"])
Done! This is just the beginning and should give you a taste of the Flux language and basic concepts. One of the cool things that you can do within Chronograf is flip between the visualization and the raw tables of data returned by Flux. This is really useful and allows you to understand how Flux evaluates the different functions you use to build up the query.
You can continue exploring Flux using the various panels within the Flux Builder. The official documentation will give you a more complete list of functions currently available along with additional examples. We will break down the query parts, the results returned in tabular format and how to leverage window() and group() in future blog posts.
But first things first: get your hands on Flux by downloading the Open Source bits for InfluxDB 1.7 and Chronograf 1.7.
As always, we are interested in community feedback. Please visit the InfluxData Community site to provide feedback on the Flux language to help us improve.
