Getting Started with Arduino and InfluxDB
By
Community
updated October 24, 2023
Product
Use Cases
Developer
Getting Started
Navigate to:
This article was written by Cameron Pavey. Scroll down for the author’s photo and bio.
Time series data differs from “normal” data in an interesting way. The essential characteristic is that the data’s primary point of reference is a timestamp showing at which point in time a sample of data was measured. Time series databases like InfluxDB are helpful for situations that involve this kind of data. Maybe you want to record the speed of a vehicle over time and identify maximum speeds, or perhaps you want to record the temperature and humidity of a given location every ten seconds. This latter example will form the basis of this tutorial. Using a small, cheap dev board, you will see how to create an Arduino application for recording climate data in an InfluxDB instance over WiFi.
The client library
For this tutorial, you can use the InfluxDB client library for Arduino. This library supports InfluxDB 1 and 2, but this tutorial will focus on InfluxDB 2.
Getting started
There are a few things you need before you can dive in with this. Being an Arduino project, there is, of course, the matter of hardware. The client library works well with ESP8266 and ESP32 boards (both compatible with the Arduino IDE). This tutorial will use the ESP32 board, which uses WiFi to connect to the InfluxDB server. You could also do this with other hardware configurations, such as an Arduino Uno with a WiFi shield, but if you do, the examples shown below might require some tweaking.
Aside from the ESP32, what good is a database without data to store in it? To obtain some interesting data to work with, we’ll pair the ESP32 with a DHT11 temperature and humidity sensor. If you don’t have one of these but have different sensors lying around, you could log some other data. The data doesn’t matter as much as what you will be doing with it. InfluxDB includes some sample datasets that you can use if you don’t have the hardware used for this tutorial.
On the software side of things, you will need an InfluxDB instance to send your data to. This tutorial will make use of the Influx Docker image for this. If you want to follow along but do not have Docker, you can refer to their official documentation for your operating system of choice. You can also use InfluxDB Cloud for a free hosted instance of InfluxDB.
Once Docker is up and running, you can start your InfluxDB instance by running the following command:
docker run -d --name=influxdb \
 -p 8086:8086 \
 -v /tmp/testdata/influx:/root/.influxdb2 \
      Influxdb:2.0
This will create a container on your system running the InfluxDB 2 image, with the application exposed on port 8086 of your host. If the command is successful, it will return a container ID as the output. Next, you can log in to InfluxDB with your browser and set up some additional elements.
Navigate to http://localhost:8086 in your browser, and you should be prompted to set up a user. Go ahead and do this, making a note of the details you set for later.
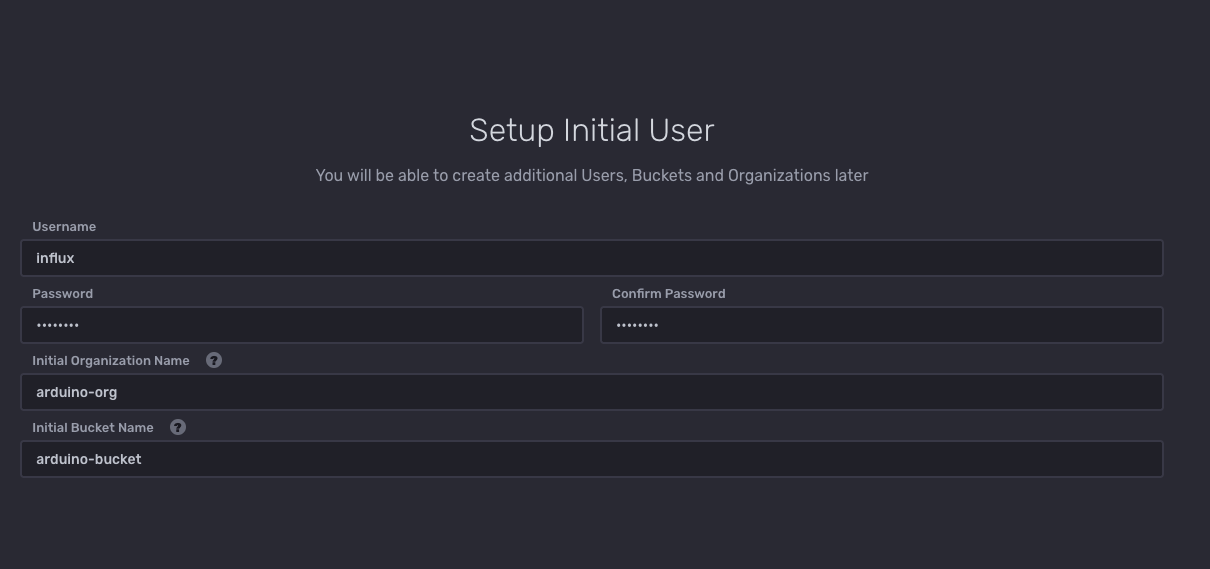
After this, InfluxDB should present you with a few quick-start options. Choose Load Data, and when it asks you to select a client library, you can select Arduino. This provides some starter code, which is pretty handy. There are also some other references on this page as well, such as your token, which can be used later when you want to send data from your Arduino device. This is all you need to do here for now. Next, it is time to deal with the Arduino code.
The Arduino
If you don’t already have the Arduino IDE installed, go here and select the correct build for your operating system to install it. Because the ESP32 is not one of the default Arduino boards, you must add it via the board manager. Go to Tools > Board > Boards Manager, and the IDE will present you with a dialog box. In the search field, input “ESP,” and as a result, you should see an entry called esp32. Install this one (or whatever the appropriate one is if you are using a different board).
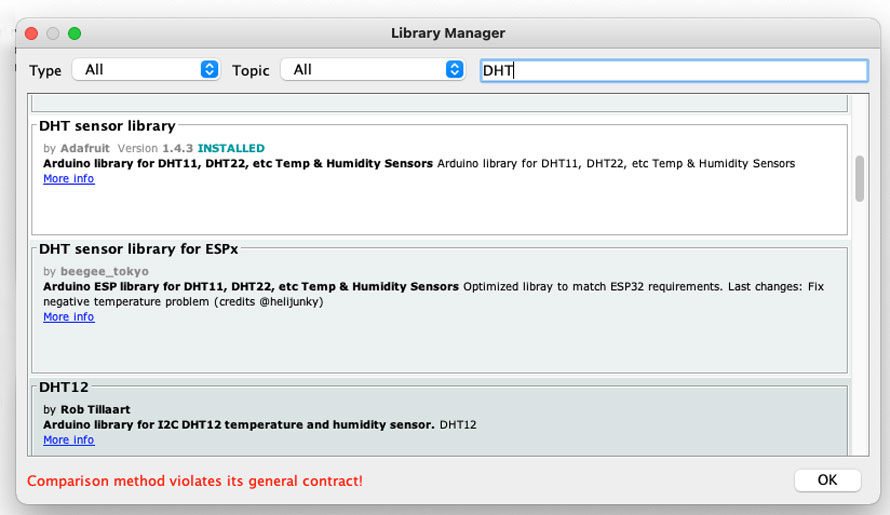
Next, there are a couple of libraries you will want to add. If you follow along and use the DHT sensor, you will need one library for that and one for the InfluxDB Client.
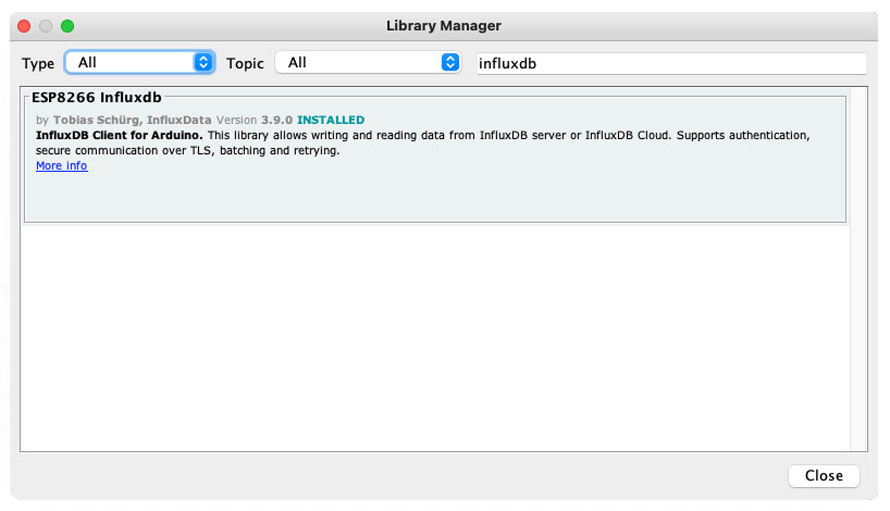
In the menu bar, go to Sketch > Include Libraries > Manage Libraries.
Again, the IDE will present you with a dialog. This time, search for “InfluxDB” and install the corresponding library:
For the DHT sensor, simply search for “DHT” and install the “DHT sensor library” as seen here:
Once you have your board, and these two libraries (or whatever other libraries you need, if you are using a different sensor), you are ready to get into the code.
The code
The code will be based on the example provided by InfluxDB’s web interface when you selected Arduino, but modified to work with the DHT11 sensor instead of recording measurements about the WiFi, as the default program does.
You can find all the code here, or you can follow along. The first thing you need to do is define some constants and import your libraries:
// This helps with compatibility with the ESP8266
#if defined(ESP32)
#include <WiFiMulti.h>
WiFiMulti wifiMulti;
#define DEVICE "ESP32"
#elif defined(ESP8266)
#include <ESP8266WiFiMulti.h>
ESP8266WiFiMulti wifiMulti;
#define DEVICE "ESP8266"
#endif

// Import the InfluxDB libraries
#include <InfluxDbClient.h>
#include <InfluxDbCloud.h>

// Import the DHT sensor library, and set some constants
#include "DHT.h"

#define DHTPIN 4 // Digital pin connected to the DHT sensor
#define DHTTYPE DHT11 // DHT 11

// Set up your WiFi connection here

// WiFi AP SSID
#define WIFI_SSID "<your ssid>"
// WiFi password
#define WIFI_PASSWORD "<your password>"

// Set up your InfluxDB details here

// InfluxDB v2 server url (Use: InfluxDB UI -> Load Data -> Client Libraries)
#define INFLUXDB_URL "http://<your influx server ip>:8086"

// InfluxDB v2 server or cloud API authentication token (Use: InfluxDB UI -> Data -> Tokens -> <select token>)
#define INFLUXDB_TOKEN "<your influx token>

// InfluxDB v2 organization id (Use: InfluxDB UI -> User -> About -> Common Ids )
#define INFLUXDB_ORG "<your org name>"

// InfluxDB v2 bucket name (Use: InfluxDB UI -> Data -> Buckets)
#define INFLUXDB_BUCKET "<your bucket name>"

// Set timezone string according to <https://www.gnu.org/software/libc/manual/html_node/TZ-Variable.html>
#define TZ_INFO "CET-1CEST,M3.5.0,M10.5.0/3"

// InfluxDB client instance with preconfigured InfluxCloud certificate
InfluxDBClient client(INFLUXDB_URL, INFLUXDB_ORG, INFLUXDB_BUCKET, INFLUXDB_TOKEN, InfluxDbCloud2CACert);

// Create your Data Point here
Point sensor("climate");

// Set up the DHT connection
DHT dht(DHTPIN, DHTTYPE);
In this code, you set up all the dependencies, specifically for the WiFi, DHT, and Influx. Note that this all comes before the public void setup() {} function, which you will prepare next:
void setup() {
  // Start Serial for monitoring
  Serial.begin(115200);

  // Init the DHT sensor
  dht.begin();

  // Setup wifi
  WiFi.mode(WIFI_STA);
  wifiMulti.addAP(WIFI_SSID, WIFI_PASSWORD);

  Serial.print("Connecting to wifi");
  while (wifiMulti.run() != WL_CONNECTED) {
    Serial.print(".");
    delay(100);
  }
  Serial.println();

  // Add tags. Here we will track which device our data is coming from
  sensor.addTag("device", DEVICE);

  // Accurate time is necessary for certificate validation and writing in batches
  // For the fastest time sync, find NTP servers in your area: https://www.pool.ntp.org/zone/
  // Syncing progress and the time will be printed to Serial.
  timeSync(TZ_INFO, "pool.ntp.org", "time.nis.gov");

  // Check server connection
  if (client.validateConnection()) {
    Serial.print("Connected to InfluxDB: ");
    Serial.println(client.getServerUrl());
  } else {
    Serial.print("InfluxDB connection failed: ");
    Serial.println(client.getLastErrorMessage());
  }
}
In the setup code, a few things are happening. The libraries are all initialized, a serial is started, and tags are added to your Influx Point object. In this example, the only tag is the name of your device (ESP32). This would help you differentiate where these readings came from in case you had multiple instances set up around the place, so including it may be helpful. There is also a time sync to ensure that your device won’t have any issues stemming from being out of sync with the server time. Finally, the InfluxDB client confirms its connection to the server. If all is well, you should see “Connected to InfluxDB” in your Serial Monitor. The last bit to look at is the loop function:
void loop() {
  // Clear fields for reusing the point. Tags will remain untouched
  sensor.clearFields();

  // Read the temperature and humidity from the sensor, and add them to your data point, along with a calculated heat index
  float h = dht.readHumidity();
  float t = dht.readTemperature();

  sensor.addField("humidity", h);
  sensor.addField("temperature", t);
  sensor.addField("heat_index", dht.computeHeatIndex(t, h, false));

  // Print what are we exactly writing
  Serial.print("Writing: ");
  Serial.println(sensor.toLineProtocol());

  // If no Wifi signal, try to reconnect it
  if ((WiFi.RSSI() == 0) && (wifiMulti.run() != WL_CONNECTED)) {
    Serial.println("Wifi connection lost");
  }

  // Write point
  if (!client.writePoint(sensor)) {
    Serial.print("InfluxDB write failed: ");
    Serial.println(client.getLastErrorMessage());
  }

  //Wait 10s
  Serial.println("Wait 10s");
  delay(10000);
}
Here, the Point object’s fields get cleared to allow for reuse between loops, and then the DHT11 sensor is read. The readings from the sensor are then added to the Point as fields. You would need to make some changes if you are using a different sensor or otherwise logging different data. After this, the Serial Monitor will show you the Line Protocol form of the data to be written. This information can be helpful if you need to debug any issues. Finally, the client writes the data point before waiting for ten seconds to repeat this process.
You can find the complete code on this GitHub Gist. Go ahead and upload this to your board, and then connect the Serial Monitor from the tools menu. You should see something like this:
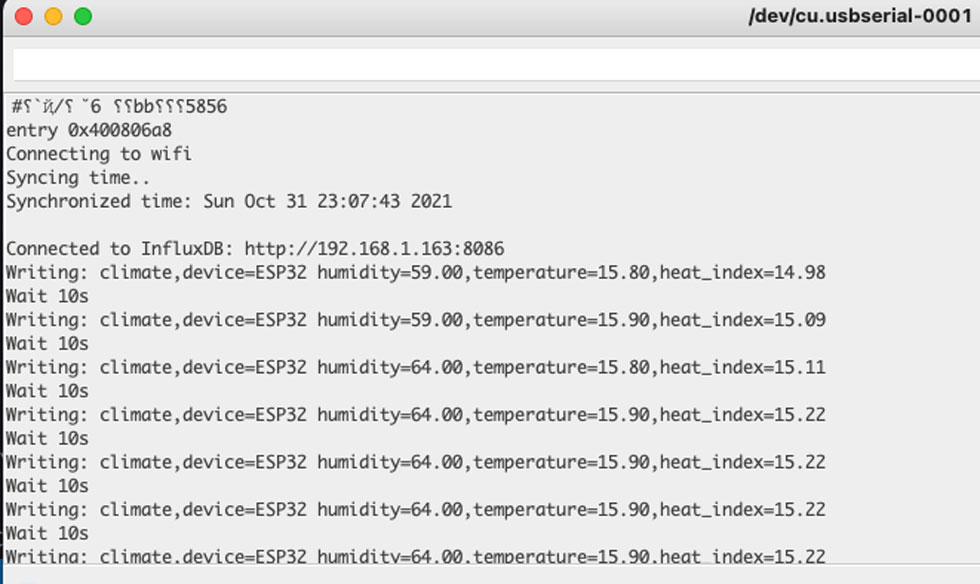
If you do, you should now have some data populating in your InfluxDB instance. Go back to the web interface and go to Data > Buckets > {your bucket}, and select the measurement you created (the name given to your Point object “Climate” in this example). You will need to let it run for a while to get some interesting data, but this is what it looked like after running it on and off for a whole day:
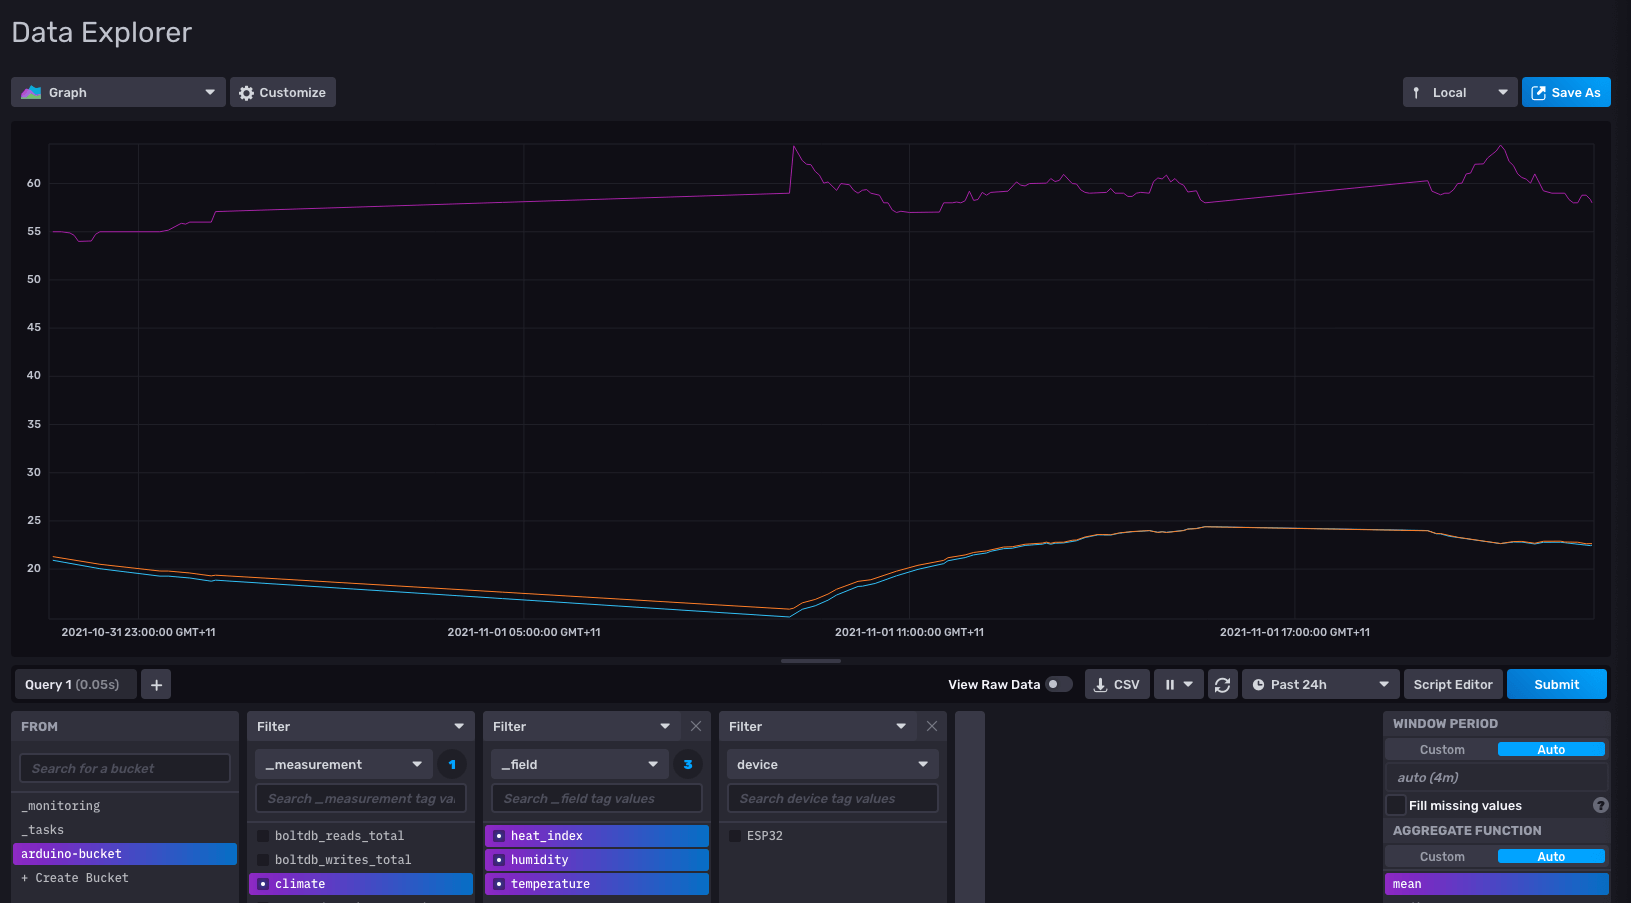
You can interact with the chart and see what the specific values were at particular points in time. If you’ve made it this far, you are now successfully logging sensor data from your Arduino board to InfluxDB over WiFi.
Why InfluxDB?
InfluxDB is a time series database and excels at storing data related to specific timestamps. There are lots of use cases for this kind of database, and this example shows the power pretty well. For something like temperature, it makes a lot of sense to log it over time so that you can see how it changes over a period. Using tags, you can further categorize your data. There is a tag for the Device name in this example, but this could easily be considered for something like “location.” If you are running multiple temperature sensors at different locations or weather stations, this would be a great candidate for a tag, as it would allow all of your climate data to live together, categorized by location, which makes for easy comparison and analysis.
Conclusion
If you’ve followed along throughout this tutorial, you now have an Arduino-compatible board sending sensor data to an InfluxDB instance. While this was a fairly basic tutorial, hopefully you can see the potential behind this pairing. With cheap Arduino boards, you can log any sensor data you can imagine and send it wirelessly to a time series database. Time series databases open the door to all sorts of new opportunities which are not usually viable with traditional databases, such as easily analyzing longitudinal data, like the data coming from the DHT11 sensor in this example. If you find yourself in a position where you need to leverage time series data in your applications, remember that InfluxDB is not just for Arduino. InfluxDB boasts a vast assortment of integrations, allowing you to collect and work with data from many sources.
About the author:

Cameron is a full-stack dev living and working in Melbourne. He’s committed himself to the never-ending journey of understanding the intricacies of quality code, developer productivity, and job satisfaction.
