Getting Started with Go and InfluxDB
By
Community /
Product, Use Cases, Developer, Getting Started
Nov 19, 2021
Navigate to:
This article was written by Alexandre Couëdelo and was originally published by The New Stack. Scroll down for the author’s picture and bio.
Conventional databases such as PostgreSQL or MongoDB are great at safekeeping the state of your system in a tabular or document format, but what about time-dependent data: systems metrics, IoT device measurement or application state change?
For those things, you need a more suitable type of database, one designed to manage better semi-structured data with a time characteristic.
InfluxDB is a high-performance data store explicitly written for time-series data. InfluxData provides not only the database, but also tools to ingest, transform and visualize your data. For instance, Telegraf offers more than 200 plugins to ingest data. However, if you want to integrate InfluxDB directly into your backend application, you need to use the dedicated client library.
This tutorial will walk you through how to use the InfluxDB Go client library, create a connection to the database and store and query data from it.
Getting started with InfluxDB
You are about to add InfluxDB to your application stack. At the end of this tutorial, you will have a codebase illustrating how to interface a Go application with InfluxDB. But first, let’s create some context for this demo.
You are designing a new smart thermostat IoT product. You receive frequent temperature measurement from your IoT sensors. Let’s assume you store temperature measurements in an InfluxDB database. Also, that your users can adjust the temperature of their smart thermostat using your application. Every time the user changes the thermostat, you update the state of the thermostat in your classical database.
Furthermore, you wish to keep a history of all the thermostat temperature settings, alongside the temperature measurement. Temperature settings and measurements together enable you to analyze user behaviors. With that data in hand, you can later make your smart thermostat even smarter by predicting changes before the user even acts.
Requirements for this tutorial
This tutorial is OS agnostic and assumes that you have GO 1.16+ and Docker installed.
I selected the Docker installation, as it’s best suited for continuous integration. However, InfluxDB supports many platforms (Linux, macOS, Windows, Docker, Kubernetes).
Starting a local database
To start the setup, you need to define a docker-compose.yml file that defines the configuration of your InfluxDB in Docker.
services:
    influxdb:
        image: influxdb:2.0.7
        environment:
            DOCKER_INFLUXDB_INIT_MODE: setup
            DOCKER_INFLUXDB_INIT_USERNAME: ${INFLUXDB_USERNAME}
            DOCKER_INFLUXDB_INIT_PASSWORD: ${INFLUXDB_PASSWORD}
            DOCKER_INFLUXDB_INIT_ORG: iot
            DOCKER_INFLUXDB_INIT_BUCKET: users_business_events
            DOCKER_INFLUXDB_INIT_ADMIN_TOKEN: ${INFLUXDB_TOKEN}
        ports:
        - "8086:8086"
Run docker-compose up to get the database started. For test purposes, define your environment variables in a file called test_influxdb.env. Here is the content of my test_influxdb.env:
docker-compose --env-file test_influxdb.env up
INFLUXDB_USERNAME=admin
INFLUXDB_PASSWORD=admin1234
INFLUXDB_TOKEN=F-QFQpmCL9UkR3qyoXnLkzWj03s6m4eCvYgDl1ePfHBf9ph7yxaSgQ6WN0i9giNgRTfONwVMK1f977r_g71oNQ==
INFLUXDB_URL="http://localhost:8086"
You need to add the flag --env-file to your docker-compose command to force Docker to take that file into account.
docker-compose --env-file test_influxdb.env up
InfluxDB comes with an easy-to-use UI. Go to http://localhost:8086 and have a look.

Getting familiar with InfluxDB
InfluxDB is not just a time-series database. It’s the core element behind the influxdata ecosystem. This ecosystem includes:
- A UI. The web interface offers administrative interfaces, development tools such as Query Builder and Data Visualization.
- A command-line interface (CLI) influx.
influxCLI can administer the database, load data from CSV, insert data and query it. It's a good companion when developing and debugging applications.
Getting started with the Go Client Library
Your database is ready, so let’s write some Go. Initialize your Go module.
go mod init github.com/xNok/Getting-Started-with-Go-and-InfluxDB
Add influxdb-client-go as a dependency to your project.
go get github.com/influxdata/influxdb-client-go/v2
Making a connection
Let’s create a function that helps you connect to the database. You already defined a token in your test_influxdb.env with the variable INFLUXDB_TOKEN. You will be using this token for test purposes. You can also create a new token via the UI. Your instance of InfluxDB should still be running.
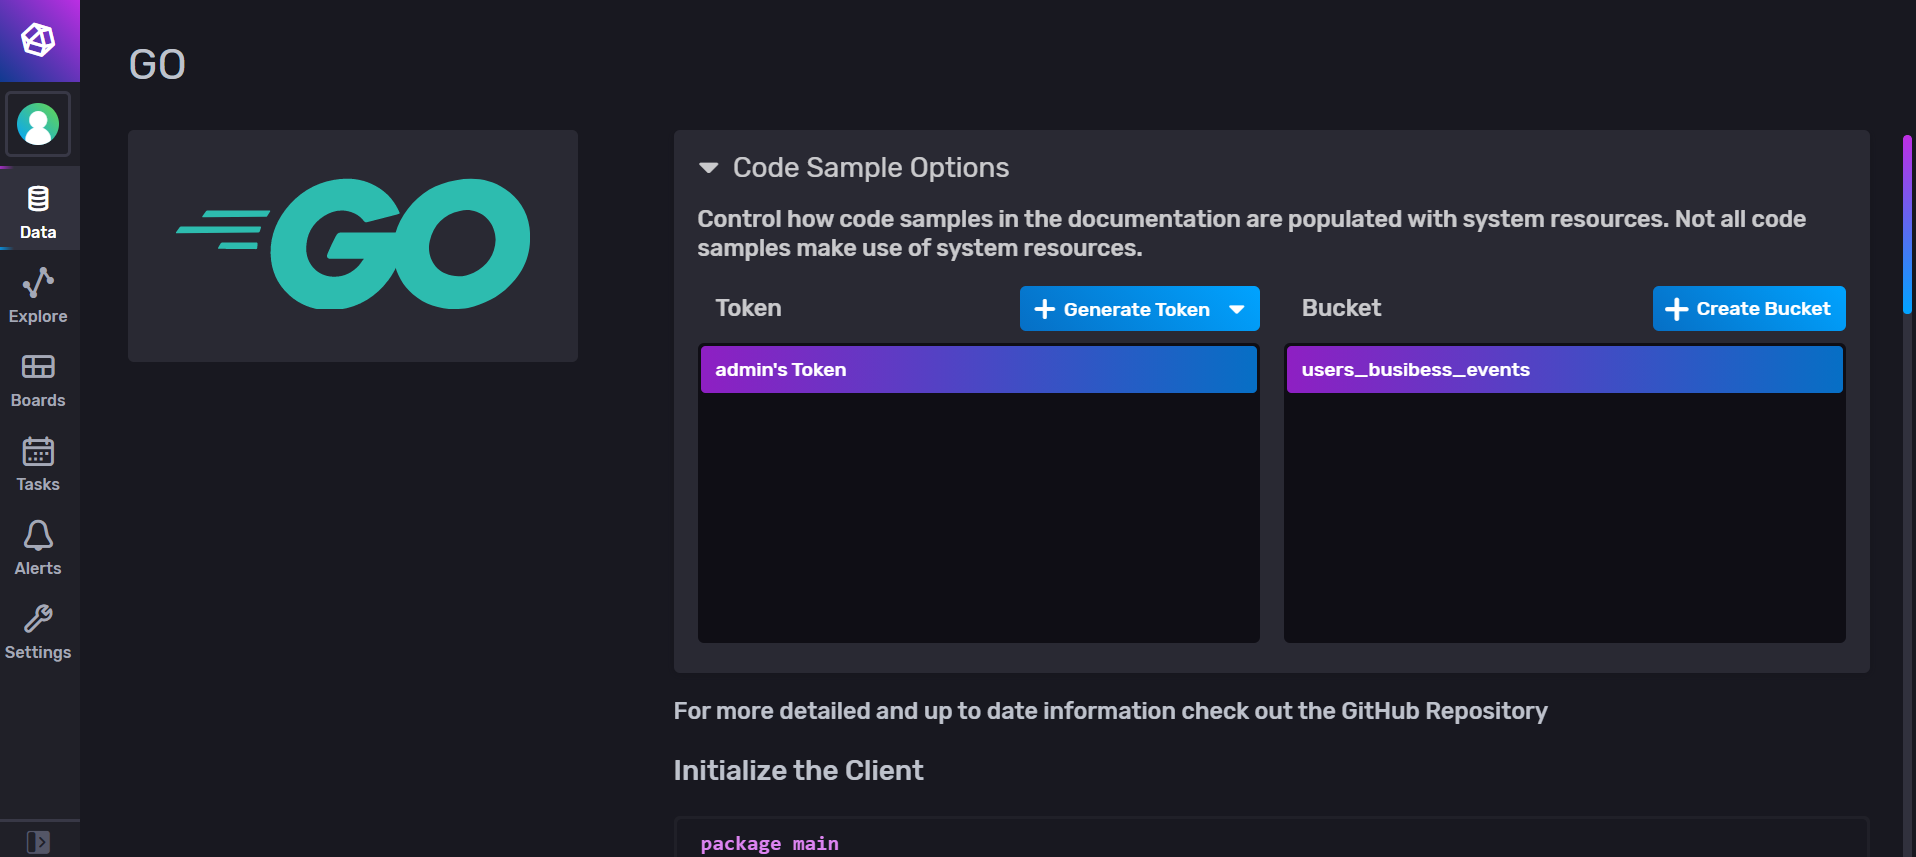
- Go back to the UI and generate a new authentication token.
- Click Data.
- In Client Libraries, select Go.
This section lets you create an auth token and provide some code snippets to get started with the Go library.
This is the function you’ll aim to create:
// Connect to an Influx Database reading the credentials from
// environment variables INFLUXDB_TOKEN, INFLUXDB_URL
// return influxdb Client or errors
func connectToInfluxDB() (influxdb2.Client, error) {

}
Next, create the test function. When you call connectToInfluxDB, you get a successful connection to the database, and you can validate that by calling the Health method from influxdb2.Client. As you can see, I used godotenv.Load("../test_influxdb.env") to fetch the credentials you defined for your InfluxDB in Docker. (You will need to add godotenv as a dependency to your project).
func Test_connectToInfluxDB(t *testing.T) {

    //load environment variable from a file for test purposes
    godotenv.Load("../test_influxdb.env")

    tests := []struct {
        name string
        wantErr bool
    }{
        {
            name:    "Successful connection to InfluxDB",
            wantErr: false,
        },
    }
    for _, tt := range tests {
        t.Run(tt.name, func(t *testing.T) {
            got, err := ConnectToInfluxDB()
            if (err != nil) != tt.wantErr {
                t.Errorf("ConnectToInfluxDB() error = %v, wantErr %v", err, tt.wantErr)
                return
            }
            health, err := got.Health(context.Background())
            if (err != nil) && health.Status == domain.HealthCheckStatusPass {
                t.Errorf("connectToInfluxDB() error. database not healthy")
                return
            }
            got.Close()
        })
    }
}
When it comes to creating a connection, call the influxdb2 client initialization constructor. Including reading the credentials from environment variables and validating the code for connectToInfluxDB looks like this:
// Connect to an Influx Database reading the credentials from
// environement variables INFLUXDB_TOKEN, INFLUXDB_URL
// return influxdb Client or errors
func ConnectToInfluxDB() (influxdb2.Client, error) {

    dbToken := os.Getenv("INFLUXDB_TOKEN")
    if dbToken == "" {
        return nil, errors.New("INFLUXDB_TOKEN must be set")
    }

    dbURL := os.Getenv("INFLUXDB_URL")
    if dbURL == "" {
        return nil, errors.New("INFLUXDB_URL must be set")
    }

    client := influxdb2.NewClient(dbURL, dbToken)

    // validate client connection health
    _, err := client.Health(context.Background())

    return client, err
}
If you pass the test, you are ready to implement some features using InfluxDB. However, you are not prepared yet to go to production.
Enabling SSL/TLS encryption is strongly recommended for the production environment. You won’t need it in this tutorial, since you’re using a local Docker environment.
In your application, you’ll need to pass the certificates to your InfluxDB client.
// read the certificate
cer, _ := tls.LoadX509KeyPair("server.crt", "server.key")
// define the certificate
client := influxdb2.NewClientWithOptions(dbURL, dbToken,
    influxdb2.DefaultOptions().
        SetTLSConfig(&tls.Config{
            Certificates: []tls.Certificate{cer}
        }))
Inserting data
First step: Model your data. Your requirement is to send changes in “thermostat settings” to an InfluxDB. The setting contains an identifier for your user and the desired average and maximum temperature in the room.
type ThermostatSetting struct {
    user string
    max  float64 //temperature
    avg  float64 //temperature
}
Second step: Write a test function. You can use several possible ways to insert data to find the one that suits you best.
The InfluxDB Go client library offers three ways to insert data:
- Line protocol uses text-based database queries.
- Data point with a constructor uses maps to populate the data.
- Data point with fluent style uses a builder pattern.
Here is a generic test function made for that purpose:
func Test_write_event_with_line_protocol(t *testing.T) {
    tests := []struct {
        name  string
        f     func(influxdb2.Client, []ThermostatSetting)
        datas []ThermostatSetting
    }{
        {
            name:  "Write new record with line protocol",
            // Your data Points
            datas: []ThermostatSetting{{user: "foo", avg: 35.5, max: 42}},
            f: func(c influxdb2.Client, datas []ThermostatSetting) {
                // Send all the data to the DB
                for _, data := range datas {
                    write_event_with_line_protocol(c, data)
                }
            },
        },
    }
    for _, tt := range tests {
        t.Run(tt.name, func(t *testing.T) {
            // helper to initialise and clean the database
            client := init_testDB(t)
            // call function under test
            tt.f(client, tt.datas)
            // TODO Validate the data
        })
    }
}
You will need a small helper function, init_testDB, to initialize the connection and clean the database before each test.
func init_testDB(t *testing.T) influxdb2.Client {
    t.Helper() // Tells `go test` that this is an helper
    godotenv.Load("./test_influxdb.env") //load environement variable
    client, err := drivers.ConnectToInfluxDB() // create the client

    if err != nil {
        t.Errorf("impossible to connect to DB")
    }

    // Clean the database by deleting the bucket
    ctx := context.Background()
    bucketsAPI := client.BucketsAPI()
    dBucket, err := bucketsAPI.FindBucketByName(ctx, bucket)
    if err == nil {
        client.BucketsAPI().DeleteBucketWithID(context.Background(), *dBucket.Id)
    }

    // create new empty bucket
    dOrg, _ := client.OrganizationsAPI().FindOrganizationByName(ctx, org)
    _, err = client.BucketsAPI().CreateBucketWithNameWithID(ctx, *dOrg.Id, bucket)

    if err != nil {
        t.Errorf("impossible to new create bucket")
    }

    return client
}
At last, you’re ready to try each type of data insertion.
The line protocol is straightforward to use and acts a bit like an SQL query. A record in InfluxDB is composed of three elements: measurementName, fields and tags. The key concepts of InfluxDB include:
measurementName, which refers to a datasetfields, which are key/value pairstags, which are also key/value pairs, but act as indexes for your record.
func write_event_with_line_protocol(client influxdb2.Client, t ThermostatSetting) {
    // get non-blocking write client
    writeAPI := client.WriteAPI(org, bucket)
    // write line protocol
    writeAPI.WriteRecord(fmt.Sprintf("thermostat,unit=temperature,user=%s avg=%f,max=%f", t.user, t.avg, t.max))
    // Flush writes
    writeAPI.Flush()
}
The point data approach is lengthy to write, but also provides more structure. It’s convenient when data parameters are already in the desired format.
func write_event_with_params_constror(client influxdb2.Client, t ThermostatSetting) {
    // Use blocking write client for writes to desired bucket
    writeAPI := client.WriteAPI(org, bucket)
    // Create point using full params constructor
    p := influxdb2.NewPoint("thermostat",
        map[string]string{"unit": "temperature", "user": t.user},
        map[string]interface{}{"avg": t.avg, "max": t.max},
        time.Now())
    writeAPI.WritePoint(p)
    // Flush writes
    writeAPI.Flush()
}
Alternatively, you can use the builder NewPointWithMeasurement to construct the query step by step, which is easy to read.
func write_event_with_fluent_Style(client influxdb2.Client, t ThermostatSetting) {
    // Use blocking write client for writes to desired bucket
    writeAPI := client.WriteAPI(org, bucket)
    // create point using fluent style
    p := influxdb2.NewPointWithMeasurement("thermostat").
        AddTag("unit", "temperature").
        AddTag("user", t.user).
        AddField("avg", t.avg).
        AddField("max", t.max).
        SetTime(time.Now())
    writeAPI.WritePoint(p)
    // Flush writes
    writeAPI.Flush()
}
Which insertion method is best for you? Don’t forget to update the tests to validate your implementations.
Batching
Note that the InfluxDB client uses batching to send data to the database. By default, no data will be sent to the database until the batch size is reached (5,000 points by default), as a trade between the load on the database and the availability of the data. A smaller batch size means a higher gear, thus potentially affecting the performance of the database. On the other hand, waiting for the batch size to be reached means that the data is still in memory in your application and not in the database.
You can adjust the Batch Size when calling the initialization constructor for influxdb2:
client := influxdb2.NewClientWithOptions(dbURL, dbToken,
        influxdb2.DefaultOptions().SetBatchSize(20))
Also, you can force the client to send the data using Flush(). You’ve seen this in the previous example.
writeAPI.Flush()
However, based on my experience with time-series databases, don’t use the Flush methods everywhere. Even if it seems reasonable to write the data instantly to the database, it can significantly affect performance. Instead, use the Batch Size option.
Blocking vs. non-blocking
While the default behavior of InfluxDB is to use asynchronous calls and batches (i.e., non-blocking I/O), you have the option to write points synchronously. This option is recommended for infrequent writes that need to be immediately committed to the database.
func write_event_with_blocking_write(client influxdb2.Client) {
    // Get blocking write client
    writeAPI := client.WriteAPIBlocking(org, bucket)

    // write line protocol
    writeAPI.WriteRecord(context.Background(), fmt.Sprintf("stat,unit=temperature1 avg=%f,max=%f", 23.5, 45.0))
}
Querying data
InfluxDB uses a query language called Flux. Flux uses a functional approach to select, filter and aggregate data. It’s effortless to read and understand once you get the basics of it. Additionally, InfluxDB provides a powerful query builder to design your query based on the data ingested.
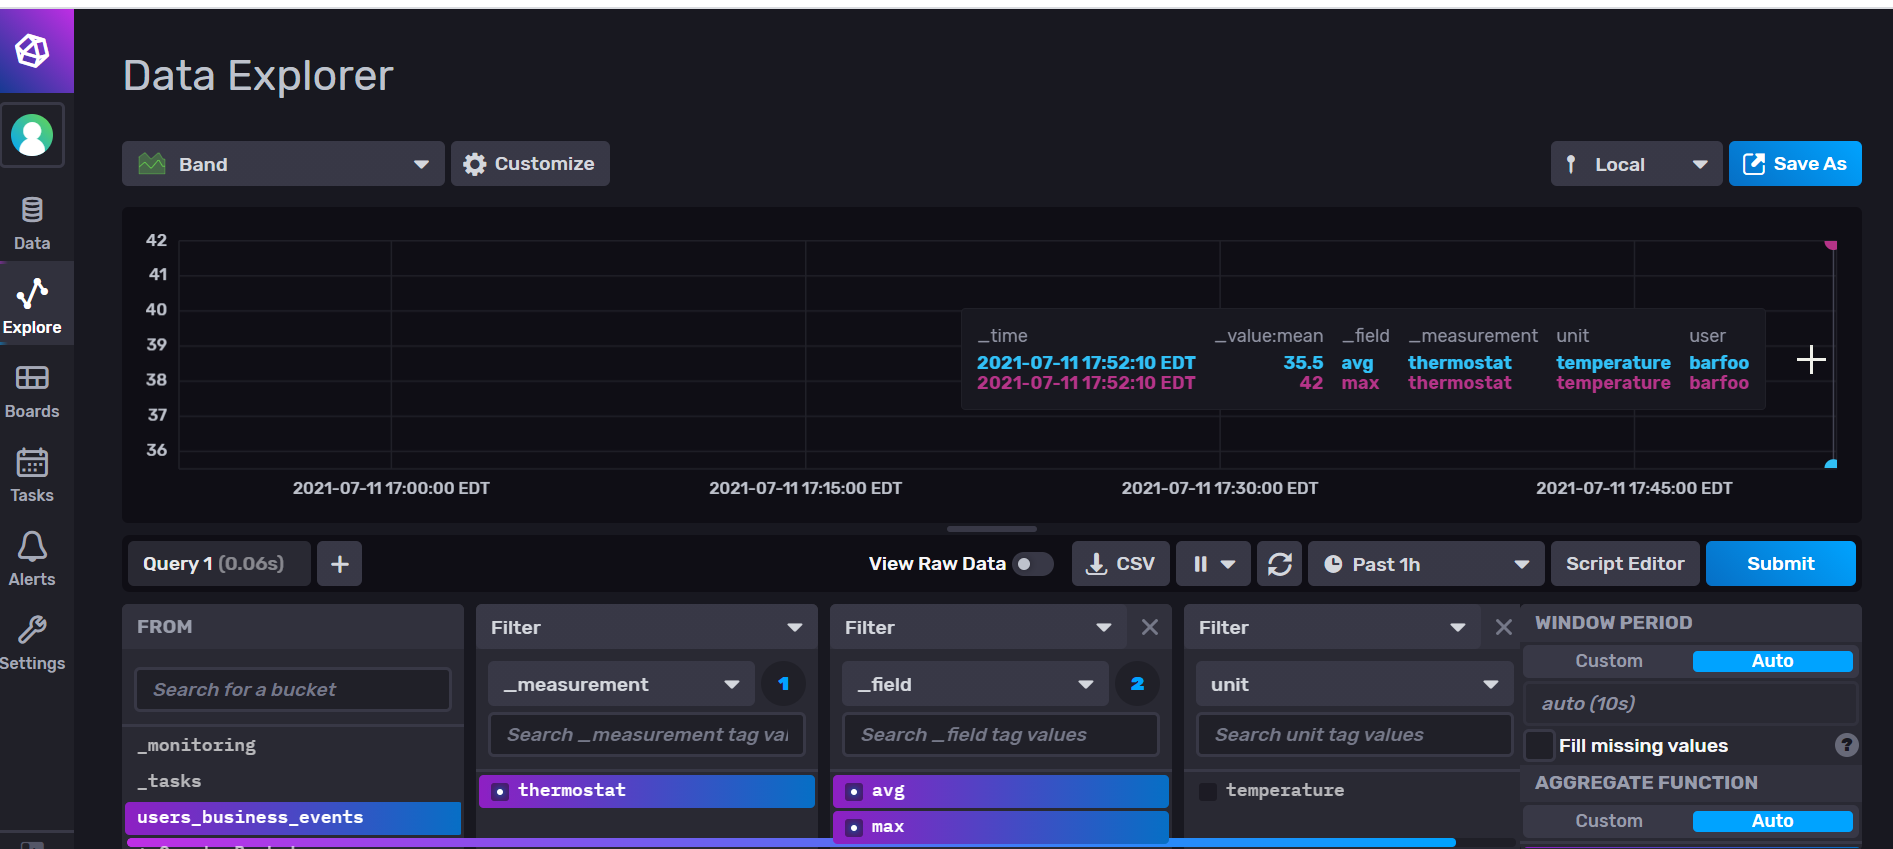
To complete this tutorial, run your integration test to add data points to the database. Next, use the query builder to create a query that isolates the data you need. This is the query built using the QueryBuilder:
from(bucket: "users_business_events")
  |> range(start: v.timeRangeStart, stop: v.timeRangeStop)
  |> filter(fn: (r) => r["_measurement"] == "thermostat")
  |> aggregateWindow(every: v.windowPeriod, fn: mean, createEmpty: false)
  |> yield(name: "mean")
Now all that’s left to do is implement a function that queries your data using the Go client. There are two ways to query data.
The first is to use QueryTableResult. You will notice that putting back the data into the ThermostatSetting structure requires a bit of work. Even though you send the content of ThermostatSetting as one data point, the fields avg and max come out as two separate records.
func read_events_as_query_table_result(client influxdb2.Client) map[time.Time]ThermostatSetting {

    // Get query client
    queryAPI := client.QueryAPI(org)

    // Query. You need to change a bit the Query from the Query Builder
    // Otherwise it won't work
    fluxQuery := fmt.Sprintf(`from(bucket: "users_business_events")
    |> range(start: -1h)
    |> filter(fn: (r) => r["_measurement"] == "thermostat")
    |> yield(name: "mean")`)

    result, err := queryAPI.Query(context.Background(), fluxQuery)

    // Putting back the data in share requires a bit of work
    var resultPoints map[time.Time]ThermostatSetting
    resultPoints = make(map[time.Time]ThermostatSetting)

    if err == nil {
        // Iterate over query response
        for result.Next() {
            // Notice when group key has changed
            if result.TableChanged() {
                fmt.Printf("table: %s\n", result.TableMetadata().String())
            }

            val, ok := resultPoints[result.Record().Time()]

            if !ok {
                val = ThermostatSetting{
                    user: fmt.Sprintf("%v", result.Record().ValueByKey("user")),
                }
            }

            switch field := result.Record().Field(); field {
            case "avg":
                val.avg = result.Record().Value().(float64)
            case "max":
                val.max = result.Record().Value().(float64)
            default:
                fmt.Printf("unrecognized field %s.\n", field)
            }

            resultPoints[result.Record().Time()] = val

        }
        // check for an error
        if result.Err() != nil {
            fmt.Printf("query parsing error: %s\n", result.Err().Error())
        }
    } else {
        panic(err)
    }

    return resultPoints

}
The second option is QueryRaw() that returns an unparsed result string.
func read_events_as_raw_string(client influxdb2.Client) {
    // Get query client
    queryAPI := client.QueryAPI(org)

    // Query
    fluxQuery := fmt.Sprintf(`from(bucket: "users_business_events")
    |> range(start: -1h)
    |> filter(fn: (r) => r["_measurement"] == "thermostat")
    |> yield(name: "mean")`)

    result, err := queryAPI.QueryRaw(context.Background(), fluxQuery, influxdb2.DefaultDialect())
    if err == nil {
        fmt.Println("QueryResult:")
        fmt.Println(result)
    } else {
        panic(err)
    }
}
Finally, you’ll need to update your test function and see if it works as expected.
func Test_write_event_with_line_protocol(t *testing.T) {
    tests := []struct {
        name  string
        f     func(influxdb2.Client, []ThermostatSetting)
        datas []ThermostatSetting
    }{
        [...]
    }
    for _, tt := range tests {
        t.Run(tt.name, func(t *testing.T) {
            client := init_testDB(t)

            // call function to test
            tt.f(client, tt.datas)
            // test can be flicky if the query is done before that data is ready in the database
            time.Sleep(time.Millisecond * 1000)

            // Option one: QueryTableResult
            results := read_events_as_query_table_result(client)
            // convert results to array to compare with data
            resultsArr := []ThermostatSetting{}
            for _, v := range results {
                resultsArr = append(resultsArr, v)
            }

            if eq := reflect.DeepEqual(resultsArr, tt.datas); !eq {
                t.Errorf("want %v, got %v", tt.datas, resultsArr)
            }

            // Option two: query raw data
            // TODO add validation
            read_events_as_raw_string(client)

            client.Close()
        })
    }
}
Conclusion
If you completed this tutorial, you have a thoroughly tested application using InfluxDB. You’re using four different ways to query data (three styles of non-blocking insertion plus one blocking insertion), and you’re aware that you need to enable SSL/TLS certificates before going to production.
You have the opportunity to insert data and visualize it in the InfluxDB UI, from which you can quickly build your queries and then use the data in your application. In sum, you can insert data and retrieve it in the same data structure to use in your application. Your future smart thermostats company is definitely on the right track.
If you’re interested in going further with InfluxDB, read the official documentation to get more familiar with the Go client library.
About the author:

Alexandre is a Complex Systems Engineering and Management Specialist. He has been embracing the DevOps culture since he started his career by contributing to the digital transformation of a leading financial institution in Canada. His passion is the DevOps Revolution and Industrial Engineering. He loves that he has sufficient hindsight to get the best of both worlds.
