Home Assistant Tutorial: A Beginner’s Guide to Automation
By
Community
Jan 05, 2024
Developer
Getting Started
Navigate to:
In this post, we’ll be taking a closer look at Home Assistant, an open source platform for connecting your smart devices at home. We’ll walk through every important section of Home Assistant: dashboards, integrations, add-ons, devices and entities, automation, scripts, and scenes. In addition, we’ll be walking through how to set up your Home Assistant and create automation using Home Assistant’s graphical user interface.
How Does Home Assistant Work?
Home Assistant is an open source smart home platform that allows you to connect your smart home devices like your TV, fan, cameras, thermostats, lights, and sensors. As a user, you can build intricate automation using Home Assistant’s user-friendly, unified web-based user interface.
Home Assistant means you don’t need to be a programmer or a computer scientist to get a device working with your smart home. You can simply build and test automation without writing a single line of code. Home Assistant can also be as complex as you want it to be, just depending on how much time you’re willing to put into it.
Important Parts of Home Assistant
Home Assistant has some very important features, which include the following:
- Dashboard
- Integrations
- Add-ons
- Devices and entities
- Automation
- Scripts
- Scenes
Now let’s take a closer look at each of them.
Home Assistant dashboard
The first thing you see once you’ve installed and logged into Home Assistant is the dashboard. The dashboard is a page in Home Assistant used to display information that is available in Home Assistant. The more devices and services you add to Home Assistant, the more information will be available for display. Whenever devices or services are added, Home Assistant automatically adds their information to a default dashboard. But if you’d like, you can take control and display exactly what you want.
Dashboards are composed of cards that display information about the devices and services that are in Home Assistant. These cards can be added via the user interface or by editing YAML scripts. Even though Home Assistant is largely configurable through the user interface, you’re still going to run the YAML scripts. It is, therefore, paramount that you understand it properly.
Home Assistant integrations
Integrations are additional software that can be installed within Home Assistant and allow it to connect to different platforms, which bring in data and devices. When integrations are installed, the data from these integrations are represented in Home Assistant as devices and entities. There are currently over 1,000+ built-in integrations in Home Assistant that are fully supported by the Home Assistant community. Built-in integrations are those that are directly supported by Home Assistant, and they’re often automatically discovered on your Wi-Fi network. For custom integrations, there is also a Home Assistant community store, which can be installed as an integration itself, and it gives you access to thousands of these custom integrations as well.
Home Assistant add-ons
Sometimes integrations and add-ons are confused with each other, but we should keep them separate because they are, in fact, different from one another. Depending on your installation type, you may or may not have the ability to install add-ons. Add-ons are applications that run alongside Home Assistant and whatever hardware your Home Assistant is running on. They can be easily and quickly installed, configured, and run within Home Assistant.
While integrations only connect Home Assistant with many applications, devices, and services, add-ons provide additional functionality.
An example of an add-on is the Z-Wave JS server, which runs alongside Home Assistant to act as a server for all Z-Wave devices. Those devices are then connected to Home Assistant using the Z-Wave JS integration. Other examples are file editors, which can allow you to edit your Home Assistant configuration files right within Home Assistant.
Home Assistant devices and entities
Entities in Home Assistant represent logical groupings of functions within the system. A device, on the other hand, signifies a physical device connected to Home Assistant through integration. However, entities can be added independently without grouping them into devices. They encompass not only devices but also automation, scripts, and scenes. For instance, the Philips Hue motion sensor in Home Assistant comprises temperature, illuminance, occupancy sensors, and a motion detector, each represented as separate entities within the device grouping. Entities can have different types, such as binary sensors and motion sensors, and exhibit various states. For example, a motion sensor may have an “ON” state when motion is detected and an “OFF” state when no motion is detected. Numeric states are also possible, such as a temperature sensor with a state of 70°F. Additionally, entities can possess attributes that provide further information about their state.
Home Assistant automation
Automation is a process of making certain actions happen automatically. Automation in Home Assistant typically include the following:
- Triggers: This is a prompt for those actions to happen.
- Conditions: These are rules dictating if the actions should happen.
- Actions: This represents the actions that Home Assistant will do when the automation is triggered.
An example of simple automation is as follows.
A motion sensor device like the Philips Hue sensor has a motion sensor entity. When that entity turns on (meaning there is motion), it triggers an automation that turns the light on. The automation has a condition that it has to be after 8 pm. So the light only comes on at night.
Home Assistant scripts
Scripts are similar to automation in that they allow you to run multiple actions in a row, step by step. The main difference here is that scripts don’t have triggers, meaning that they cannot automatically run. They have to be called upon by automation. For instance, if you have a series of actions you want to run in multiple automation, you can create a single script, and each automation can call that single script. In that way, if an action needs to be changed, you’re only changing one script instead of two automation. Within a script, delays can be added between steps if needed. You can also trigger scripts from your Home Assistant dashboard with cards.
An example of a script is a projector setup. We choose this as a script because, let’s say, there are two different ways that you want to trigger your projector setup to run. Firstly, you want to use a dashboard button and a smart physical button that anyone can press to run the setup. Now when you press the start button, it triggers automation to call the projector setup script. This script lowers the projector’s screen, turns on the projector, and also selects HDMI as the input.
Home Assistant scenes
Scenes are a set of saved states of entities that can be used as Home Assistant automation or scripts. For example, you can set up two different scenes, one for the morning and one for the evening, that both have specific brightness and light colors and then you can run an automation that changes the scene based on the time of day. This may seem like automation or a script can do what a scene can do, so there is no point in having scenes. However, contrary to that, automation and scripts are for actions, while scenes are for setting the state of entities. Automation and scripts follow a sequential flow and can be interrupted if triggers are not met, whereas scenes execute simultaneously.
Setting Up Home Assistant
There are two steps in setting up Home Assistant:
- Installation
- Initial setup wizard
Installation
The first step in setting up Home Assistant on your system is by installing it. There are different ways of getting Home Assistant up and running on your device, some of which include the below:
- Raspberry Pi
- Virtual machine
- Docker
- Windows
- macOS
- Linux
To get Home Assistant up and running, you need to choose from the list of options for installation by visiting the official Home Assistant website, www.home-assistant.io, then following the instructions provided for the respective installation options.
Initial setup wizard
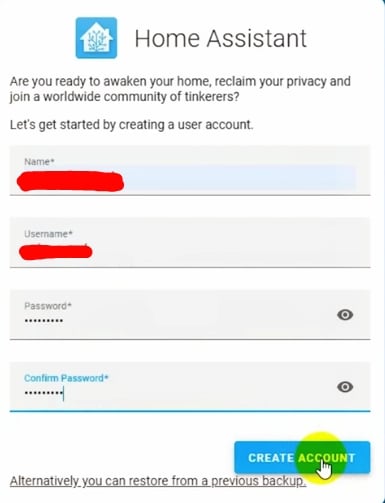
Here at the initial setup wizard step, you need to fill in the blank fields (name, username, password) with your details to create an account. After filling in your details, you can now click “CREATE ACCOUNT.” You can see the details below.
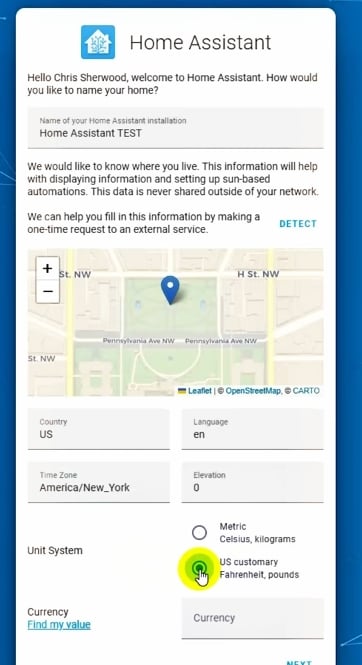
The next page shows you fields and options for you to set a name for your home, your location, and your unit system. You can manually get your preferred location using the map, or you can simply detect your location by clicking the “DETECT” option. Furthermore, the setting of your time zone, currency, and unit system will be required based on your location. Afterward, you click “NEXT.” You can see the details in the image below.
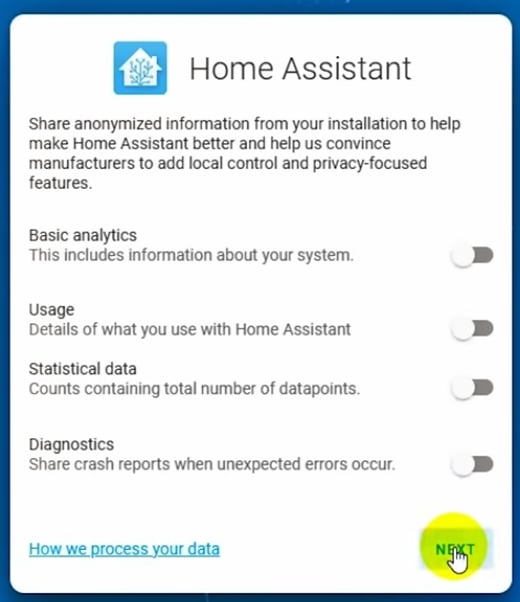
The next screen asks you if you would like to share any data with Home Assistant. This is entirely up to you to decide. Afterward, click “NEXT.” You can see the details below.
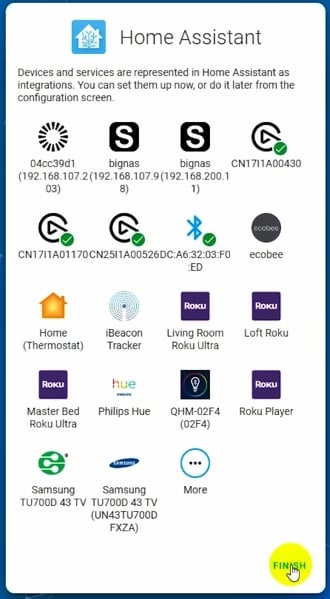
Now the next screen shows a bunch of devices that we can import into Home Assistant. You have the option to set these up now or later on. Lastly, you click on “FINISH.” You can see the details in the image below.
Bravo! We can now see our Home Assistant Dashboard!

Setting Up Automation in Home Assistant
There are two ways to configure automation in Home Assistant. You can use the built-in automation editor right in the Home Assistant user interface, or you can manually write it yourself in a YAML script. In this post, we’ll be making use of the built-in automation editor within Home Assistant.
The following steps show you how to build a basic automation that sends a simple notification when the front door is open.
Automation and scenes
-
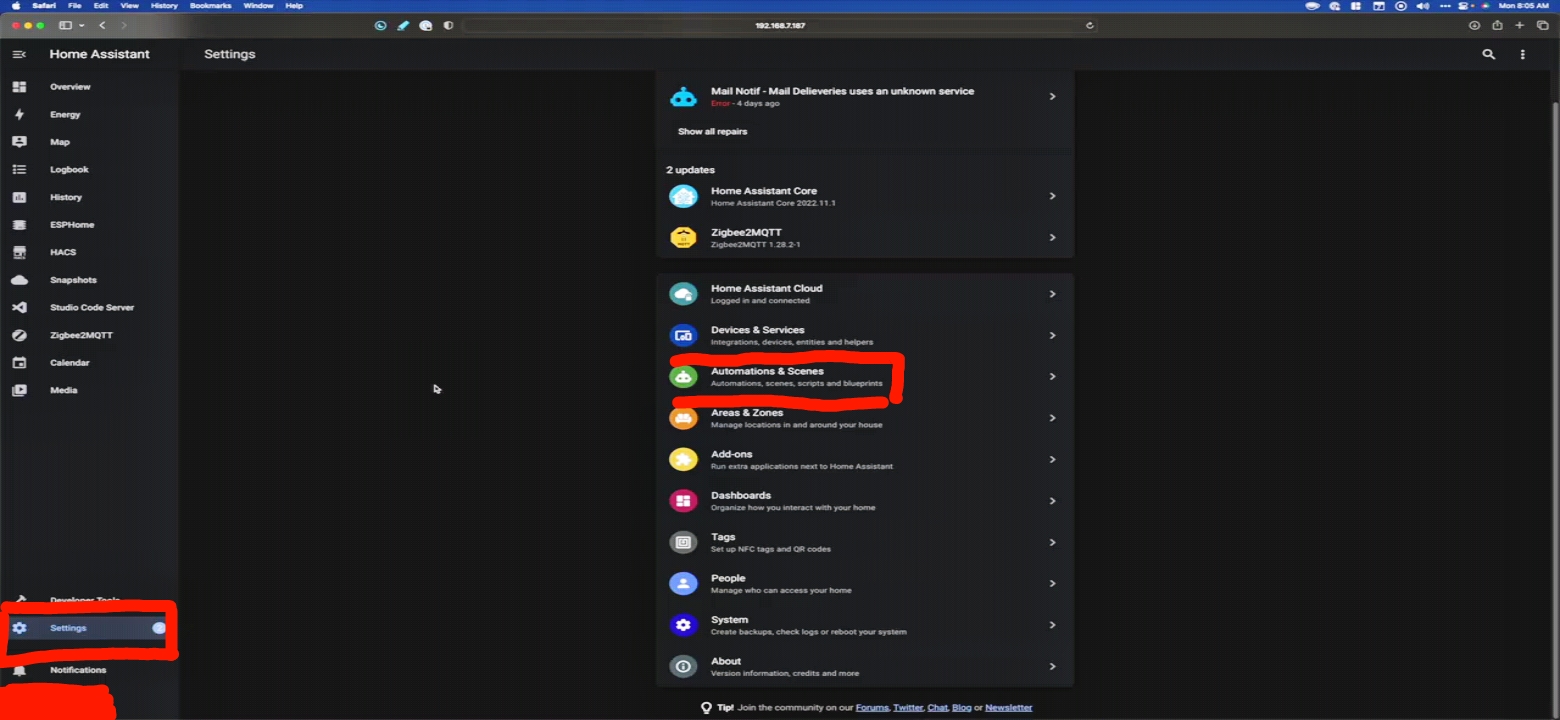
You’ll find the automation editor under Settings, and under this, you’ll find Automations & Scenes. Now when Settings is opened, click on Automations & Scenes.
-
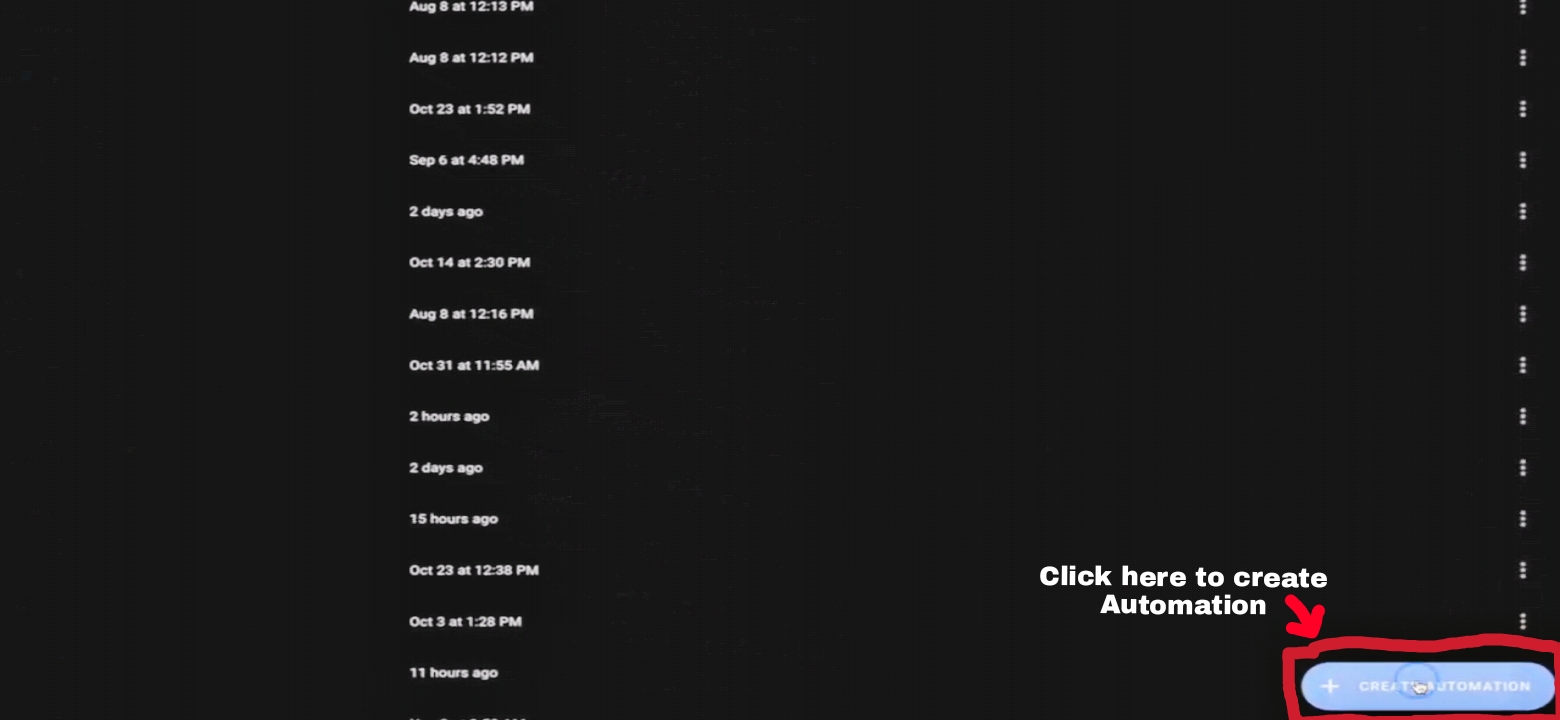
Click Create Automation in the lower right
-
Now you have an option of using a blueprint or starting with empty automation. Select Start with empty automation since our objective is to create a new automation.
-
Now you have the three parts of automation: Triggers, Conditions, and Actions, which were defined earlier in the post. Now select + ADD TRIGGER under Trigger to add a trigger.


Triggers
- For Triggers, under which you’ll see a lot of trigger options to pick from, we’ll be making use of State. Now select State from the list. Under the blank space for Entity, type in Front Door. In the search results, select your entity for the front door. In From and To, fill the blanks with Closed and Open, respectively. Now we’re done with Trigger, so next is to add the conditions. Now select + ADD CONDITION, which can be found under Condition. You can see the details below.

Conditions
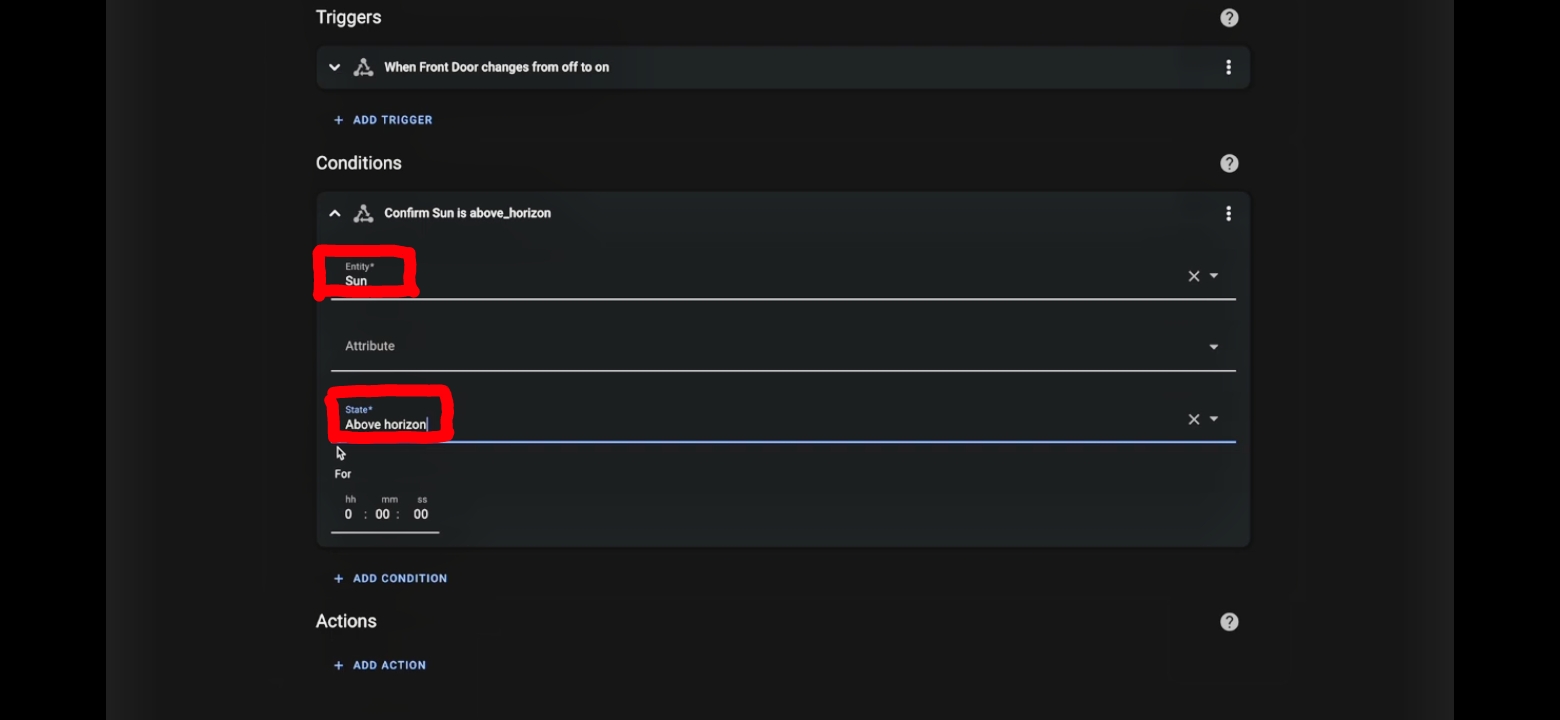
- Under Conditions, you’ll find a list of options to choose from. Any of these conditions need to be true for the automation to continue. Since, in our case, we’re only sending a notification, we’ll make sure the automation happens only when people are away. For that reason, we’ll be making use of the sun as a proxy for that context. For the Condition, we’ll use State from the list of options provided. Now we’ll fill in the blanks for entity and state withSun andAbove Horizon, respectively. Remember that automation will continue only if these conditions are true. Now let’s proceed with the actions since we’ve finished with the conditions. Now select + ADD ACTION, which can be found under Action. You can see the details below.
Actions
- Under Actions, you’ll find a list of options to choose from. Now we’ll select Call Service. To fill in the blank for Service, type mobile into the search bar (since we intend to use the mobile application for receiving the notification). Unfortunately, you may not find a notification service in the search results. But then, select any of the services from the search results that have “mobile_app” in the name. Furthermore, now that you have made the selection, the system will prompt you with other attributes you can use. It’s important to note that the options without a check box are mandatory, whereas the ones with a check box are optional. Let’s put a check on the Message option and assign it the label Front door was opened. You can see the details in the image below.

- Now, if we want, we can check the Title to give it the title Door Notification. Lastly, hit save.
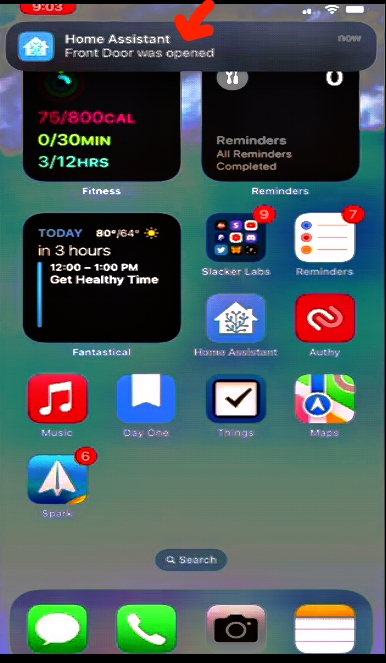
Bravo! The process is complete. So, whenever someone opens the front door, you’ll receive a notification like this:
Summary
Home Assistant enables users to automate and control home appliances like cameras, thermostats, lighting, and sensors. To get the Home Assistant software up and running on your system, you must choose the most convenient option for your installation. The list of options for installation and the necessary steps to successfully install Home Assistant on your system are provided on the Home Assistant official website. After completing the installation, you should set up your personal Home Assistant to connect your smart home devices by using the initial setup wizard. You can create automation using the GUI feature within Home Assistant, where you need to put in place triggers, conditions, and actions, which are essential features for your automation to run successfully.
This post was written by Theophilus Onyejiaku. Theophilus has over 5 years of experience as data scientist and a machine learning engineer. He has garnered expertise in the field of Data Science, Machine Learning, Computer Vision, Deep learning, Object Detection, Model Development and Deployment. He has written well over 660+ articles in the aforementioned fields, python programming, data analytics and so much more.
