How to Use Google Core IoT with InfluxData
By
David G. Simmons
updated December 14, 2025
Use Cases
Developer
Navigate to:
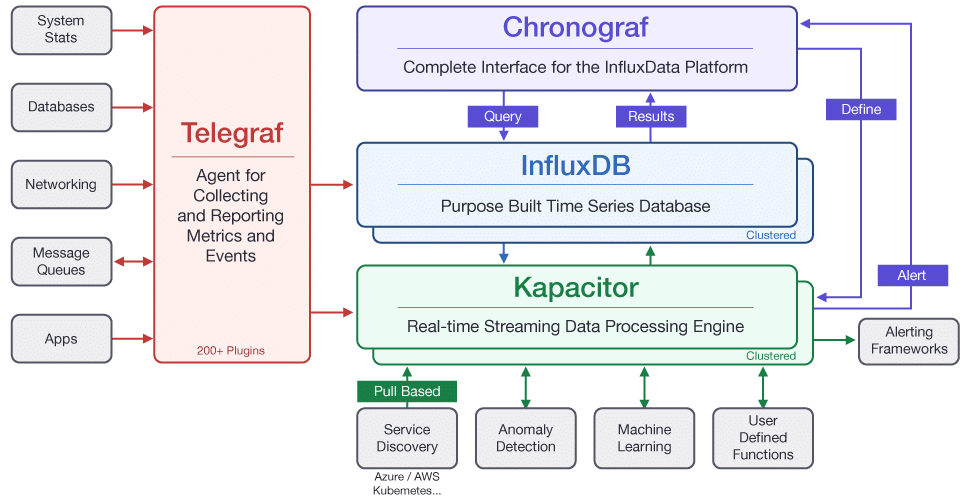
As more and more IoT deployments look to leverage the power of cloud-based solutions, we here at InfluxData have been working closely with Cloud Service Providers to make sure that InfluxDB continues to be the go-to Time Series Database for IoT. Google’s Core IoT platform is no exception, so we’ve built a new Telegraf Plugin for Google Core IoT as well as a complete end-to-end tutorial on deploying your IoT solution using Google Core IoT and InfluxData.
This tutorial will assume that you have an instance of InfluxDB running that is accessible.
We will be also be building and installing a version of Telegraf which supports the Google Core IoT Pub/Sub client. That instance of Telegraf must be running on a publicly accessible internet server that is available with an SSL encryption certificate. Google Pub/Sub can only write to SSL-secured instances of Telegraf.
I’ve got to say a special thanks to the engineers at Google for their assistance in making this happen. Without our close partnership, this would not have been possible.
What You Will Need
As I said, this is a complete tutorial on building an end-to-end IoT application with Google Core IoT, so we will definitely need to build ourselves an IoT device. There are a couple of ways to do this, including not building a device at all, so we will go through all the options.
What you’ll need to complete this tutorial:
You can, of course, run your InfluxDB instance in the Google Cloud, but getting that set up is beyond the scope of this tutorial.
If you want to use real sensor data, you’ll need:
- Raspberry Pi 3 device
- Bosch BME 280 sensor board from Adafruit
- Senseair K30
Otherwise you can use virtual data generated by the application in simulation mode.
All of the code required for this tutorial is available in the following Github repositories:
You will have to build Telegraf from source (from the link above) in order to use this integration, as the plugin is not yet available in an official build of Telegraf just yet. Complete instructions for doing that are included below as well.
IoT Core Setup on the GCP Side
Google Cloud Platform Account
Before you can set up IoT Core, you will need an account with Google. You can start with your Google account, if you have one, or create a new one for this tutorial. Once you have your Google account ready, you will be able to run the gcloud commands below. Alternatively you can use the Google Cloud Console. The instructions for that are in the next section.
Install the ?Google Cloud Command Line Tool
Start by installing the Google Cloud Command Line Tools according to this document from Google. You’ll need to install the components, authenticate to Google Cloud, and create and configure your project:
# gcloud components install beta
# gcloud auth login
# gcloud projects create ? <YOUR_PROJECT_NAME>
# gcloud config set project ? <YOUR_PROJECT_NAME>
# gcloud beta pubsub topics create ? <iot-topic>
# gcloud beta pubsub subscriptions create --topic ? <iot-topic>? ? <iot-subscription>
The Google Cloud IoT platform requires that all communications be secured with SSL/TLS, so you’ll need to generate a Public/Private key pair in order for your device to communicate with the Cloud. First you’ll generate RSA Public and Private keys, and then you will use those keys to send data.
As long as your computer has OpenSSL installed, you can run the following commands to generate the required key files:
# mkdir PemFiles
# cd PemFiles
# openssl req -x509 -newkey rsa:2048 -keyout private_key.pem -nodes -out public_key.pem -subj "/CN=unused"
Now that you have your Public/Private key pair, your can create a device registry and a device.
# gcloud beta iot registries create ?<iot-registry>? --region us-central1 --event-pubsub-topic=?<iot-topic>
# gcloud iot devices create <DEVICE_ID>\
 --project=<PROJECT_ID> \
 --region=<REGION> \
 --registry=<REGISTRY_ID>\
 --public-key path=public_key_file,type=rs256
Note: replace public_key_file with the path to the public key file generated above.
Using the Google Web Console
You will need to login to your Google Cloud Platform account. There’s a great Getting Started Guide to get you started.
Create a Registry
You will need to create a Google Core IoT Registry:
Once you’ve created your Public/Private key pair and cert for your device, you can create a device to write to that registry.
Once you’ve created the device, with the proper security certificate, you can run the client application on that device.
InfluxData Components
This tutorial will assume that you have an instance of InfluxDB running that is accessible.
We will be also be building and installing a version of Telegraf which supports the Google Core IoT Pub/Sub client. That instance of Telegraf must be running on a publicly accessible internet server that is available with an SSL encryption certificate. Google Pub/Sub can only write to SSL-secured instances of Telegraf.
Building InfluxData Telegraf
Right now, the Google Core IoT Plugin for Telegraf has not been released in a ‘released’ version of Telegraf. This is a preview release and hence must be built from source before running.
Prerequisites: Golang
Installing and configuring Go is beyond the scope of this tutorial, but you can find detailed instructions for your operating system here.
Note: It is possible to build Telegraf on your local machine, and run it on your internet-accessible server by setting some GO environment variables which we will also cover later.
Building Telegraf
First, you will want to clone the GoogleIoTCore branch of Telegraf to your machine, then you’ll need to build telegraf:
$ git clone https://github.com/davidgs/telegraf/tree/GoogleIoT
$ cd GoogleIoT
$ make
The above code will build the Telegraf agent for your platform. If you are building on a Mac OS X machine, but plan to run it on a Linux machine, you can still build it locally:
$ export GOOS=linux
$ export GOARCH=amd64
$ make
The above code will build a 64-bit linux version of Telegraf.
Configuring Telegraf
Once you have built telegraf, you will need to create, and then edit, a configuration file to adjust the Google-specific section.
$ telegraf config > telegraf.conf

## Server listens on <server name>:port
## Address and port to host HTTP listener on
service_address = ":9999"
## Path to serve
## default is /write
## path = "/write"
## maximum duration before timing out read of the request
read_timeout = "10s"
## maximum duration before timing out write of the response
write_timeout = "10s"
## precision of the time stamps. can be one of the following:
	# second, millisecond, microsecond, nanosecond
	# Default is nanosecond
precision = "nanosecond"
# Data Format is either line protocol or json
protocol="line protocol"
## Set one or more allowed client CA certificate file names to
## enable mutually authenticated TLS connections
## tls_allowed_cacerts = ["/etc/telegraf/clientca.pem"]
## Add service certificate and key
tls_cert = "/etc/telegraf/cert.pem"
tls_key = "/etc/telegraf/key.pem"
## You **must** provide the certificate and key files!
Once this file is complete, save it to /etc/telegraf/telegraf.conf and then you can start telegraf:
$ sudo telegraf -config /etc/telegraf/telegraf.conf
You can verify that your telegraf agent is listening with
$ netstat -nlp
and look for the output line:
tcp6 129 0 :::9999 :::* LISTEN -
Running the Client App
The client app is also written entirely in Go, so you should be able to run it on virtually any device that supports Golang. For this example, I have been running it on a Raspberry Pi 3, but any device that has a network connection and can run Go code should be fine.
$ git clone https://github.com/davidgs/GoogleIoTClient
$ cd GoogleIoTClient
$ go build GoogleIoT.go
$ ./GoogleIoT -ca_certs roots.pem -device [deviceName] -private_key [privatekey.pem] -project [projectID] -region [region] -registry [registryName] -format json -virtual
The above command (after you replace the values between []s) will publish ‘virtual’ (random) values in JSON format.
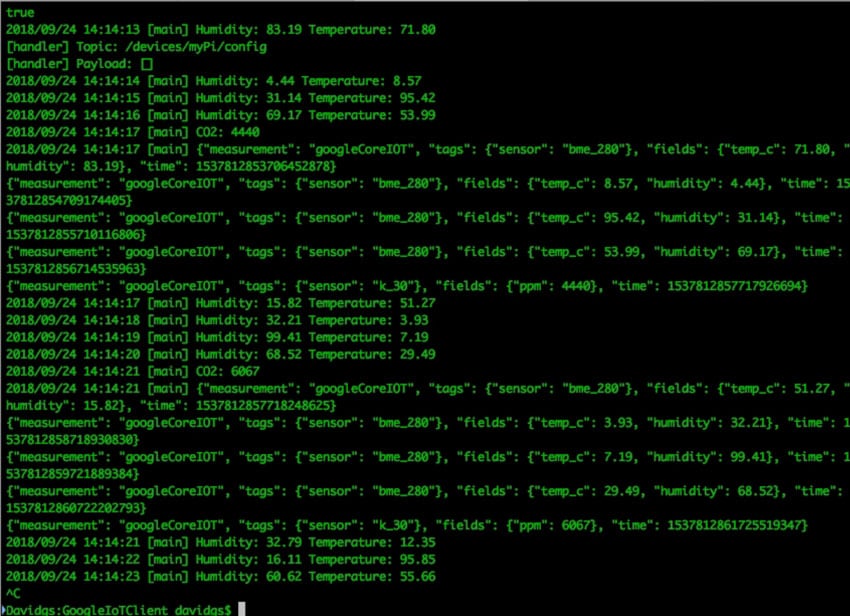
Sample output on device without a K30 sensor:
$ ./GoogleIoT -ca_certs roots.pem -device [deviceName] -private_key [privatekey.pem] -project [projectID] -region [region] -registry [registryName] -format line
Would publish live sensor data (assuming you have the above-mentioned sensors) in Line Protocol format and show the following output:
2018/09/15 12:45:58 [main] Humidity: 66.24 Temperature: 22.56
2018/09/15 12:45:59 [main] Humidity: 66.26 Temperature: 22.56
2018/09/15 12:46:01 [main] Humidity: 66.24 Temperature: 22.57
2018/09/15 12:46:02 [main] Humidity: 66.23 Temperature: 22.56
2018/09/15 12:46:04 [main] testingGoogle,sensor=bme_280 temp_c=22.56,humidity=66.24 1537029958025504878
testingGoogle,sensor=bme_280 temp_c=22.56,humidity=66.26 1537029959527147539
testingGoogle,sensor=bme_280 temp_c=22.57,humidity=66.24 1537029961028724629
testingGoogle,sensor=bme_280 temp_c=22.56,humidity=66.23 1537029962530306772
Note that the output is 4 lines of Influx Line Protocol, so 4 temp and humidity points are written with each iteration.
This writes data to the Google Core IoT MQTT broker, which then sends it to the Google Pub/Sub agent, which pushes to Telegraf (using GoogleIoT branch of Telegraf from davidgs)
Seeing the Results
If you’ve gotten everything configured correctly, and are running the client app, you should be able to launch Chronograf and see data streaming in to the database in real time.
You now have a complete, end-to-end data pipeline from device to Google Core IoT and into InfluxDB for your IoT sensor data!
Acknowledgements
Thanks to article from Daz Wilkins for 90% of the code! Couldn’t find it on his Github, so … good developers copy, great developers paste. :-)
