InfluxDB 2 Migration Path: Instrumentation
By
David Flanagan
Product
Use Cases
Developer
Aug 15, 2019
Navigate to:
InfluxDB 2 and our SaaS offering, InfluxDB Cloud 2, are right around the corner. While we’re finalizing the last of our wonderful updates to give you the InfluxDB 2 experience you deserve, we’re going to talk to you about migration paths.
This article is part of a series. This installment will cover migrating existing instrumentation in your applications with the InfluxDB 1 client libraries to InfluxDB 2 with NO code changes.
The official migration path
InfluxDB 2 will ship with a compatibility mode for InfluxDB 1, but this will come later in the year closer to our first GA release of InfluxDB 2. This means that you’ll still be able to utilize the client libraries for v1 when using v2, at least in a limited capacity. As that isn’t available right now, we can do something pretty similar, using Telegraf; and that’s what I want to talk about today.
But before we get to that, let’s talk about client libraries.
Client libraries
Our CTO Paul Dix has previously mentioned that we’ll be creating, maintaining, and supporting our own official client libraries for InfluxDB 2! While there are some client libraries for InfluxDB 1 under the InfluxData banner on GitHub, these are often maintained by external contributors and the APIs can vary greatly. With InfluxDB 2, we’re going to take a much more active role in the progression and maintenance of the client libraries.
Of course, these aren’t available at this moment in time either; but on (or near) the launch of 2.0, we plan to support dotNet, Go, Java, JS, PHP, Python and Ruby.
So how can you start instrumenting your applications for InfluxDB 2 in the meantime?
Introducing Telegraf
Well
obviously Telegraf needs no introduction
but, more often than not, people don’t quite understand the width and breadth of the plugins available. Case in point: did you know Telegraf has an input plugin called influxdb_listener? This plugin allows Telegraf to provide an InfluxDB 1 /write compatible proxy.
???? Woah ????
Caveats
There are a few things worth noting before you get too excited. Firstly, it really is just the /write path. This will not allow you to read from InfluxDB, should you be using any of the client libraries for that purpose. CREATE DATABASE requests will respond with a 200 OK but nothing is actually executed on the remote InfluxDB server; only the Telegraf plugin can determine which database you can write to. More about this shortly.
The migration path
Let’s get down to details and look at your current, assumed and estimated, architecture.
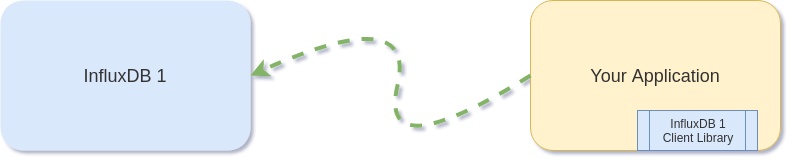 <figcaption> Writing to InfluxDB 1</figcaption>
Nice and simple. You’ve got one of our client libraries in your application and you’re using it to write directly to InfluxDB 1.
Now, we want to change as few pieces as possible. So instead of writing to InfluxDB 1, we’re going to bring in Telegraf to sit in the middle and proxy our requests. Depending on the volume you’re sending through to InfluxDB, it’s up to you on how to deploy this Telegraf.
Common scenarios are:
- Telegraf on every host (or DaemonSet)
- Telegraf sidecar (Kubernetes)
- Centralized Telegraf service
 <figcaption> Writing to InfluxDB 2 with InfluxDB 1 client libraries through Telegraf</figcaption>
If you’re running Telegraf in a container, be sure to check out my Bring Your Own Telegraf work.
Configuring Telegraf
The first step is to enable the influxdb_listener plugin and get it configured. You can do that with the following:
[[inputs.influxdb_listener]]
  ## Address and port to host HTTP listener on
  service_address = ":8086"
This is the simplest setup with no authentication, but we don’t recommend running InfluxDB this way. So in order to configure authentication, you can provide TLS and basic authentication details within your Telegraf configuration:
[[inputs.influxdb_listener]]
  ## Set one or more allowed client CA certificate file names to enable mutually authenticated TLS connections
  tls_allowed_cacerts = ["/etc/telegraf/clientca.pem"]
  ## Add service certificate and key
  tls_cert = "/etc/telegraf/cert.pem"
  tls_key = "/etc/telegraf/key.pem"
  ## Optional username and password to accept for HTTP basic authentication.
  ## You probably want to make sure you have TLS configured above for this.
  basic_username = "foobar"
  basic_password = "barfoo"
Now when you run Telegraf, it will accept InfluxDB 1 write requests on the configured port.
???? Sweet! ????
Now to configure our InfluxDB 2 output. Again, Telegraf makes this trivial:
[[outputs.influxdb_v2]]
    ## The URLs of the InfluxDB cluster nodes.
    ## Multiple URLs can be specified for a single cluster, only ONE of the
    ## urls will be written to each interval.
    urls = ["http://127.0.0.1:9999"]

    ## Token for authentication.
    token = ""

    ## Organization is the name of the organization you wish to write to.
    organization = ""

    ## Destination bucket to write into.
    bucket = ""
Simple!
But wait, there's more!
Why stop there? Did you know you can use Telegraf to combi-write? There’s no need to migrate entirely to InfluxDB 2, because who would do that while we’re still in alpha, amirite?
Why not write to InfluxDB 1, InfluxDB 2, and InfluxDB Cloud 2 … with no code changes whatsoever?
To do so, just configure multiple output plugins.
[[outputs.influxdb_v2]]
    # As above
[[outputs.influxdb_v2]]
    # Configure for Cloud 2 (See your settings page)
[[outputs.influxdb]
    # As you currently have right now
????????????
There you have it, a pain-free way to give InfluxDB 2 a try without changing a single line of code.
Until next time ????????????
?? Did you know our SaaS offering, Cloud 2, has a fantastic free tier? ??
