Mineflux: Building a Telegraf Plugin to Collect Data from Your Minecraft Server
By
Adam Perlin
Product
Use Cases
Developer
Aug 10, 2017
Navigate to:
Written by Ayrdrie Palmer & Adam Perlin
Translated into Japanese by Atsushi Fujiwara
Overview
Our first week at InfluxData was spent learning InfluxDB, the database behind InfluxData. We were told how simple the other components were to use so we decided to test this claim by writing a Telegraf plugin then use it to gather metrics and events to feed into InfluxDB and visualize in Chronograf. Telegraf is a Go agent that is a part of InfluxData that is responsible for collecting, processing, aggregating, and writing metrics into InfluxDB. We were excited that this opportunity would provide us the chance to exercise our Go skills, but first we needed something to collect data from. And the idea came pretty quickly to us, since here at InfluxData, Minecraft is one of the online games of choice. We even have a company Minecraft server where remote employees can interact with employees at the main office.
Although it may not be obvious to the average player, Minecraft is actually rife with opportunities to collect statistics. The game itself has a lot of numeracy; one can measure anything from a player’s oxygen level to the total number of cows killed. We figured that writing a plugin for Minecraft would be a simple start to learning how to write a plugin and would be fun for the whole office to use. If you’re interested in setting up the TICK stack for measuring your Minecraft statistics, read on!
How to Write a Telegraf Plugin
First, we had to figure out how to pull data from Minecraft. We decided on using the RCON protocol (which will be described shortly). The protocol allows clients to scrape output of specific in-game commands on a server. However, this output was not formatted in a convenient way, and we quickly realized that most of the work of writing the plugin would be in parsing through this data. This data processing was the hard part of building the Telegraf plugin.
The easy part was using Telegraf itself. Once the data processing code was written, all we had to do was transfer our code into an interface that Telegraf could recognize and create a config file with the necessary plugin options.
How Does The Minecraft Telegraf Plugin Work?

The plugin uses the RCON (Remote CONsole) protocol in order to gather data from a Minecraft server. RCON was originally developed by Valve for use in their own game servers, but has become a widely adopted method of game server communication. RCON allows server owners to use an in-game console even if they do not have access to the server itself.
Its use in Minecraft is no different. Minecraft already has an advanced in-game console system (many know of it because it’s how cheats are performed!) that allows players to enter commands to change the behavior of the world. For instance, the following command sets the current time to daybreak:
/time set 0Very useful when under attack by nasty mobs.
In addition to these world-altering commands, Minecraft has a built-in scoreboard which can be accessed in-game using the /scoreboard family of commands.
The Minecraft scoreboard allows server admins to track players’ achievements in a number of different ways. For instance, an admin could choose to track the number of kills for each player, or the number of diamond pickaxes in players’ inventories.
Server admins can also add tracking of specific statistics (called “Objectives” in game) which Minecraft will track internally and add to the scoreboard.
To add an objective which tracks players’ jumps, you could use the below command:
/scoreboard objectives add jump stat.jump/scoreboard objectives add
allows admins to insert objectives into the scoreboard.
The next argument in the command above, jump, is an alias for the statistic to be tracked. The last argument is the actual statistic itself.
Another example might be:
/scoreboard objectives add pickaxe stat.useItem.iron_pickaxeThis would add the objective pickaxe, tracking the number of times players use iron pickaxes.
Here is a list of “general” scoreboard stats
And a detailed list of all scoreboard criteria
How Do I Track My Own Minecraft Stats?
For this blog, you will need the following set of binaries installed: InfluxDB Telegraf Chronograf
InfluxDB, Telegraf, and Chronograf can be downloaded for your respective platform.
This blog assumes you have the binaries for all three in your $PATH.
Step 1: Prep Your Minecraft Server
You’ll need to take a few steps to make sure your Minecraft server is ready for RCON connections.
Add the following (replacing dummy fields password and port with actual data) to your minecraft server’s server.properties file.
enable-rcon=true
rcon.password=
rcon.port=<1-65535>
This enables the RCON protocol, sets a password for clients to authenticate with, and selects a port for RCON to listen on.
Step 2: Run InfluxDB
Assuming InfluxDB is installed locally and in your path, you can start it by simply running:
$ influxdCheck out this guide for getting InfluxDB up and running as service. It will instruct you on how to install it if you haven’t already.
Step 3: Set Up a Telegraf
Find a suitable directory for your TICK stack, and then run the following command to generate a template config file with the Minecraft plugin enabled:
$ telegraf --sample-config --input-filter minecraft --output-filter influxdb > minecraft.confNext, you’ll need to fill out the configuration file according to your needs.
Navigate to the [[outputs.influxdb]] section of the configuration file:
[[outputs.influxdb]]
 ## The HTTP or UDP URL for your InfluxDB instance. Each item should be
 ## of the form:
 ## scheme "://" host [ ":" port]
 ##
 ## Multiple urls can be specified as part of the same cluster,
 ## this means that only ONE of the urls will be written to each interval.
 # urls = ["udp://localhost:8089"] # UDP endpoint example
 urls = ["http://localhost:8086"] # required
Change urls to the ip/port where your instance of influxd is running. The default localhost:8086 should be fine if you’re running influxd directly on your local machine, but you’ll have to change this field to the IP of your cluster/container/remote server if you have a different setup.
Next, navigate down to the [[inputs.minecraft]] section of the config file, and fill in the server , port , and password fields. Make sure to uncomment them by removing the “#”. This section of the config should contain much of the same information as your minecraft server.properties file.
[[inputs.minecraft]]
 # server address for minecraft
 server = "localhost"
 # port for RCON
 port = "25575"
 # password RCON for mincraft server
 password = "replace_me"
Once the config file has been modified to suit your needs, run the below command. This will start the Telegraf service with the Minecraft plugin as data input.
$ telegraf --input-filter minecraft --config minecraft.confIf you encounter any errors at this point, either influxd isn’t running, or you didn’t set it up correctly in the configuration file.
From this point on, the Telegraf service will continually poll your Minecraft server scoreboard, and will write those datapoints into InfluxDB.
Step 4: Take a Look at Your Data!
To view/analyze your Minecraft data, you can use Chronograf. If you’ve been following the blog thus far, you should have it installed already. For a detailed walkthrough of a Chronograf setup, take a look at the documentation.
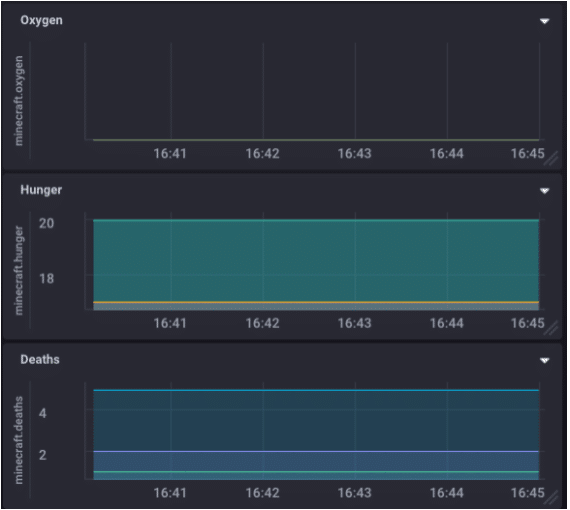
Once Chronograf is connected to your InfluxDB instance, you can create some dashboards. Here, we’ve created three graphs on our dashboard. They measure player oxygen level, player hunger level, and number of player deaths respectively. For an excellent guide on how to create dashboards.
 Here’s an example of building a query which measures the number of player jumps:
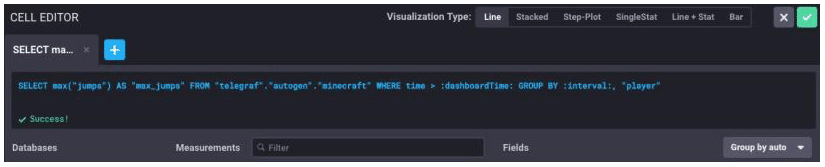
A note on how Minecraft data is stored in the database:
The data is indexed by Minecraft server and player, and the fields share the same name as the statistic aliases you set when you added the objectives.
An example datapoint in InfluxDB’s line protocol might look like:
minecraft,player=notch,server=127.0.0.1:25575 jumps=178i 1498261397000000000A Note on Telegraf Ease of Use
We started out unfamiliar with the components of the TICK stack, yet we were able to write a Telegraf plugin over the course of just 5 days, with the majority of that time spent writing data processing code, not figuring out how to use Telegraf. Furthermore, Minecraft servers return data in a format which is not particularly suitable for storage in any database, so we had to do a lot of parsing to scrape out the important parts. Without this extra boilerplate, the plugin could probably have been written in 3 days or less. We feel that this experience proves that Telegraf provides a minimal interface which is unobtrusive and easy to build around, making this seemingly difficult task that much simpler.
Step 5: Enjoy!
Add as many objectives as you want. Track them all in Chronograf if you please. This plugin is purely meant to demonstrate that Telegraf is an easy framework to use, and seamlessly integrates with the TICK stack. Though the usage case of collecting Minecraft statistics might not be entirely evident, we thought it would be a fun way to show just how powerful Telegraf can be.
If you’re interested to learn more about the TICK stack, download it for free and try it out for yourself.
Telegraf InfluxDB Chronograf Kapacitor
If you’re interested in the plugin code itself, check out our github repo (and feel free to contribute):
https://github.com/influxdata/telegraf/tree/master/plugins/inputs/minecraft
