Quix Community Plugins for InfluxDB: Build Your Own Streaming Task Engine
By
Jay Clifford
Oct 18, 2023
Product
Navigate to:
With our plans for InfluxDB 3.0 OSS laid out, both myself and the rest of the DevRel team have been actively searching for ecosystem platforms that would be logical integrations for the future of InfluxDB. One of these platforms is Quix!
Quix is a comprehensive solution tailored for crafting, launching, and overseeing event streaming applications using Python. If you’re looking to sift through time series or event data in real-time for instant decision-making, Quix is your go-to. What we discovered is that it makes a great alternative task engine for InfluxDB 3.0. If you would like to see our initial project with Quix to create an anomaly detection pipeline, check out this blog.
Progressing from this, we are extremely pleased to announce the release of two InfluxDB Community plugins for Quix. In this blog post, we will break down what each plugin does and provide an example of a use case you can try out yourself.
The plugins
The community contributions comprise two plugins:
- InfluxDB Source: This plugin allows users to query InfluxDB 3.0 using Apache Arrow Flight on a user-defined interval, parse the data into a pandas DataFrame, and publish to a Quix stream topic.
- InfluxDB Destination: This plugin allows users to ingest a DataFrame from a Quix stream topic, and define its structure (measurement and tags) before writing the data to an InfluxDB instance (this is compatible with both InfluxDB 2.x and 3.x).
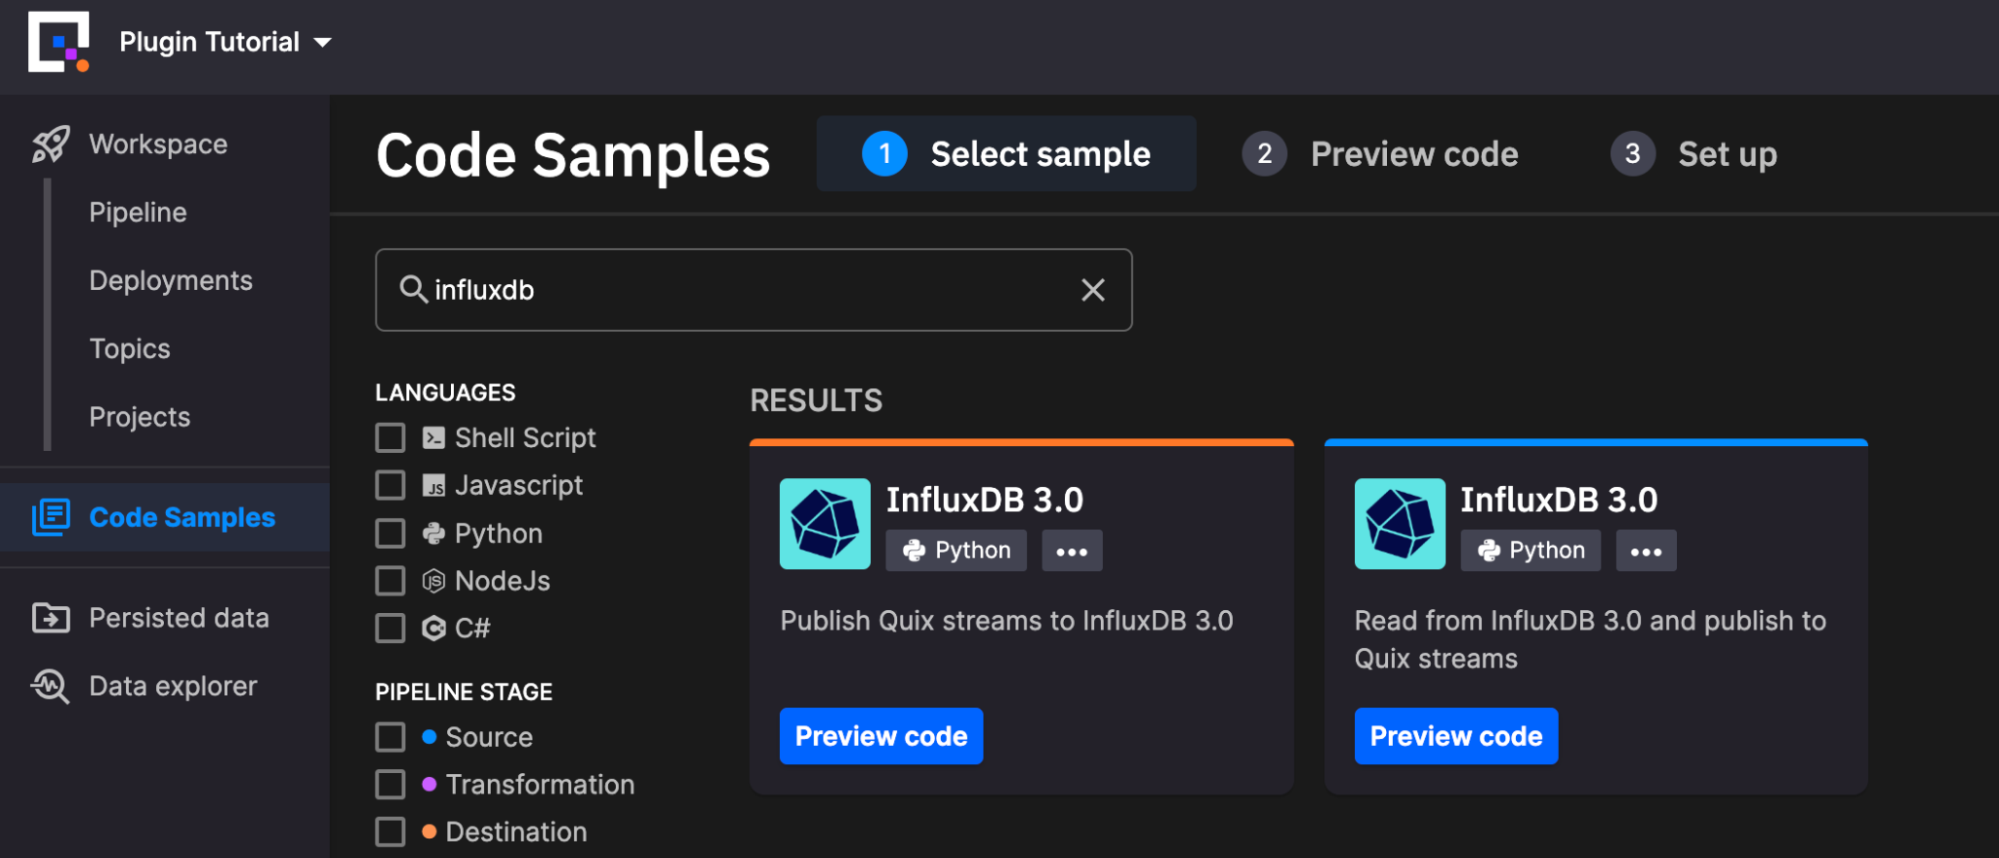
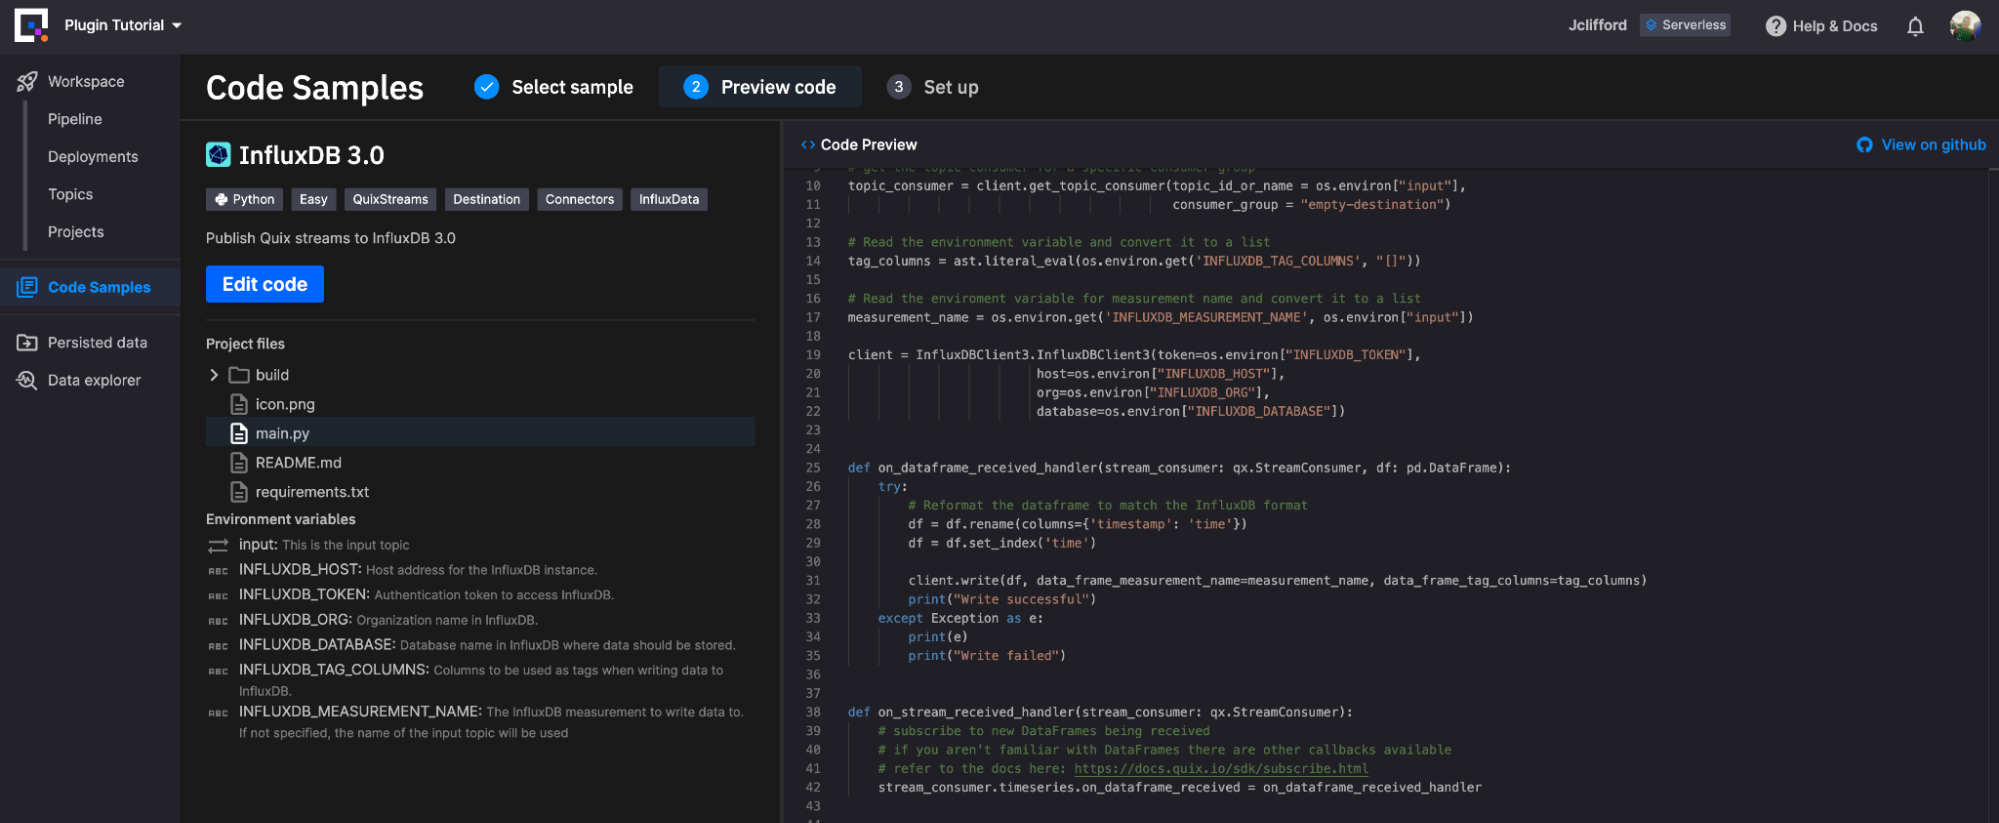
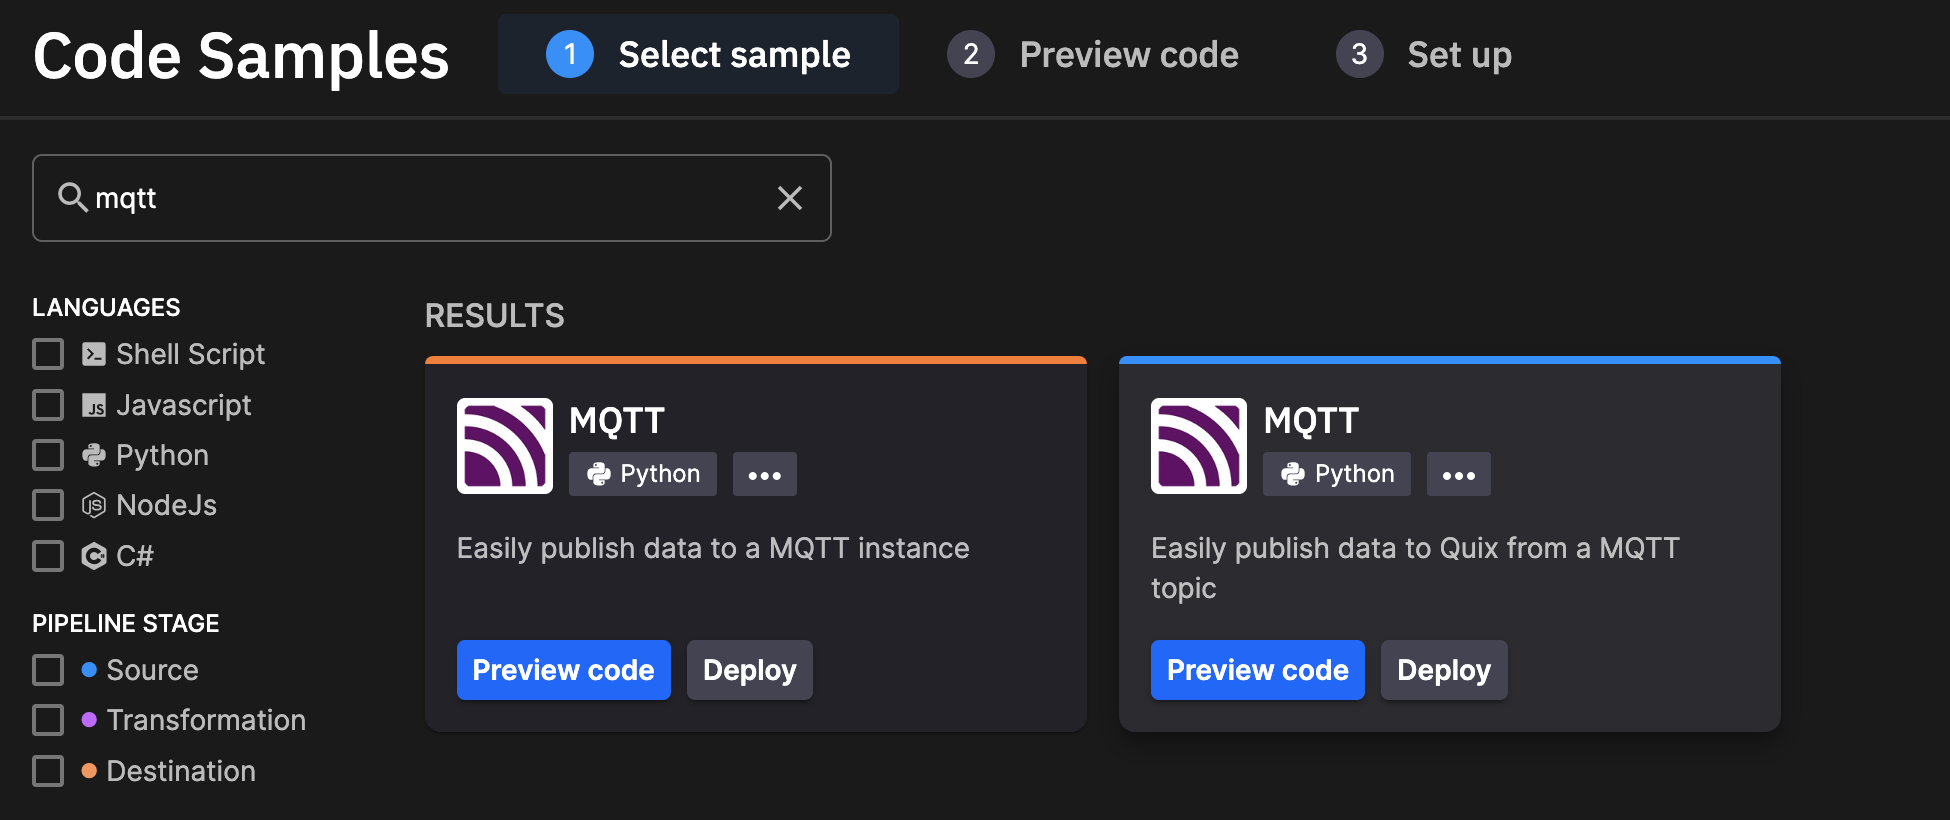
You can find these plugins in the Quix platform by navigating to “Code Samples” via the menu on the left and searching for “InfluxDB”. Let’s take a look at the configuration of each of these plugins individually.
InfluxDB Source
InfluxDB Source is a Python-based plugin, so within the Quix environment it’s highly customizable based on your needs. You may simply edit the Python script within their cloud-based editor before deployment. Let’s start with an overview of the “out of the box” plugin.

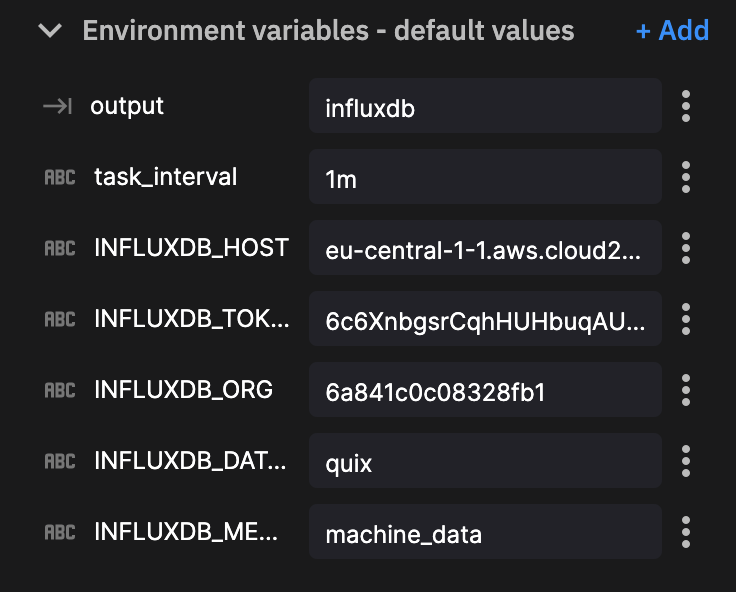
The InfluxDB Source plugin requires the following environment variables to be defined in order to run:
- output: This is the output topic that will receive the stream (Default: influxdb, Required: True)
- task_interval: Interval to run query. Must be within the InfluxDB notation; 1s, 1m, 1h, 1d, 1w, 1mo, 1y (Default: 5m, Required: True)
- INFLUXDB_HOST: Host address for the InfluxDB instance. (Default: eu-central-1-1.aws.cloud2.influxdata.com, Required: True)
- INFLUXDB_TOKEN: Authentication token to access InfluxDB. (Default:
<TOKEN>, Required: True) - INFLUXDB_ORG: Organization name in InfluxDB. (Default:
<ORG>, Required: False) - INFLUXDB_DATABASE: Database name in InfluxDB where data is stored. (Default:
<DATABASE>, Required: True) - INFLUXDB_MEASUREMENT_NAME: The InfluxDB measurement to read data from. If not specified, the name of the output topic will be used (Default:
<INSERT MEASUREMENT>, Required: True)
Once these parameters are set the script will run as follows:
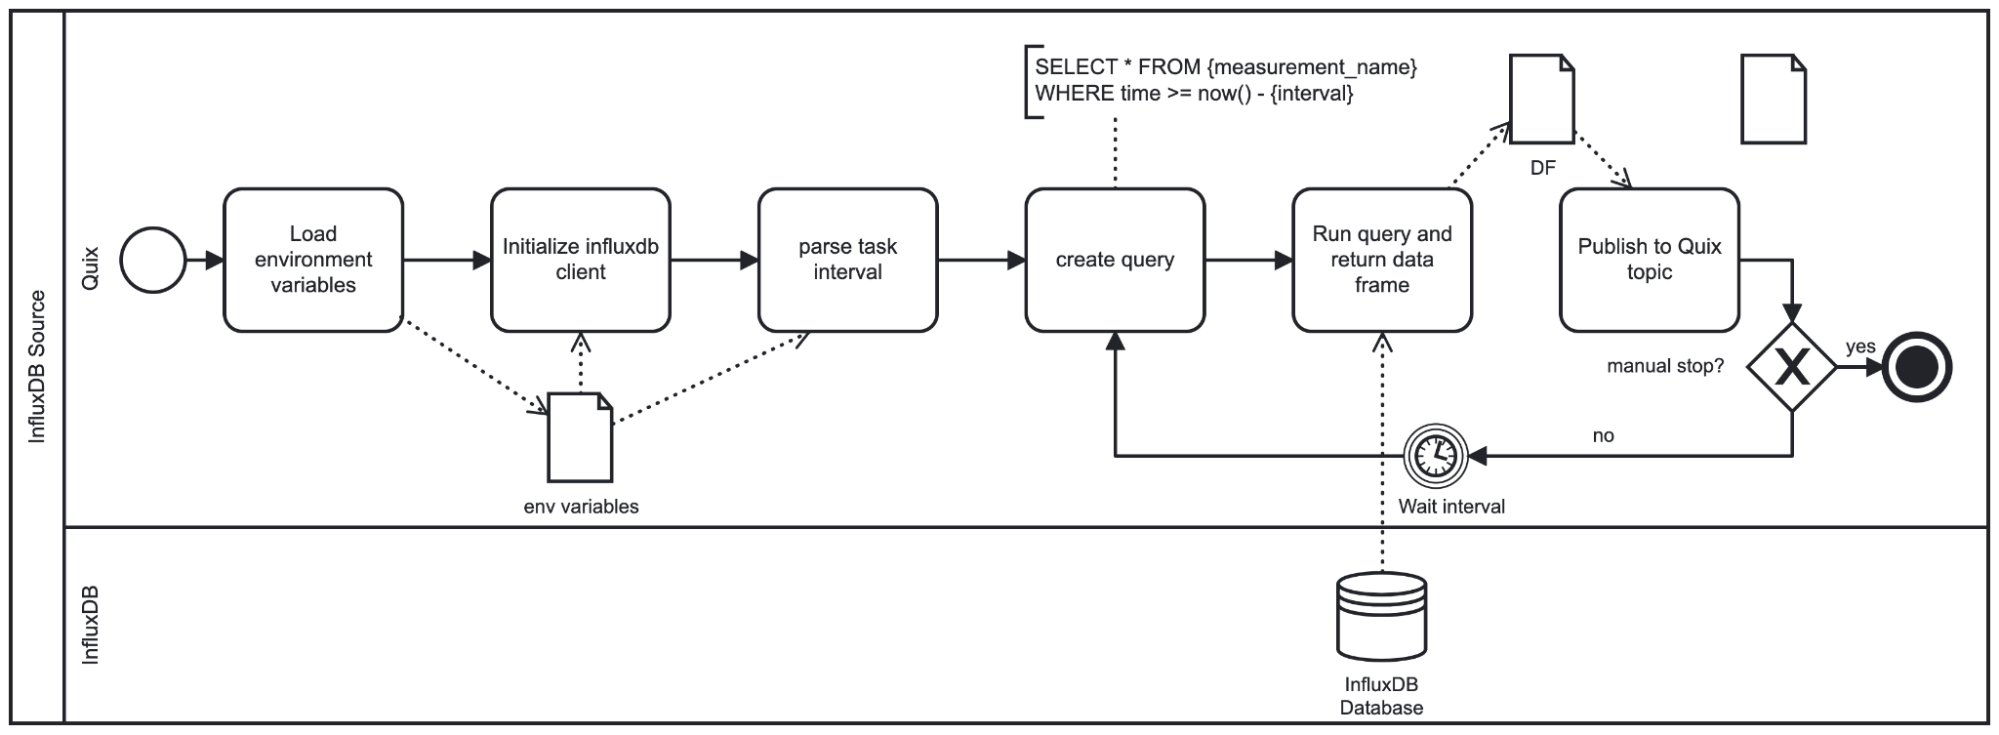
As seen in the diagram, this plugin loops until shutdown. Based on the provided interval the script sleeps before repeating the query. The interval is also used to formulate the query since we will query only the latest data based on how long the plugin has slept for. Note that the plugin pushes the resulting data using the DataFrame format.
InfluxDB Destination
The InfluxDB Destination plugin – like the Source plugin, is purely Python-based – enables you to customize how the plugin writes data to InfluxDB (a feature we will use in the demo). For now, let’s start with another overview of the “out of the box” plugin.
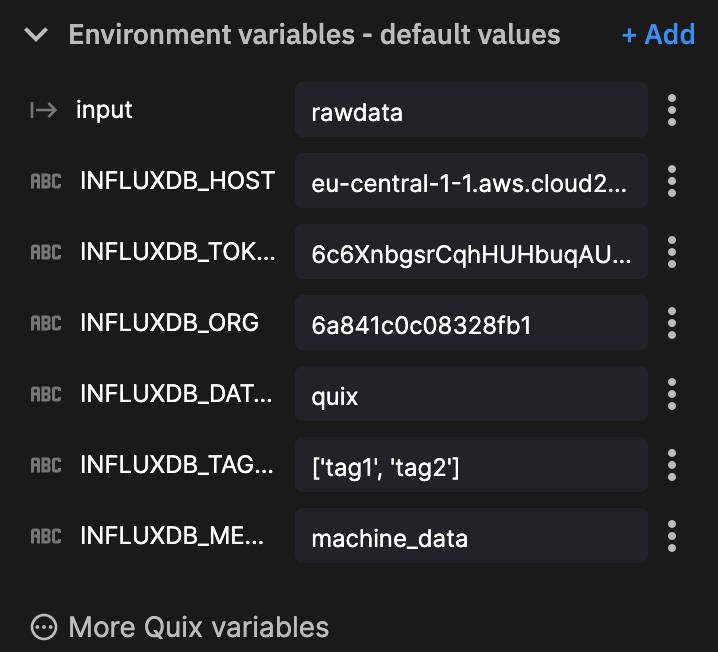
The InfluxDB Destination plugin requires you to define the following environment variables in order to run:
- input: This is the input topic (Default: detection-result, Required: True)
- INFLUXDB_HOST: Host address for the InfluxDB instance. (Default: eu-central-1-1.aws.cloud2.influxdata.com, Required: True)
- INFLUXDB_TOKEN: Authentication token to access InfluxDB. (Default:
<TOKEN>, Required: True) - INFLUXDB_ORG: Organization name in InfluxDB. (Default:
<ORG>, Required: False) - INFLUXDB_DATABASE: Database name in InfluxDB where data should be stored. (Default:
<DATABASE>, Required: True) - INFLUXDB_TAG_COLUMNS: Columns to be used as tags when writing data to InfluxDB. (Default:
['tag1', 'tag2'], Required: False) - INFLUXDB_MEASUREMENT_NAME: The InfluxDB measurement to write data to. If not specified, the name of the input topic will be used. (Default:
<INSERT MEASUREMENT>, Required: False)
Once these parameters are set the script will run as follows:
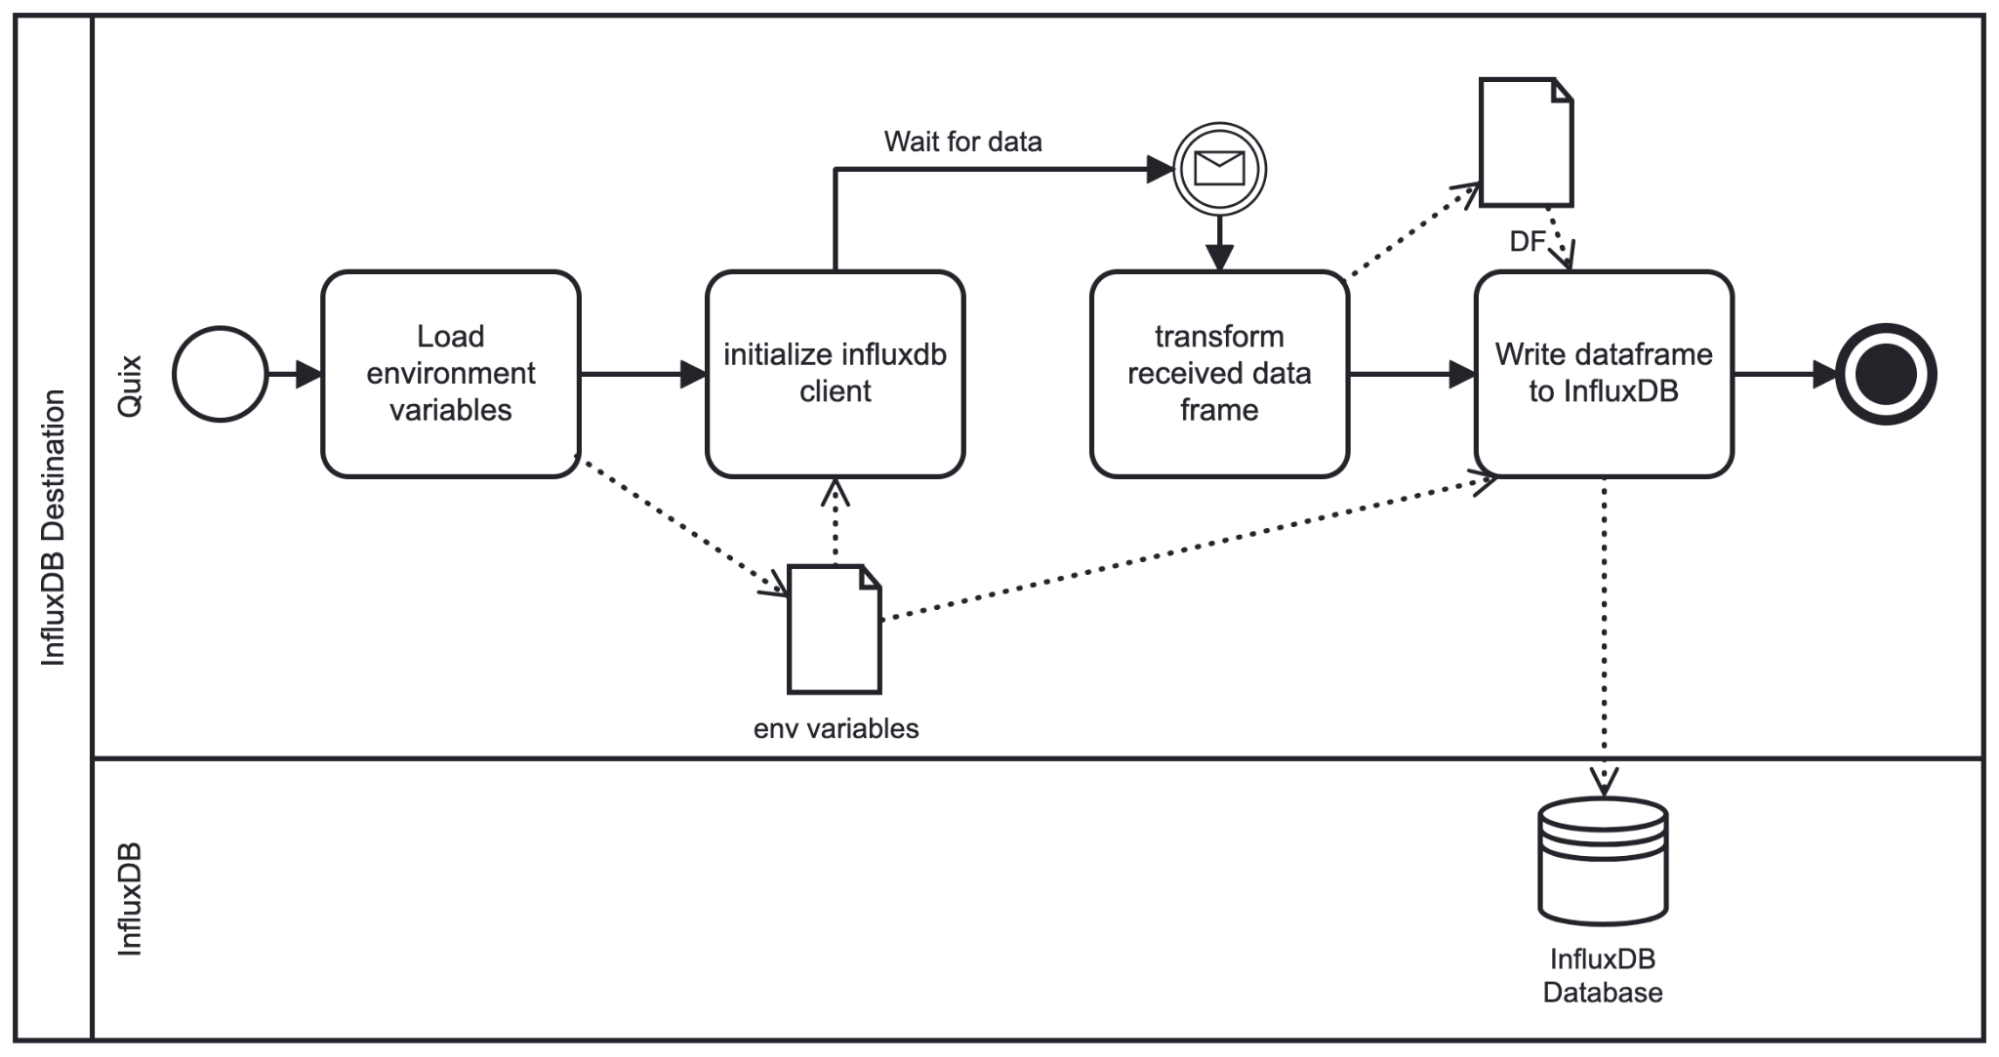
As the diagram shows, on startup the script loads the given environment variables and initializes the InfluxDB Client. It then waits for the chosen topic to stream data to the plugin. The streamed data is received as a pandas DataFrame so we need to apply some basic transformations (rename time column, set time as index) before writing to InfluxDB. From there, we write the DataFrame to InfluxDB based upon the schema specified within the environment variables.
The demo
Now that we have discussed each plugin and its respective design, let’s apply them to an industrial IoT use case.
In this example, we have three machines on a production line producing sensor data and writing to an MQTT broker (for this use case we are using HiveMQ). The payload for each machine is within a JSON structure which looks like this.
{"metadata": {"machineID": "machine1", "barcode": "31856669", "provider": "Miller-Phillips"}, "data": [{"temperature": 40}, {"load": 100}, {"power": 204}, {"vibration": 90}]}We will start by connecting the Quix MQTT client to the HiveMQ broker.
MQTT Client -> Quix -> InfluxDB
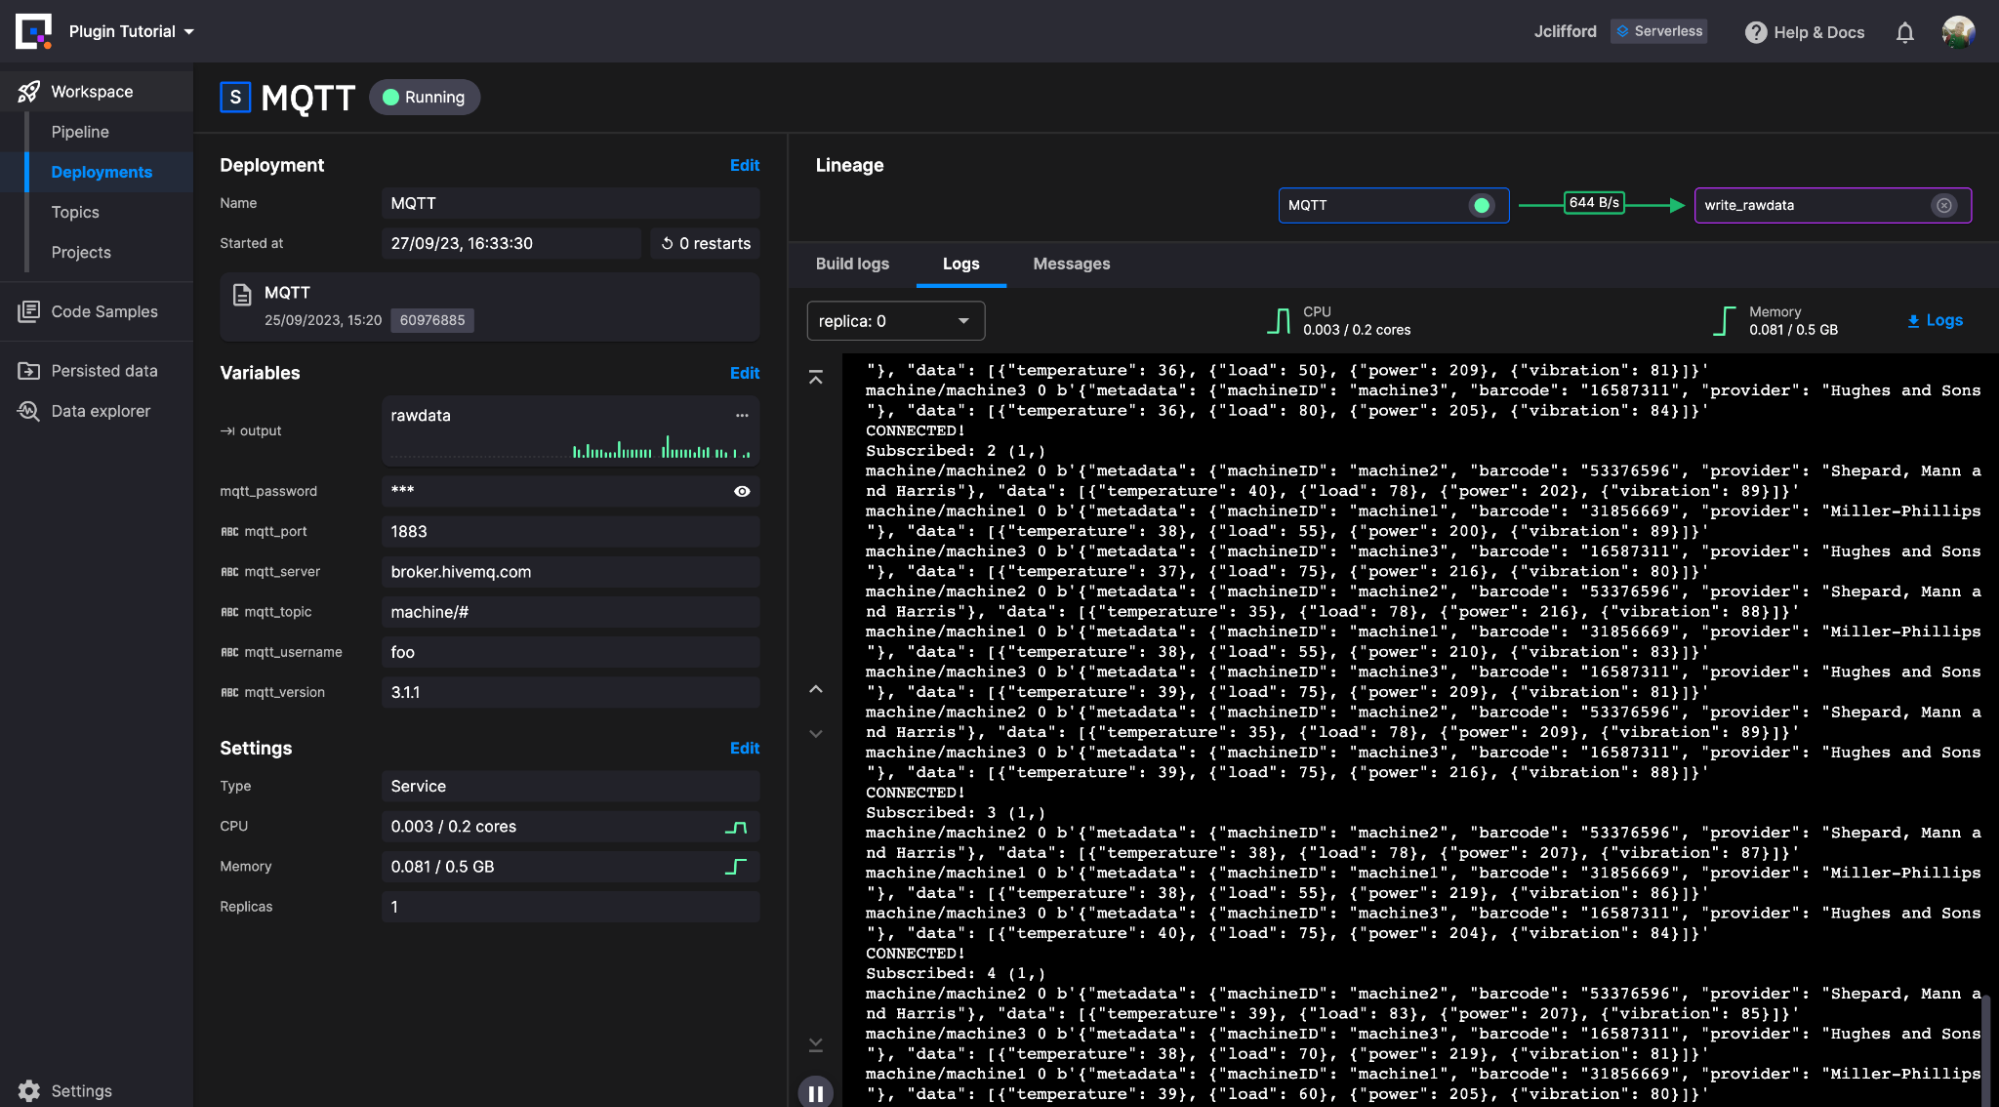
First, I located the MQTT plugin, which connects to the broker and writes the data to a Quix Stream (the one on the right).
On inspection of the code, I realized I needed to make a minor code change because I was connecting to a broker that didn’t require TLS authentication. I needed to remove these lines:
# we'll be using tls
mqtt_client.tls_set(tls_version = mqtt.client.ssl.PROTOCOL_TLS)
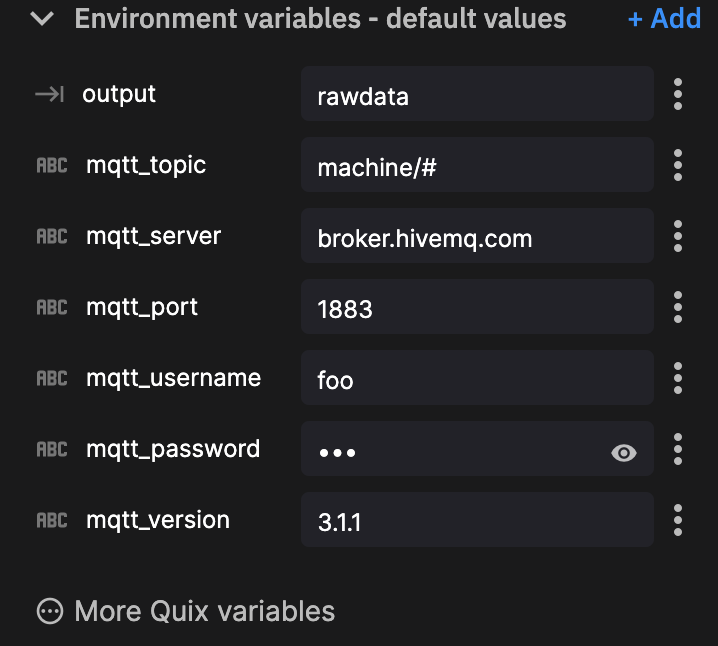
mqtt_client.username_pw_set(os.environ["mqtt_username"], os.environ["mqtt_password"])Next, I used the provided environment variables to establish my connection to the broker.
Then click new deployment. Configure our resource limits (default is fine) and click deploy. With that our first stage is complete.
Next, we need to write this data to InfluxDB. For this, we make use of the new destination plugin with some alterations.
We follow a similar process to select the InfluxDB 3.0 destination plugin and generate a project. Now we have a slight issue to overcome. Currently, the destination plugin only supports ingesting Quix DataFrames. In our case, we are writing Event Data in JSON. So we need to write a small transformation function for event-based data, which you can see here:
def on_event_data_received_handler(stream_consumer: qx.StreamConsumer,data: qx.EventData):
    with data:
        jsondata = json.loads(data.value)
        metadata = jsondata['metadata']
        data_points = jsondata['data']
        fields = {k: v for d in data_points for k, v in d.items()}
        timestamp = str(data.timestamp)

        point = {"measurement": measurement_name, "tags" : metadata, "fields": fields, "time": timestamp}

        print(point)
        client.write(record=point)

def on_stream_received_handler(stream_consumer: qx.StreamConsumer):

    # subscribe to new DataFrames being received
    # if you aren't familiar with DataFrames there are other callbacks available
    # refer to the docs here: https://docs.quix.io/sdk/subscribe.html
    stream_consumer.timeseries.on_dataframe_received = on_dataframe_received_handler

    stream_consumer.events.on_data_received = on_event_data_received_handler
The majority of the code you will use is already there. The main element we added was the on_event_data_received_handler. Now that we have done this, we define our environment variables like we did for the MQTT connector.
A note on two of these environment variables:
- You can modify
InfluxDB_tokento a secure environment variable to secure your token. - We are not using
InfluxDB_tagin this example because we are using the metadata within our JSON payload as our tags.
Click on new deployment. Configure our resource limits (default is fine) and click deploy.
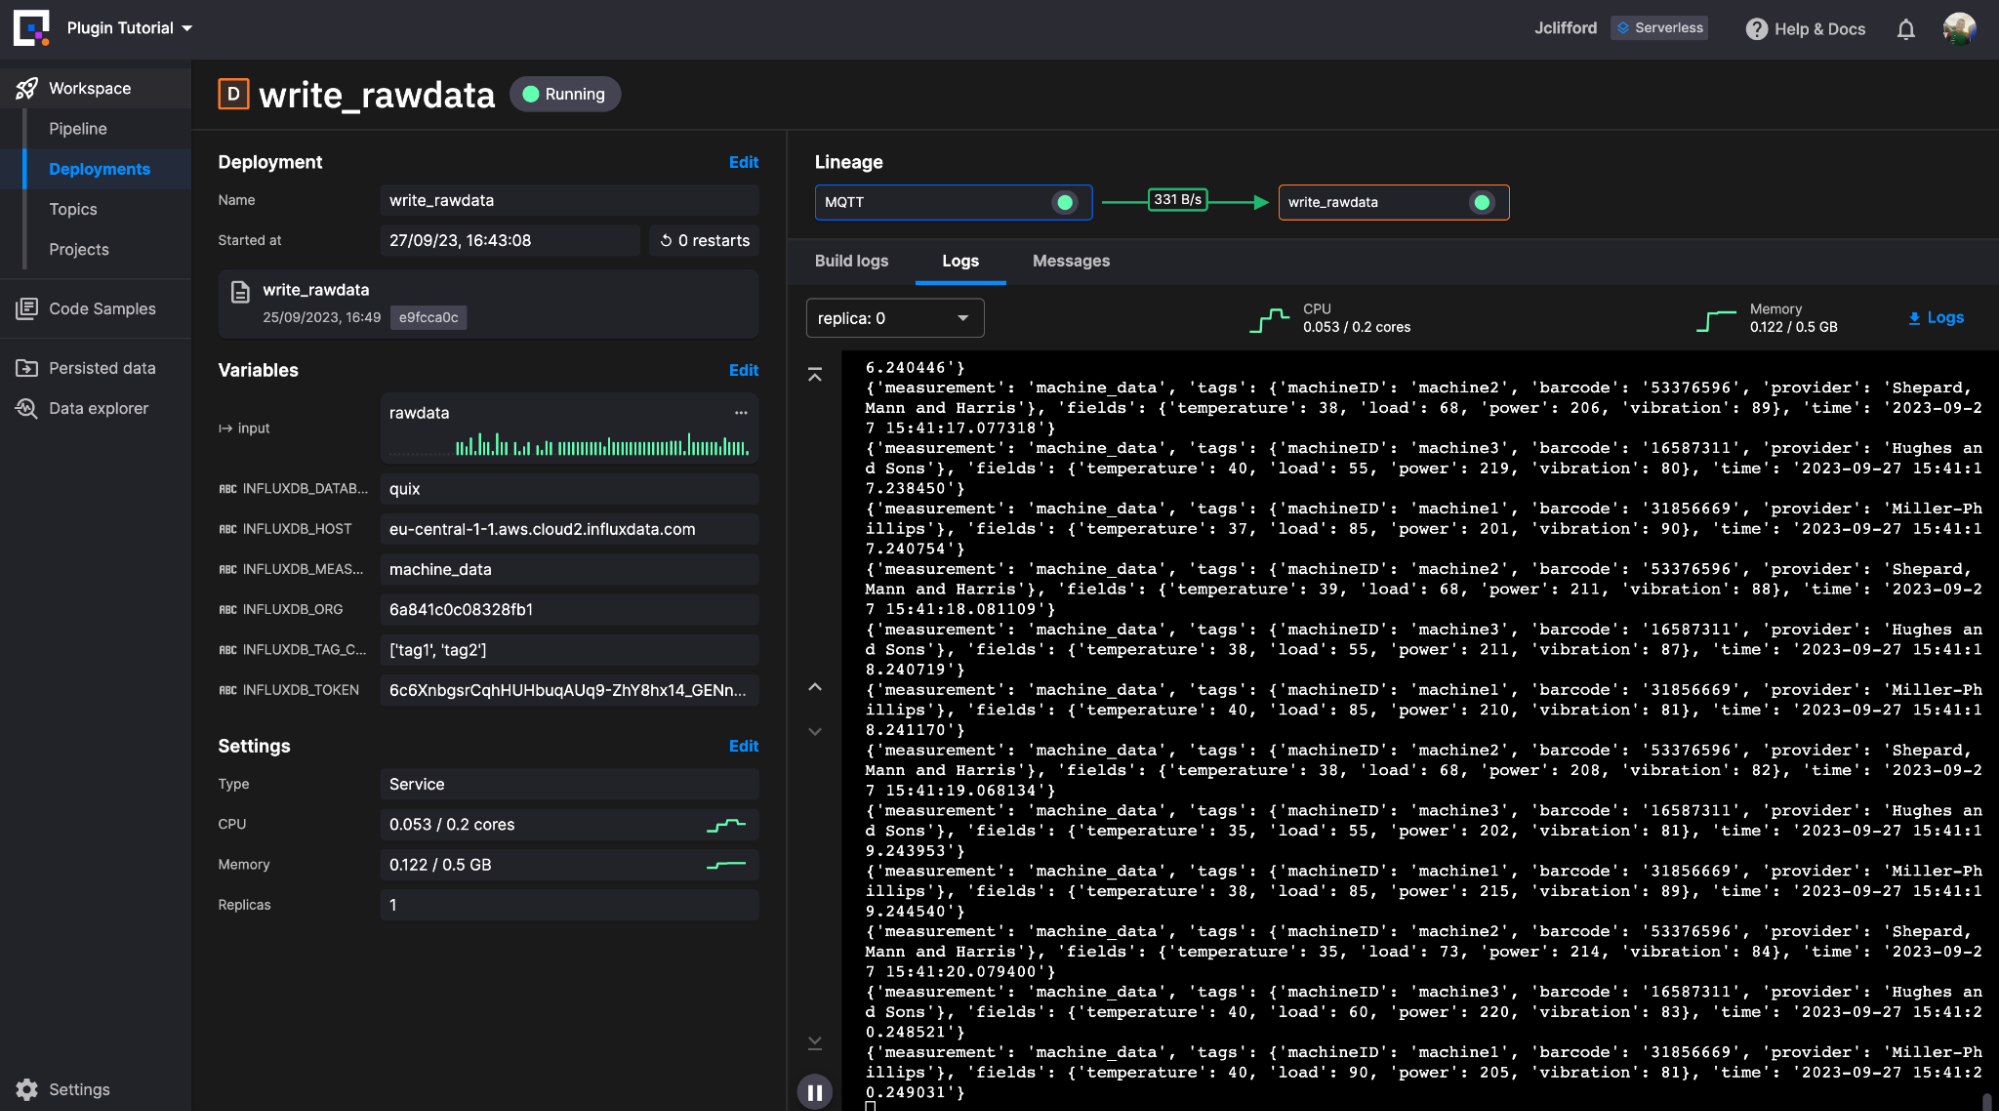
We are now writing raw machine data to our chosen measurement within InfluxDB. Let’s move on to how we can utilize Quix as a task-based engine to transform our stored raw data.
InfluxDB -> Quix (Transform) -> InfluxDB
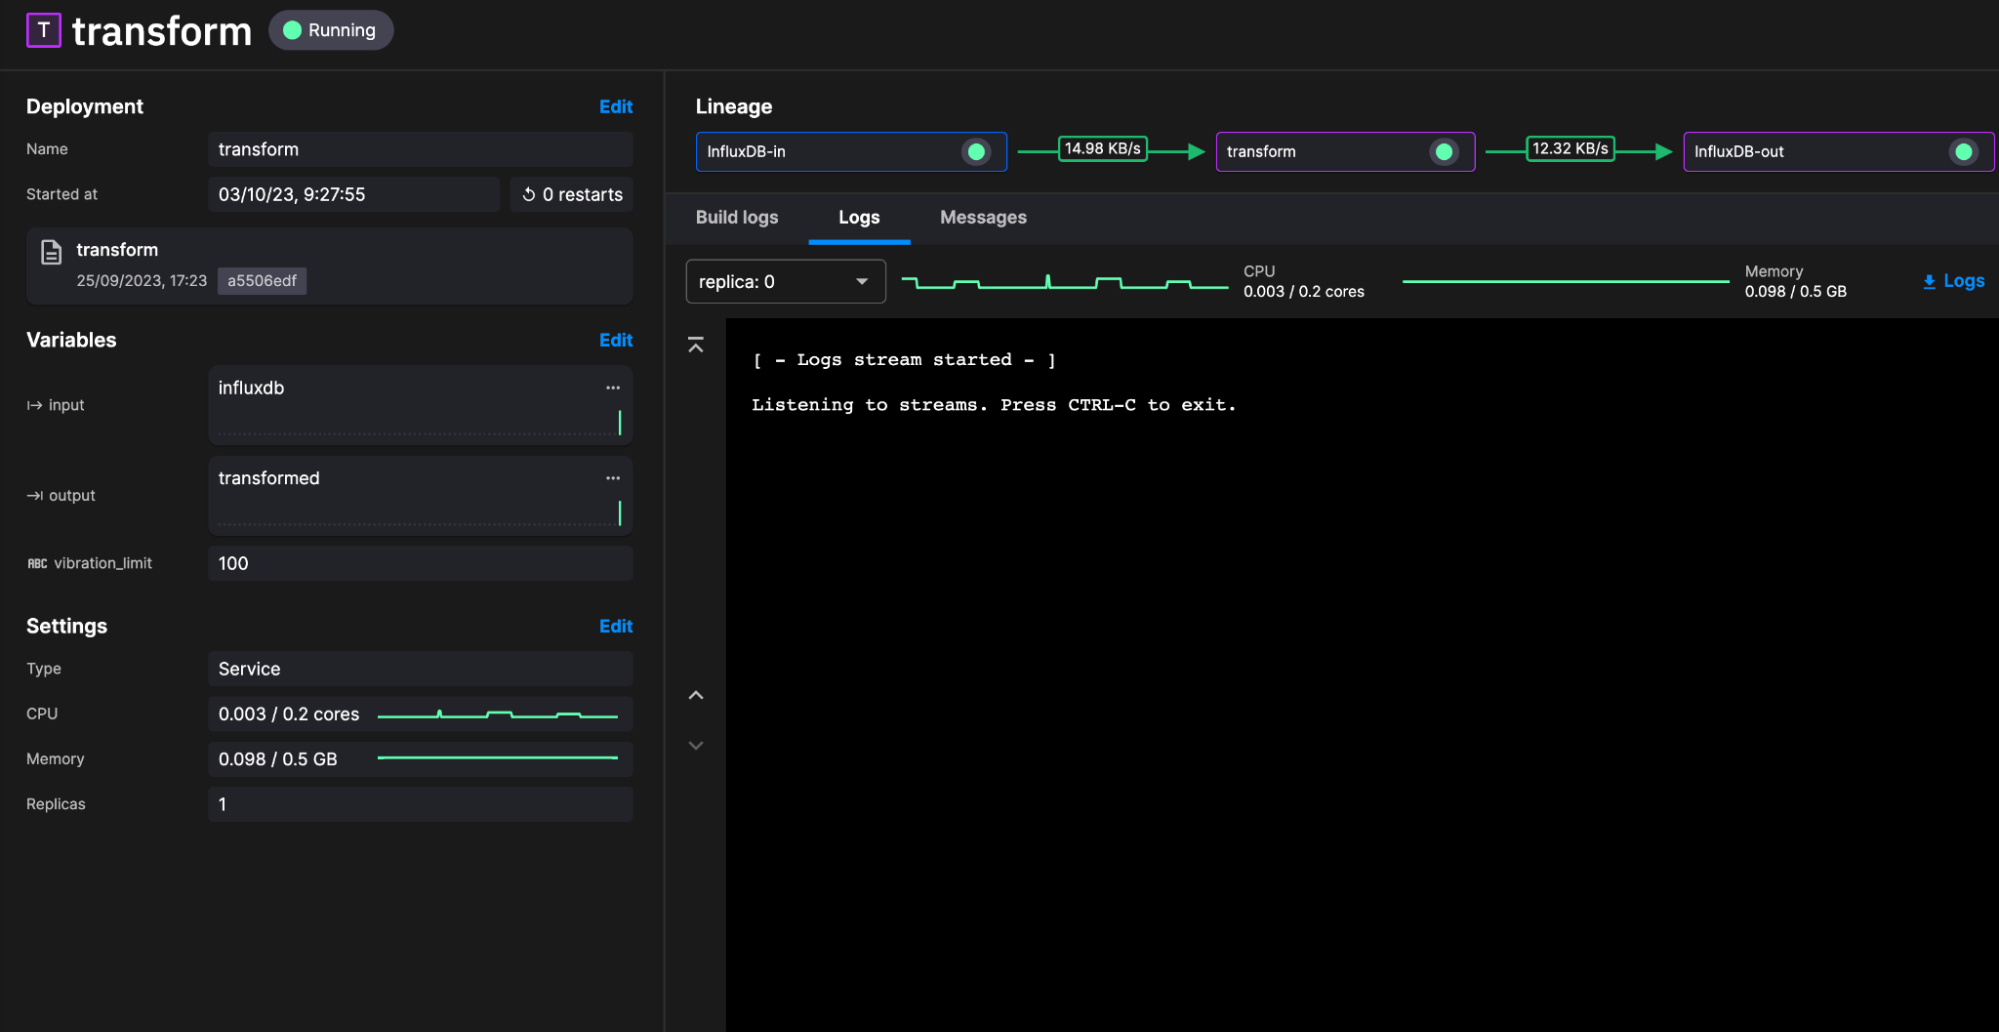
We will utilize the out-of-the-box configurations for both community plugins to piece together a transformation task. The transformation task is simple:
- Query the last 1-minute worth of data
- Add a new column that checks if the vibration over that interval surpassed a user-defined threshold. This column will contain true or false based on the outcome.
- Write the data back to a new table within InfluxDB
Let’s start with querying the data from InfluxDB. This time we are going to utilize our InfluxDB 3.0 Source plugin. Like our previous examples, we search for and select this from the Code Samples library and create a project.
We do not need to modify any of the plugin code for this one. Just simply define our environment variables:
We then click new deployment. Configure our resource limits (default is fine) and click deploy.
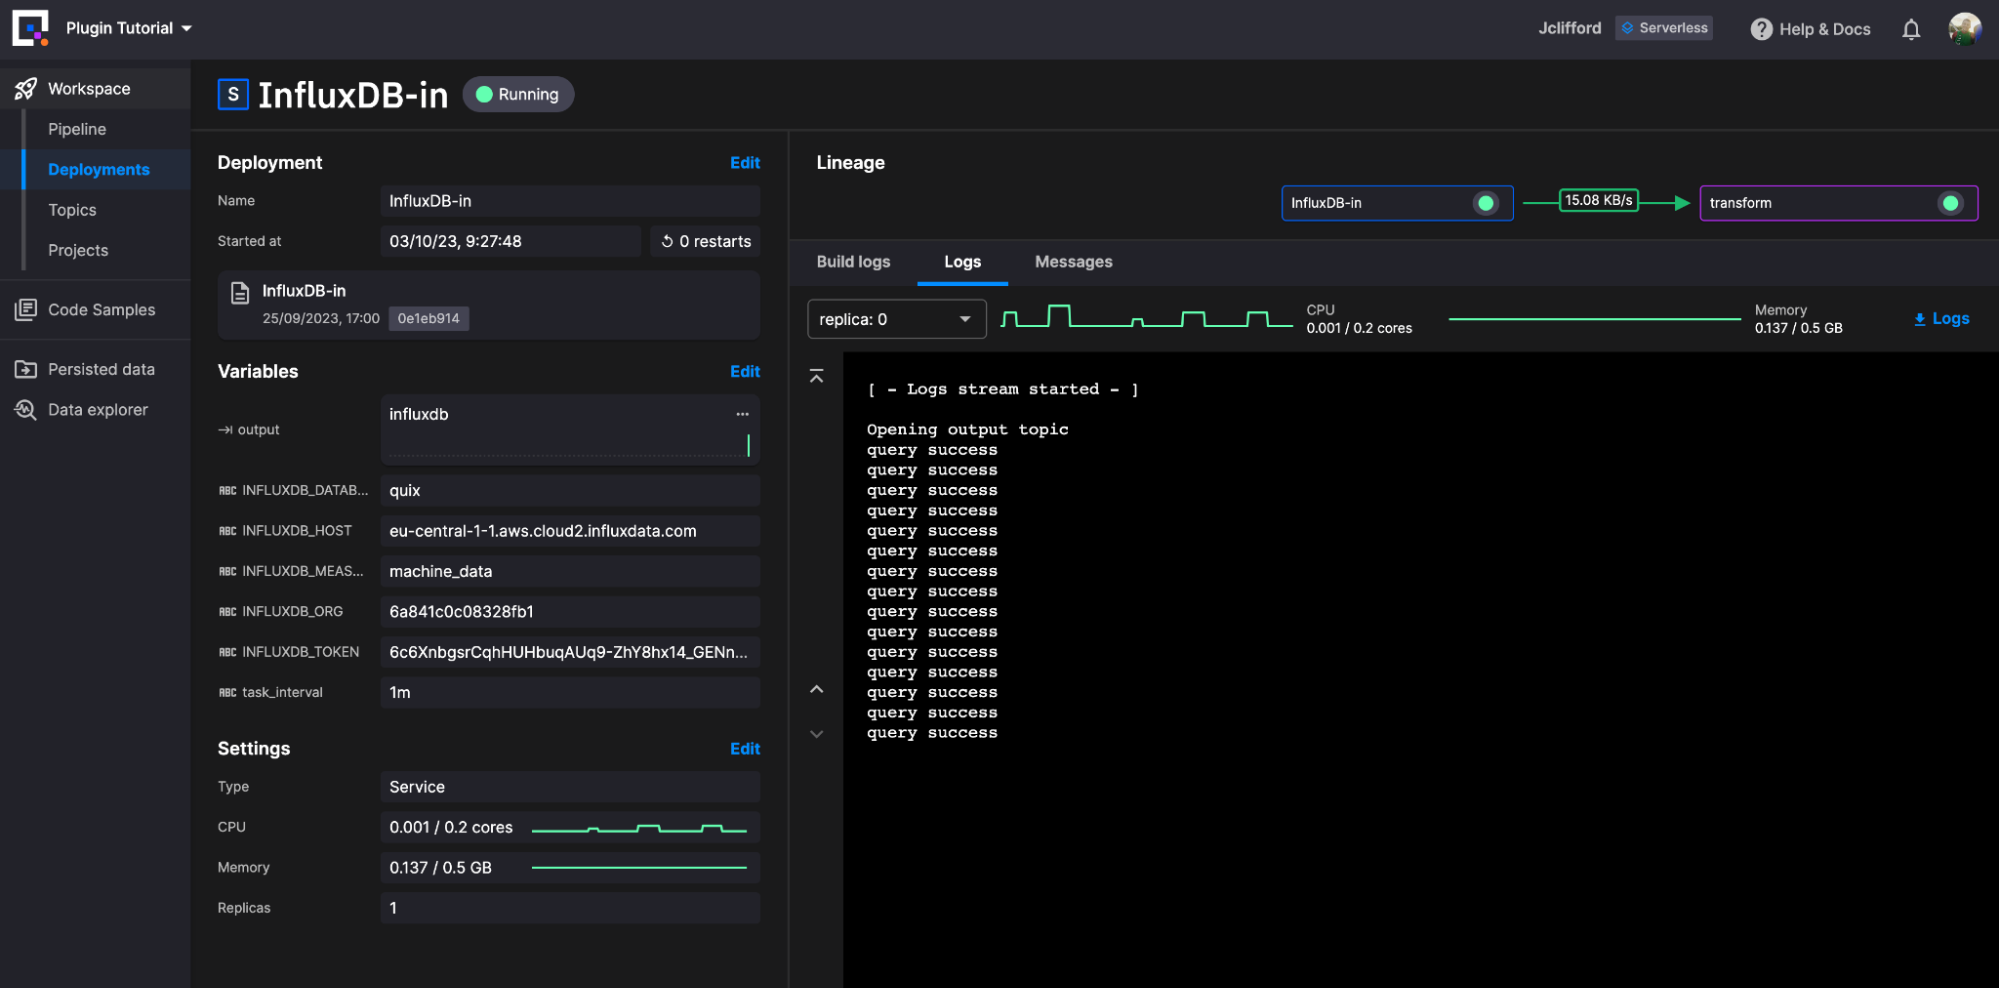
Our query data is now being written directly as a DataFrame for the topic InfluxDB. We can now deploy and create a series of transformation plugins to reshape our data. For this example, we are going to keep it simple:
- Ingest the DataFrame
- Use basic conditional logic within the vibration column to check if it surpasses our predefined threshold
- Create the new boolean column and write the DataFrame to a new topic reader for ingestion.
The code looks like this:
import quixstreams as qx
import os
import pandas as pd

client = qx.QuixStreamingClient()

topic_consumer = client.get_topic_consumer(os.environ["input"], consumer_group = "empty-transformation")
topic_producer = client.get_topic_producer(os.environ["output"])

def on_dataframe_received_handler(stream_consumer: qx.StreamConsumer, df: pd.DataFrame):

        vibration_limit = int(os.environ["vibration_limit"])
        df['over_limit'] = df['vibration'] > vibration_limit

        stream_producer = topic_producer.get_or_create_stream(stream_id = stream_consumer.stream_id)
        stream_producer.timeseries.buffer.publish(df)

def on_event_data_received_handler(stream_consumer: qx.StreamConsumer, data: qx.EventData):
    print(data)
    # handle your event data here

def on_stream_received_handler(stream_consumer: qx.StreamConsumer):
    stream_consumer.events.on_data_received = on_event_data_received_handler # register the event data callback
    stream_consumer.timeseries.on_dataframe_received = on_dataframe_received_handler

topic_consumer.on_stream_received = on_stream_received_handler

print("Listening to streams. Press CTRL-C to exit.")

qx.App.run()
Based on this basic transformation plugin we have three environment variables to define.

We then click new deployment. Configure our resource limits (default is fine) and click deploy.
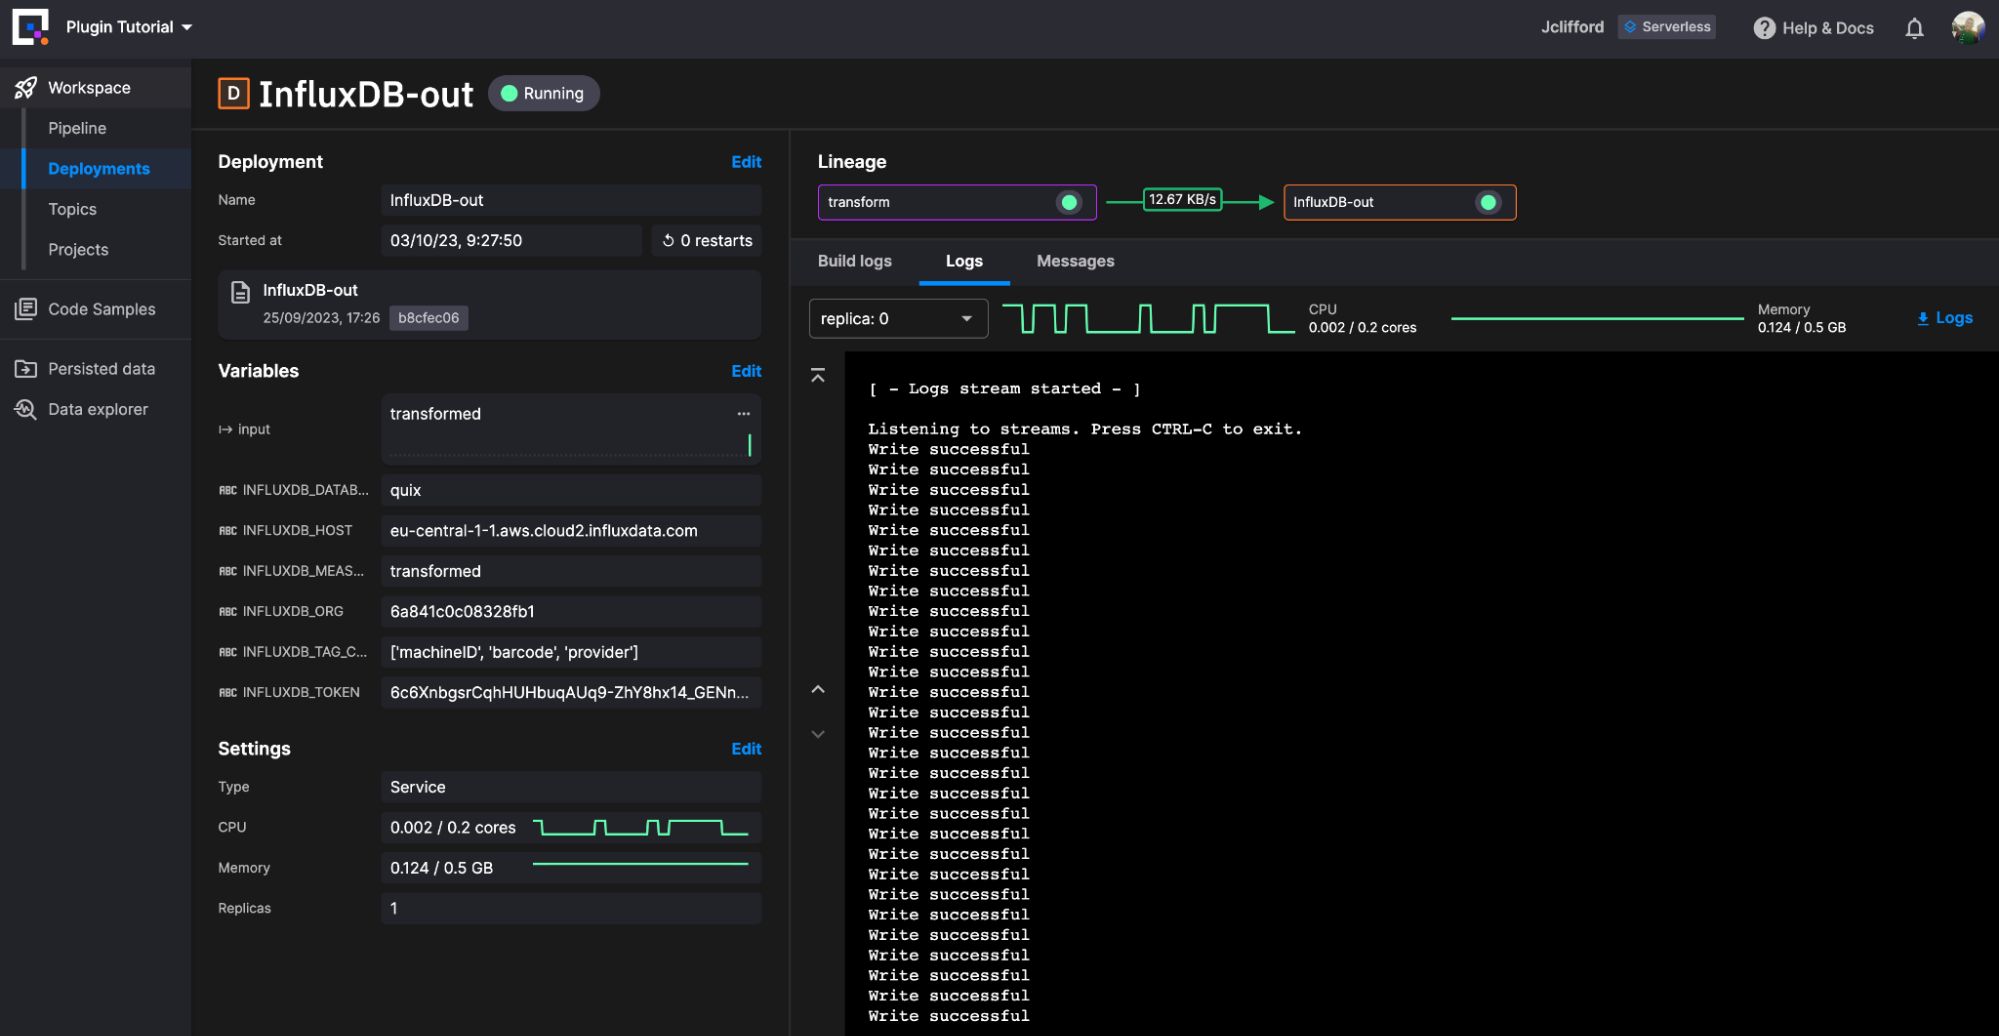
Our final step is writing the data back to InfluxDB. For this task, we deploy another instance of our InfluxDB Destination plugin. This time, because we ingest the DataFrame from our transformation topic, we only need to define the environment variables.
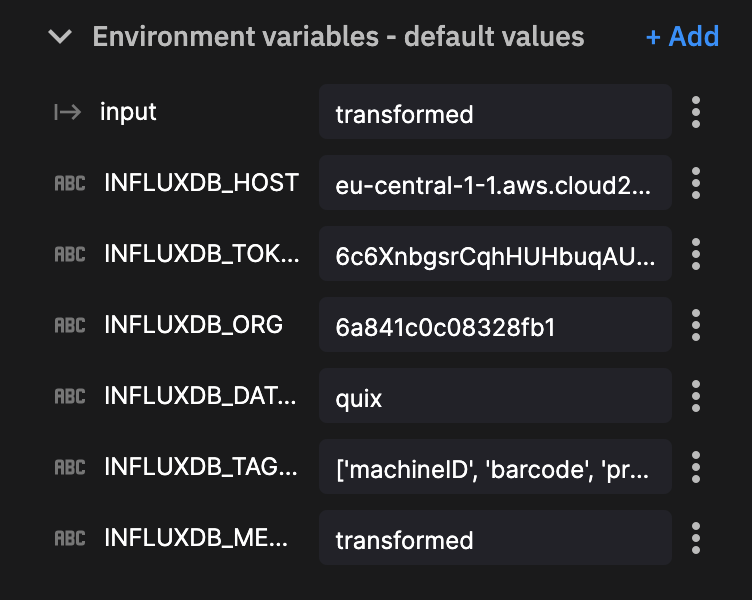
Notes on two of these environment variables:
InfluxDB_measurementwrites our transformed data to a new table calledtransformed. InfluxDB creates this table on demand.- We are providing a string array for the columns we wish to define as tags:
['machineID', 'barcode', 'provider']
We then click new deployment. Configure our resource limits (default is fine) and click deploy.
Conclusion
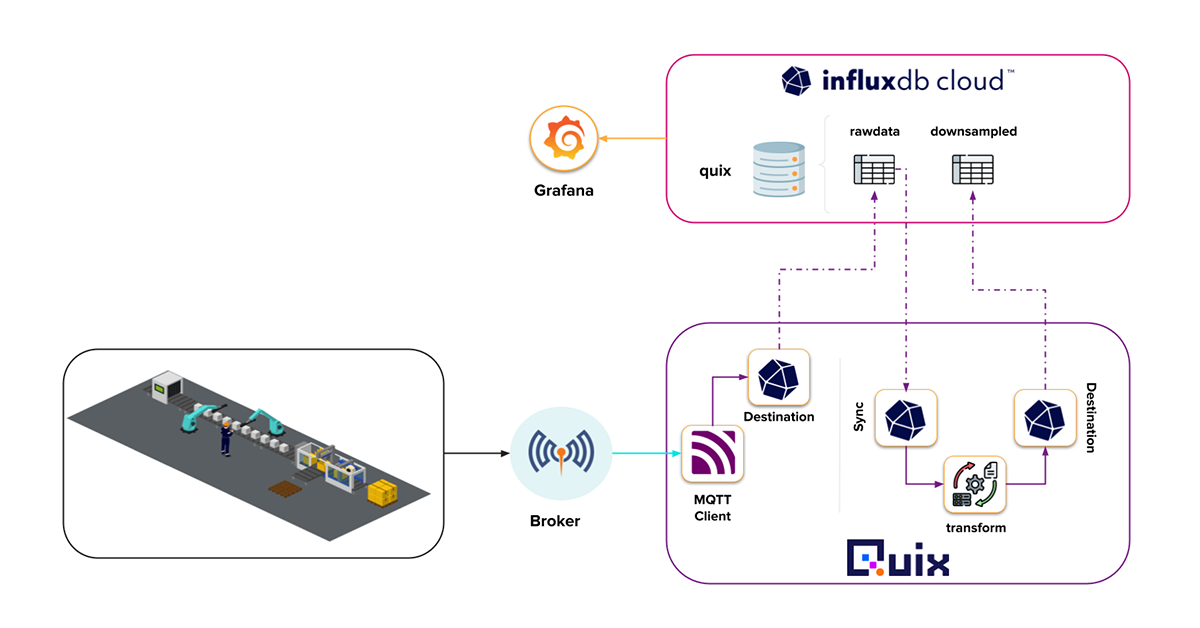
There you have it! We successfully deployed our event streaming pipeline and task engine for InfluxDB. From a birds-eye view it looks like this.
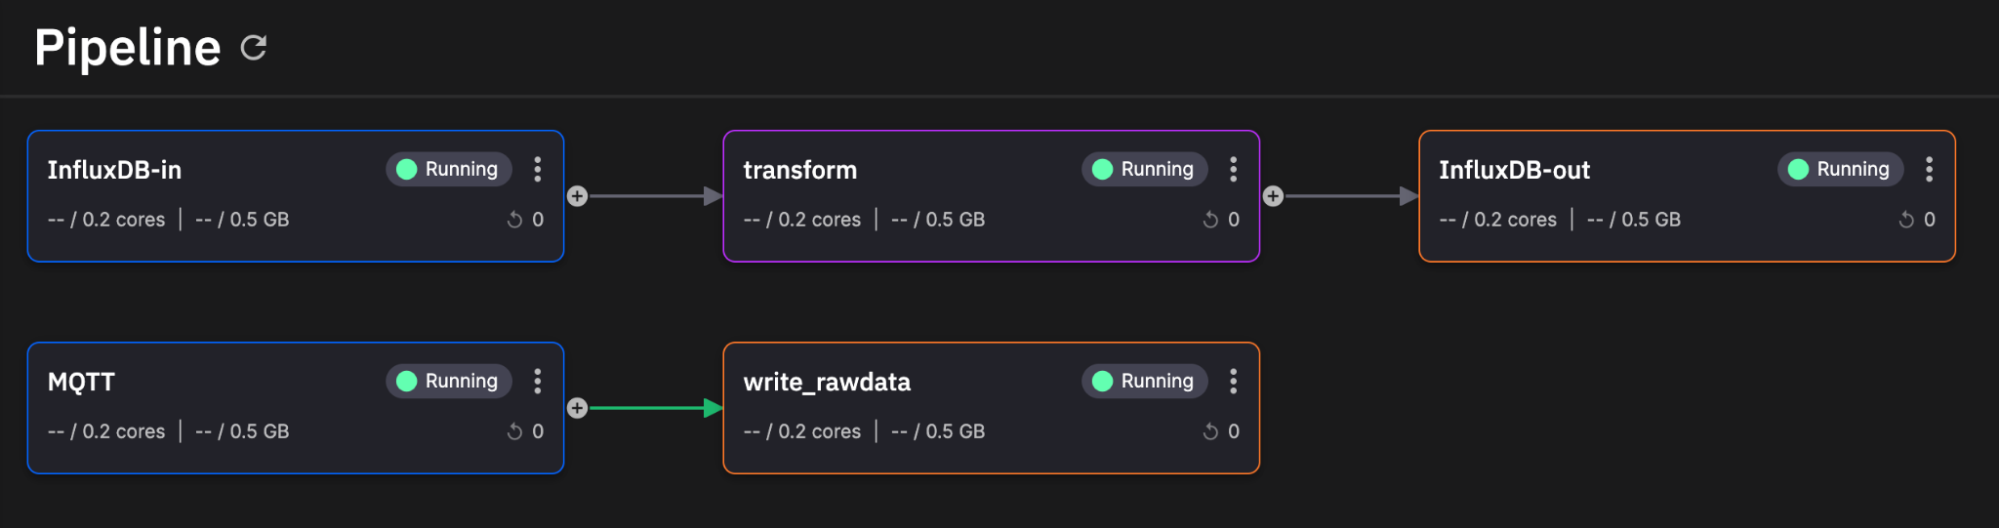
(Thanks Quix for the great user interface)
Here is what our raw machine data and transformed data look like in InfluxDB.
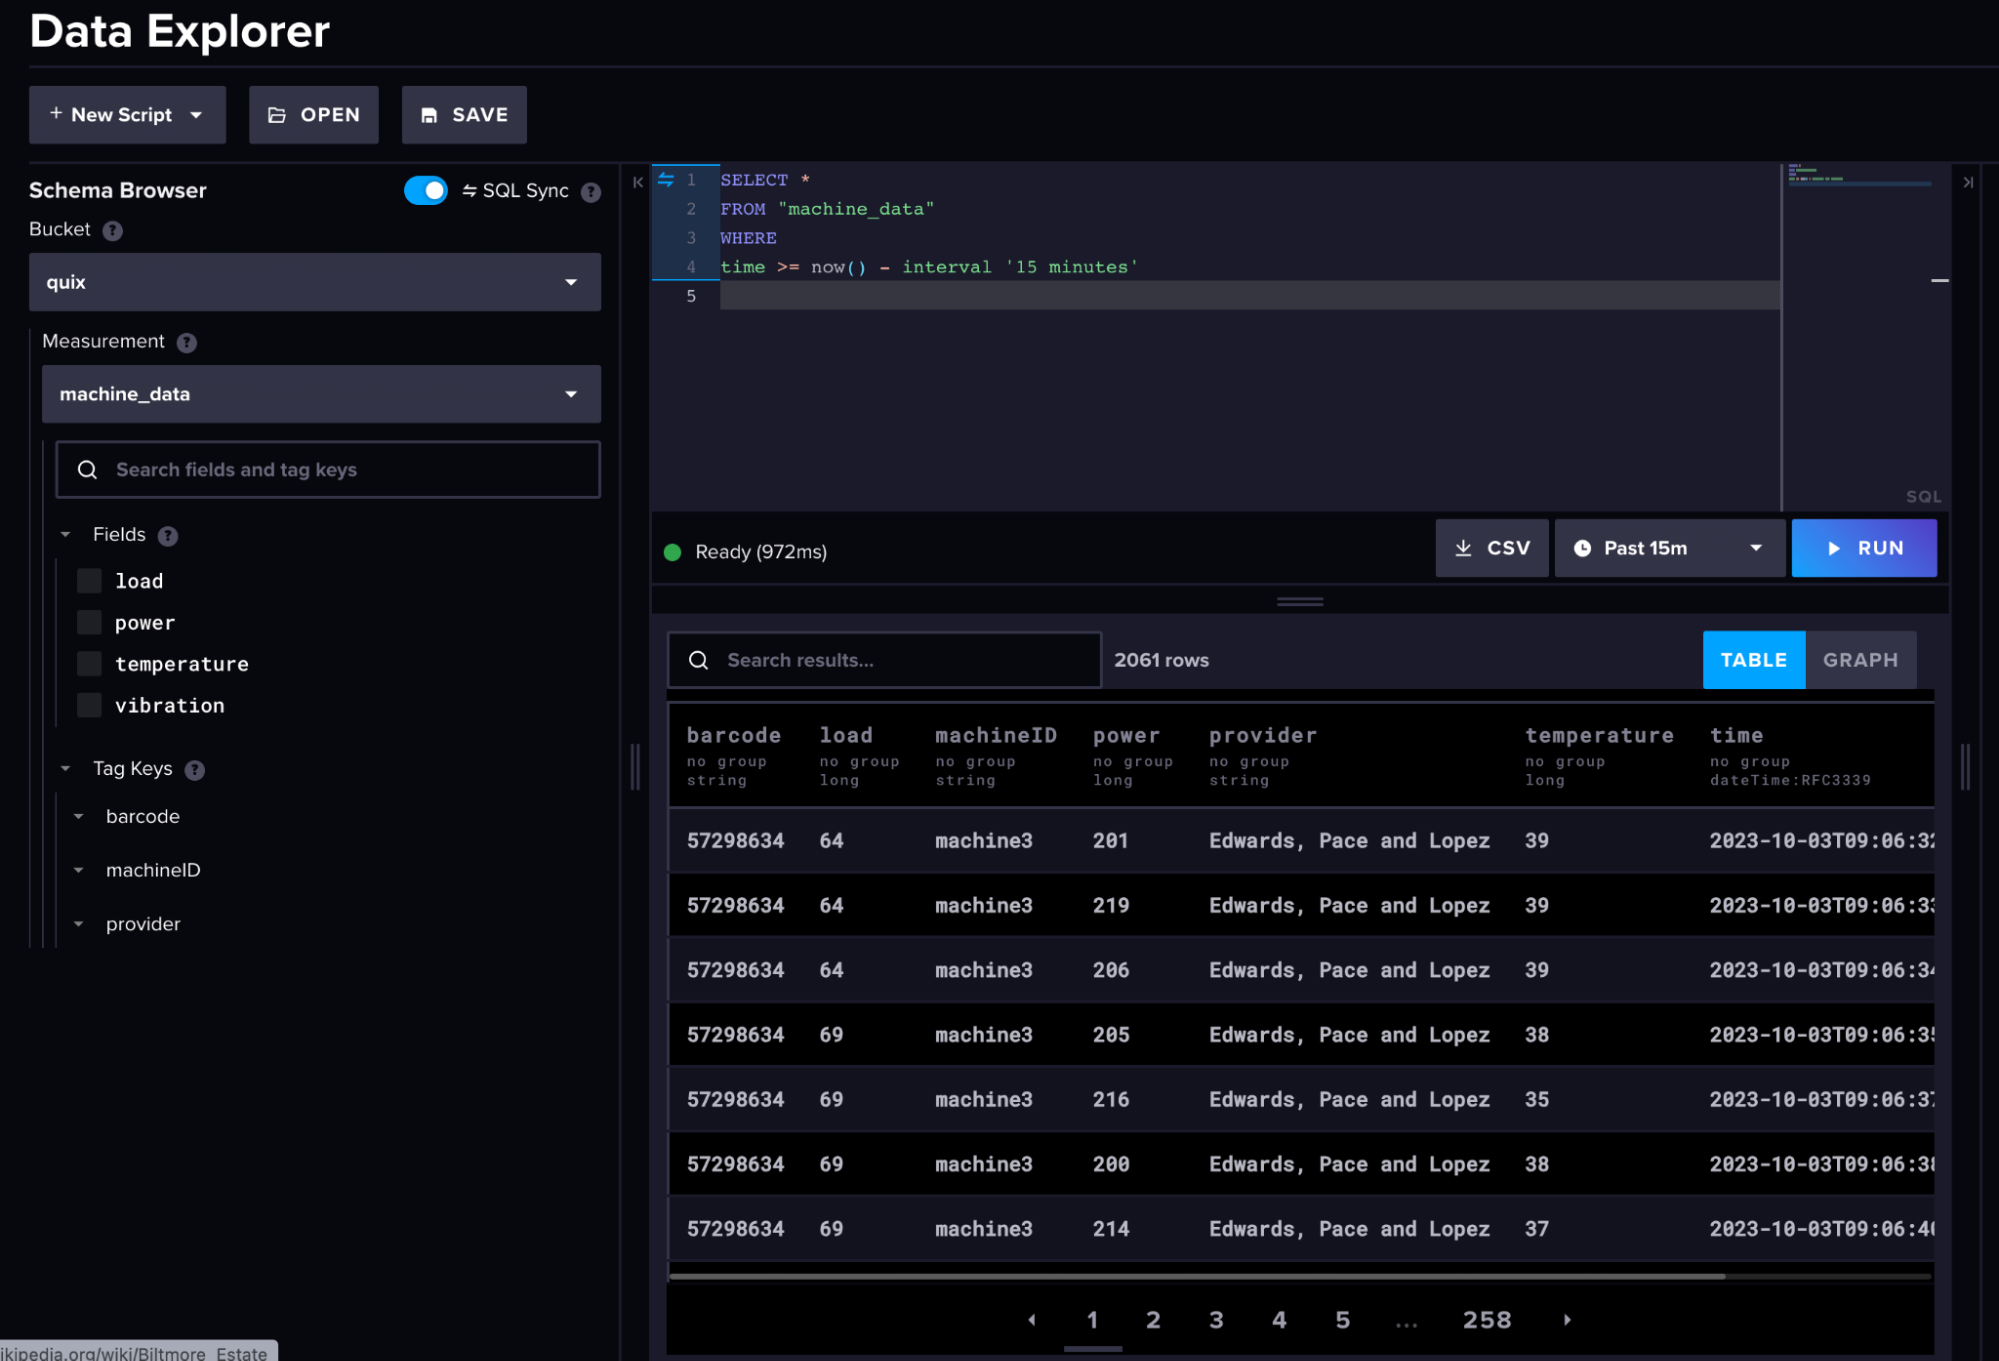 (Raw Machine Data)
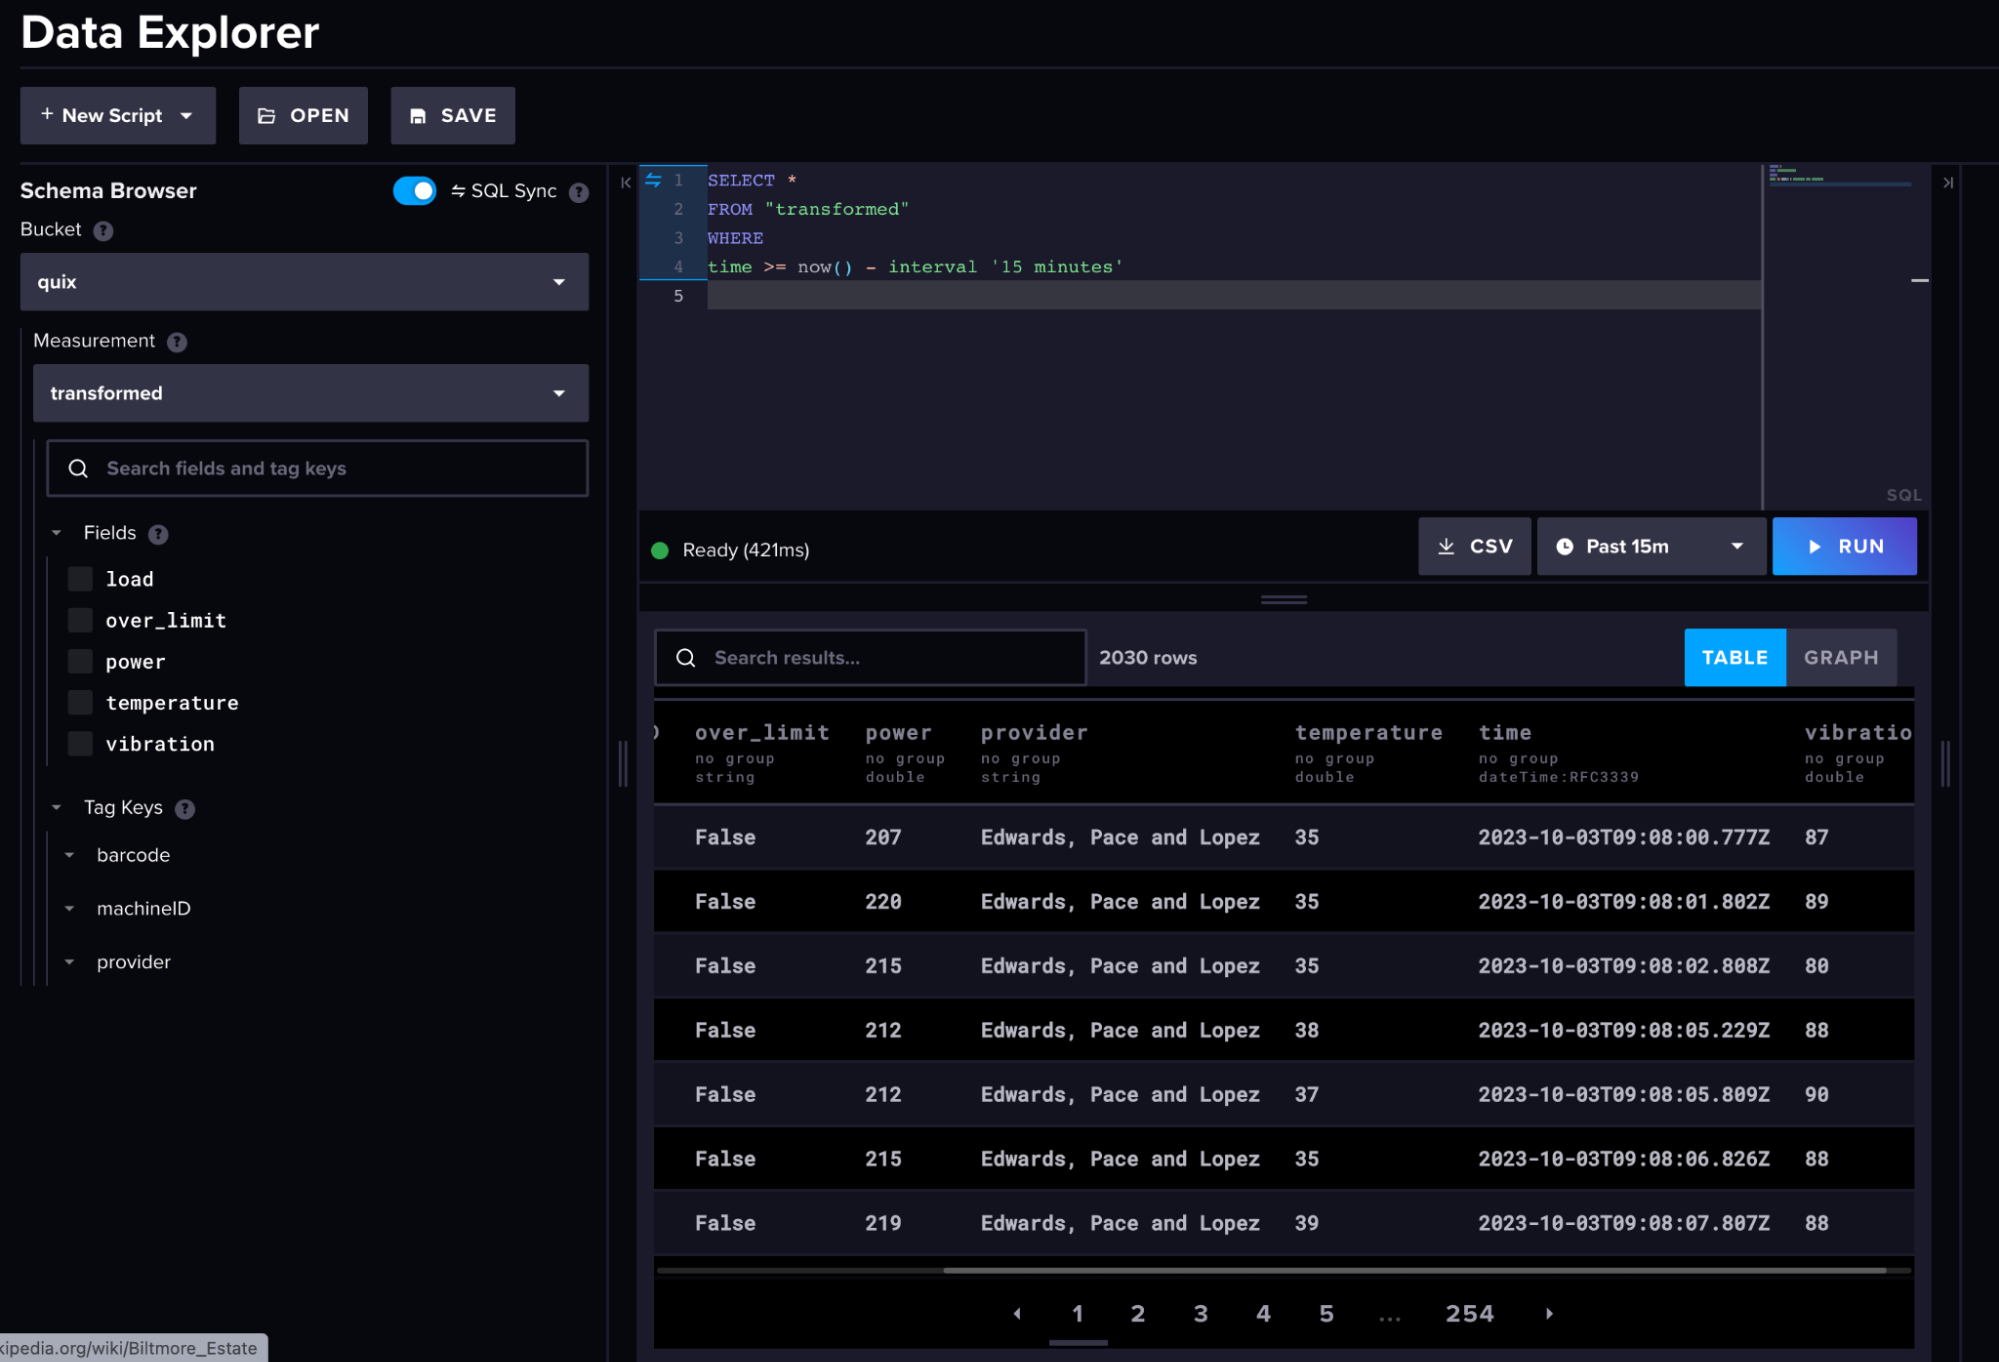 (Transformed Machine Data)
In summary, we utilized the Quix platform along with the new InfluxDB Community plugins to ingest ‘live’ raw machine data from three MQTT topics, store this data within InfluxDB, and then derive new value from our stored data. So where could you go next?
My hope is you can take this example, adapt it to your own needs, and scale it using the Quix platform. The major benefit of using Quix is we can efficiently scale the number of Sources, Transformations, and Destinations to fit our needs. A great example of this would be to expand our task engine:
- Downsampling script
- Anomaly detection algorithm
- Check and Alert script
Each script would subscribe to our InfluxDB topic and work in parallel with one another, making efficient use of the data within the event streaming pipeline compared to conventional task methods which would re-query the data.
You can find the source code for a similar project here. If you have any questions or would like to discuss InfluxDB or Quix further, come hang out with us within our Slack channel.
