The Rebirth of InfluxQL in 3.0: A Quick Start Guide to Configuration and Usage
By
Jay Clifford
Jun 30, 2023
Product
Navigate to:
If we turn the clocks back to September 2013, we released InfluxQL alongside InfluxDB. InfluxQL is a SQL-like query language, specifically designed to query time series data. For many of our users, InfluxQL still remains the primary way they interact with InfluxDB. Based on this feedback, InfluxQL has been reborn in InfluxDB 3.0 alongside native support for the SQL query language.
So what do I mean by reborn? Well, in case you didn’t know, we built InfluxDB 3.0 on three key open-source projects:
Apache DataFusion acts as the foundational query engine for InfluxDB 3.0, providing our native SQL support. Our engineers extended the query engine to natively support InfluxQL as well. This allows developers to leverage the full performance of Apache Arrow Flight while using InfluxQL-based queries.
In this blog, we will look at how you can take advantage of InfluxQL via our new v3 client libraries. We will discuss how to configure the v1 InfluxQL API for Serverless and Dedicated, which provides backward compatibility for InfluxQL plugins, such as Grafana and NodeRed.
v3 Client Libraries
We currently have five v3 community-based client libraries:
| Client Library | Status | Query Languages |
|---|---|---|
| C# | Ready | SQL, InfluxQL |
| Go | Ready | SQL, InfluxQL |
| Python | Ready | SQL, InfluxQL |
| Java | Ready | SQL, InfluxQL |
| JavaScript | Ready | SQL, InfluxQL |
Each of these client libraries support writing and querying with InfluxDB. I highly recommend checking out this blog if you would like to deep dive into their current status.
Let’s take a look at a few client examples utilizing the new InfluxQL query feature.
Python
Let’s start off with a Python example:
import influxdb_client_3 as InfluxDBClient3

client = InfluxDBClient3.InfluxDBClient3(
    token="<INSERT TOKEN>",
    host="eu-central-1-1.aws.cloud2.influxdata.com",
    org="6a841c0c08328fb1",
    database="database")

table = client.query(
    query="SELECT * FROM <MEASUREMENT> WHERE time > now() - 4h",
    language="influxql")

print(table.to_pandas())
As you can see, we create a new client instance called ‘client’. We then call query() which takes the following parameters;
-
Query: String literal representation of the query you would like to perform. This can be SQL- or InfluxQL-based.
-
Language: This parameter indicates whether your query string literal is InfluxQL or SQL.
Note: It is important to set our language parameter to influxql because SQL is the default query language.
Go
Next, we look at a Go example:
import (
  "context"
  "encoding/json"
  "fmt"
  "os"
  "github.com/InfluxCommunity/influxdb3-go/influx"
)

url := os.Getenv("INFLUXDB_URL")
token := os.Getenv("INFLUXDB_TOKEN")
database := os.Getenv("INFLUXDB_DATABASE")

// Create a new client using an InfluxDB server base URL and an authentication token
client, err := influx.New(influx.Configs{
    HostURL: url,
    AuthToken: token,
})
// Close client at the end and escalate error if present
defer func (client *influx.Client)  {
    err := client.Close()
    if err != nil {
        panic(err)
    }
}(client)

query := `SELECT * FROM <MEASUREMENT> WHERE time > now() - 4h`;

iterator, err := client.QueryInfluxQL(context.Background(), database, query, nil)

if err != nil {
    panic(err)
}

for iterator.Next() {
    value := iterator.Value()

    fmt.Printf("avg is %f\n", value["avg"])
    fmt.Printf("max is %f\n", value["max"])
}
In this example, we follow a similar practice to the Python client library except instead of using a language parameter we use the client.QueryInfluxQL function.
JavaScript
Finally, let’s consider a JavaScript example:
import {InfluxDBClient, Point} from '../index' // replace with @influxdata/influxdb3-client in your project

type Defined<T> = Exclude<T, undefined>

/* allows to throw error as expression */
const throwReturn = <T>(err: Error): Defined<T> => {
  throw err
}

async function main() {
  // Use environment variables to initialize client
  const url = 'INFLUXDB_URL'
  const token = 'INFLUXDB_TOKEN'
  const database = 'INFLUXDB_DATABASE'

  // Create a new client using an InfluxDB server base URL and an authentication token
  const client = new InfluxDBClient({url, token})

   // Prepare flightsql query
    const query = `SELECT * FROM <MEASUREMENT> WHERE time > now() - 4h`
    // Execute query
    const queryResult = await client.query(database, query, ‘influxql’)

    for await (const row of queryResult) {
      console.log(`avg is ${row.get('avg')}`)
      console.log(`max is ${row.get('max')}`)
    }
  } catch (err) {
    console.error(err)
  } finally {
    await client.close()
  }
}

main()
Like the Python library, we provide credentials to instantiate the client. We call client.query(), including influxql as the queryType parameter.
v1 InfluxQL API
We covered the client libraries, which make use of Arrow Flight to communicate with InfluxDB 3.0. This works great for building new applications but doesn’t provide a universal communication method for current InfluxQL applications and plugins because they operate using the InfluxDB API. This is where the v1 API comes into play.
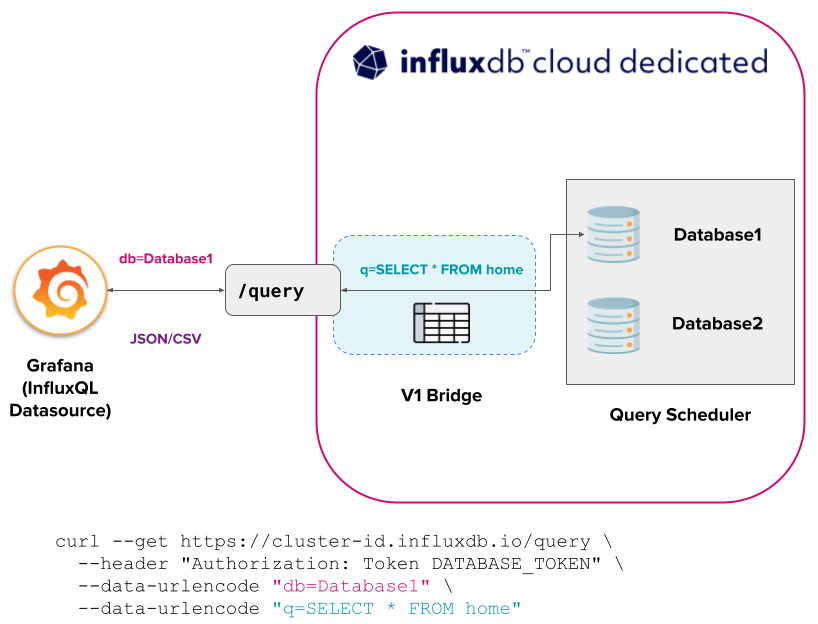
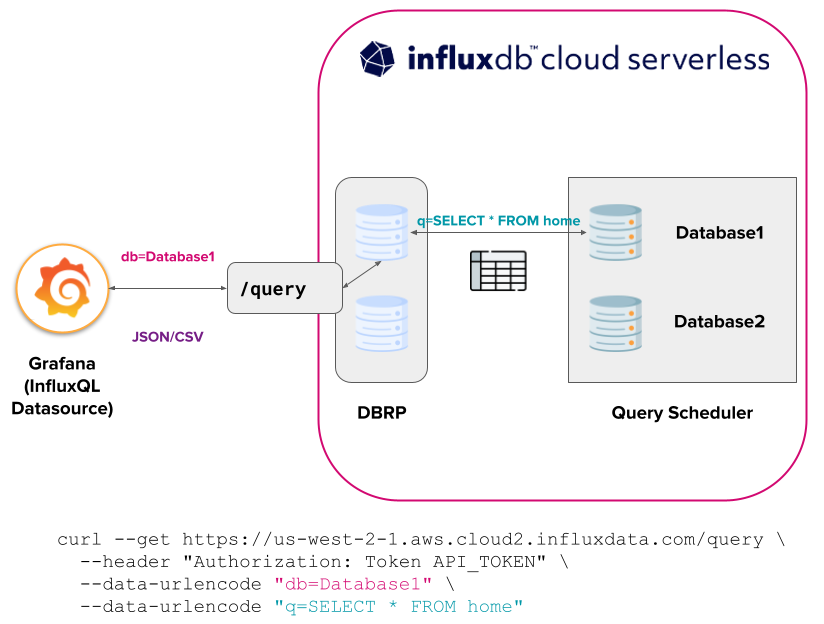
The v1 API has a v1 query endpoint, which takes the incoming query request, passes it to the query scheduler, and then runs the query. From there the result is passed back to the v1 API endpoint and then returned to complete the API request.
Note: As of writing this blog there is currently a distinct difference in how the V1 API is set up between Serverless and Dedicated.
InfluxDB Cloud Dedicated
Each database created is inherently compatible with the v1 API due to the v1 API bridge.
InfluxDB Cloud Serverless
Serverless currently requires the creation of DBRP mappings to initialize the execution of v1 API InfluxQL queries against InfluxDB 3.0 databases.
Next, let’s take a look at how to configure the DBRP mappings for Serverless.
Configure the bridge with DBRP (Serverless)
Note: Always check the documentation for updates because this feature is in active development. Cloud Dedicated users can skip this step!
Currently, you must manually create DBRPs for each of the databases you wish to use via the v1 API Bridge. There are two ways you can do this:
- InfluxDB CLI: With this method, you must have the InfluxDB CLI installed on your host computer. Make sure that you also configure an initial configuration profile, which points to your InfluxDB 3.0 instance. Next run the following command:
influx v1 dbrp create \ --token API_TOKEN \ --db DATABASE_NAME \ --rp RETENTION_POLICY_NAME \ --bucket-id BUCKET_ID \ --default - API token to authenticate. We recommend setting your token to your active InfluxDB connection configuration in the influx CLI, so you don’t have to add these parameters to each command. To set up your active InfluxDB configuration, see influx config set.
- database name to map
- retention policy name to map
- Bucket ID to map to
- Default — this flag sets the provided retention policy as the default retention policy for the database.
- InfluxDB API: If you wish to interact with the API directly, you can do this via the following curl request:
curl --request POST https://us-west-2-1.aws.cloud2.influxdata.com/api/v2/dbrps \
  --header "Authorization: Token API_TOKEN" \
  --header 'Content-type: application/json' \
  --data '{
        "bucketID": "BUCKET_ID",
        "database": "DATABASE_NAME",
        "default": true,
        "orgID": "ORG_ID",
        	   "retention_policy": "RETENTION_POLICY_NAME"
     		 }'
As you can see, curl requires the same parameters as the CLI. If you have a lot of databases you want to map in Serverless then I highly recommend setting up the InfluxDB CLI and utilizing this bash script:
#!/bin/bash

# Run influx bucket list and parse the output
influx bucket list | awk '
BEGIN {
    # Skip the header line
    getline
}
{
    # Extract the values
    bucket_id = $1
    database_name = $2

    # Construct and run the influx v1 dbrp create command
    cmd = "influx v1 dbrp create --db " database_name " --rp " database_name " --bucket-id " bucket_id " --default"
    system(cmd)
}'
This will map each database/bucket to its own DBRP.
Grafana InfluxQL datasource
Now that we created our first v1 mapping, let’s utilize it with the InfluxQL datasource in Grafana. Let’s take a look at the configuration in two stages:
Stage 1: Authentication
At this stage of the plugin configuration, we must modify three parameters (this excludes creating a Name and specifying InfluxQL as your Query Language).
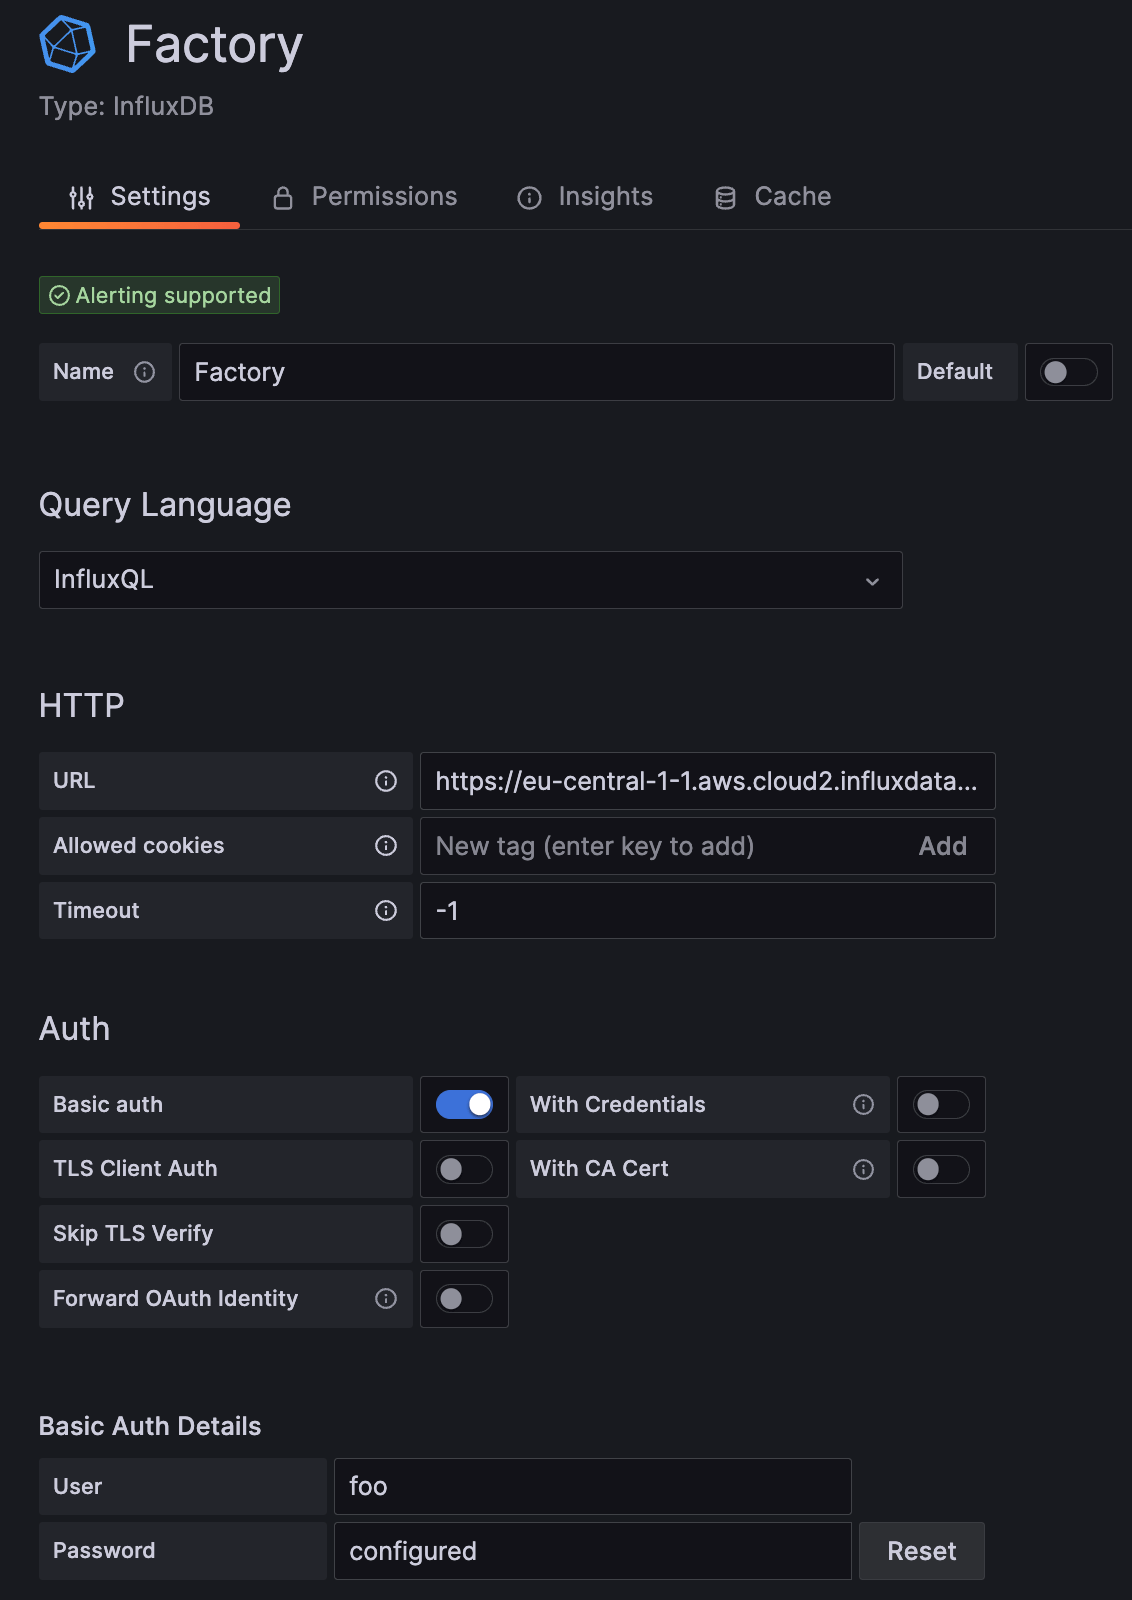
URL: Make sure to add your protocol and domain to this form. An example would look like: https://eu-central-1-1.aws.cloud2.influxdata.com
Basic auth: Toggle this to true.
User/Password: The username can be any string; it is not used for authentication purposes but cannot be empty. Password must be an InfluxDB API token that has enough privileges to query from the database you are going to use.
Stage 2: Database details
In this final stage, you only have one parameter to change. Note that the configuration doesn’t use the username and password parameters.
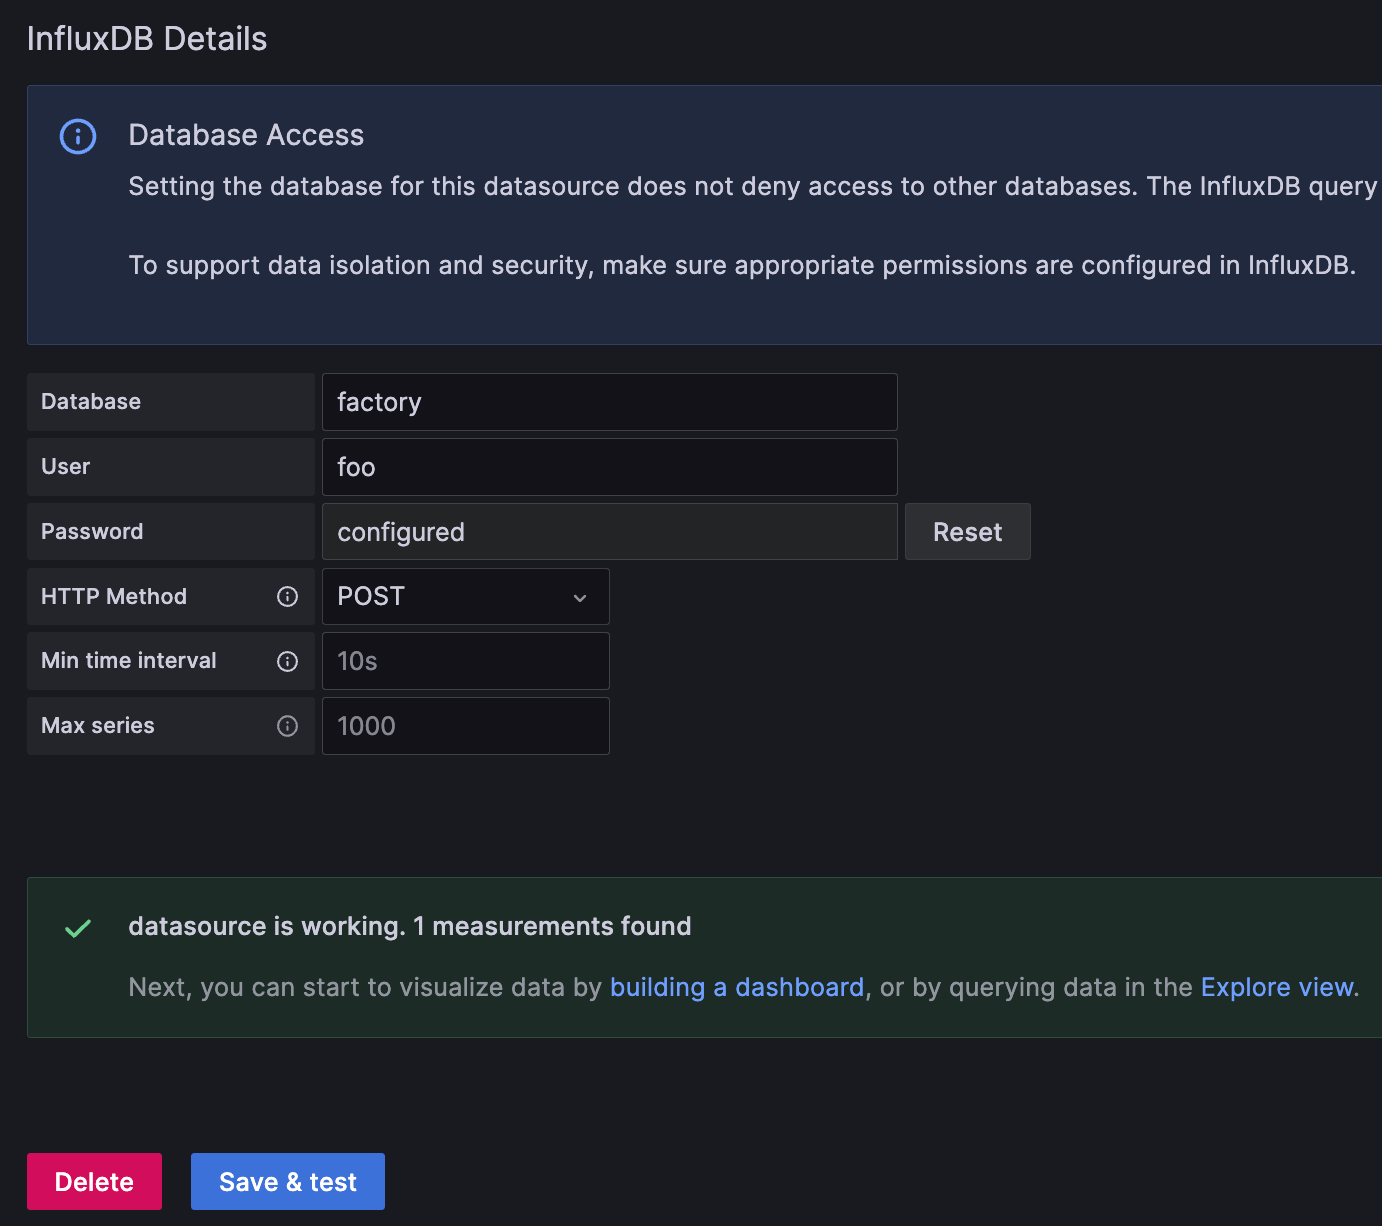
Database: Specify the name of the database you wish to query from.
Node-RED Plugin
Let’s take a look at one more example — the node-red-contrib-influxdb plugin for Node-RED. This contribution from one of our community members makes InfluxDB accessible for both querying and writing within Node-Red. Using the v1 API, we can make use of this plugin once again. Let’s split the setup into two stages:
Stage 1: Authentication
Like with the Grafana data source, we need to configure our connection and authentication to the v1 bridge first. To do this, we have a few parameters to configure:
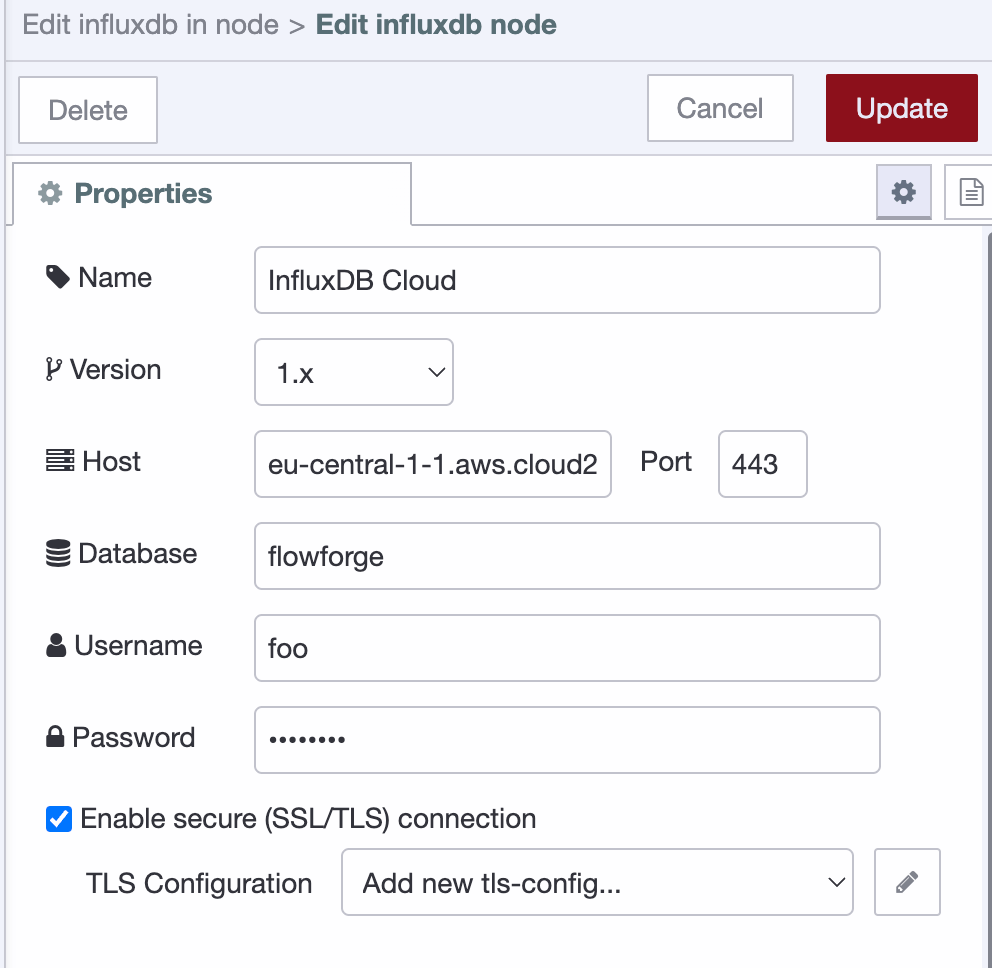
Version: Make sure this is set to 1.X
Host & Port: Strip your domain URL of any protocol (https://) and specify port ‘443’.
Database: Name of the database to query from.
User/Password: The username can be given any string; it is not used for authentication purposes but cannot be empty. Password must be an InfluxDB API token that has enough privileges to query from the database you are going to use.
Enable Secure: Make sure to enable SSL/TLS
Stage 2: Query details
Now you may form your query in Node-RED. There are only two parameters to note:
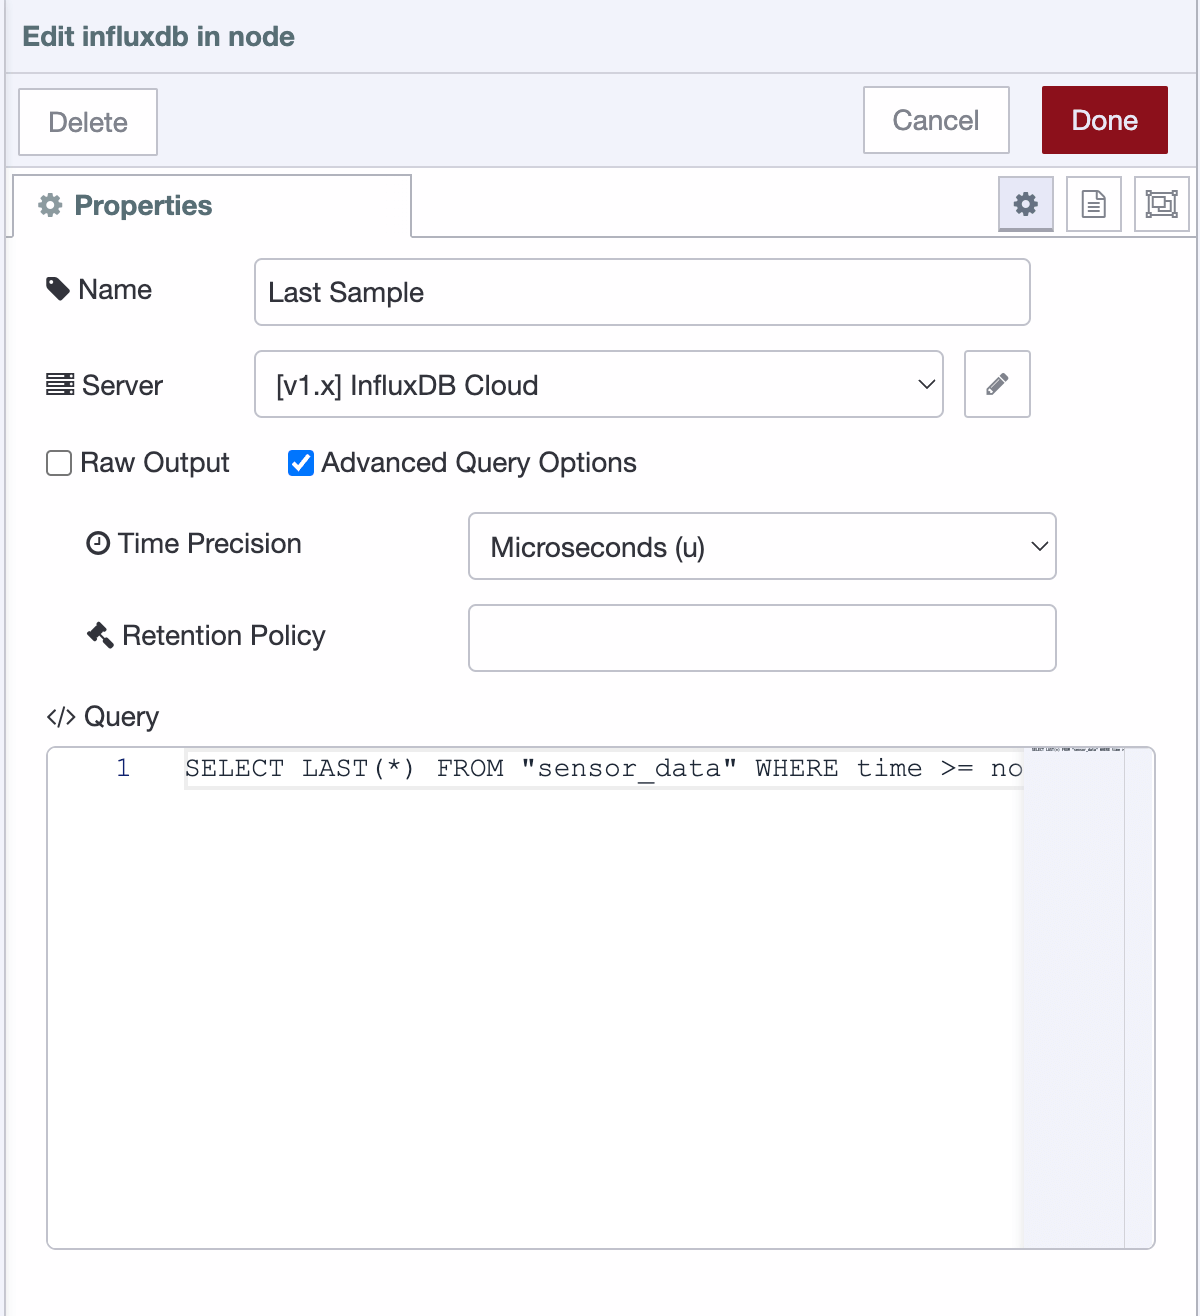
Time Precision: Make sure to set this parameter appropriately based on the timestamp stored.
Query: Provide your InfluxQL query.
Key takeaways
InfluxQL is back and better than ever. When using the v3 client libraries, InfluxQL power users can continue utilizing the language while reaping the performance gains of InfluxDB 3.0 and the vectorized, columnar DataFusion query engine. The v1 API also provides a much-needed stepping stone to backward compatibility for well-used ecosystem products, such as Grafana and Node-RED.
Now for some hard truths — InfluxQL is still under active development, so there isn’t yet a like-for-like feature representation for v1 InfluxQL. My advice is to check out the InfluxQL reference documentation and see what is currently possible. At present, it supports most core querying functions or will support them soon. My call to action is to start pointing your InfluxQL applications at InfluxDB 3.0 and tell us about your experience in our community. In later blogs, we will deep-dive into some of the core InfluxQL functions.
