Start with Python and InfluxDB
By
Community /
Product, Use Cases, Developer, Getting Started
Mar 14, 2022
Navigate to:
This article was written by Pravin Rahul Banerjee and was originally published by The New Stack. Scroll down for the author’s photo and bio.
Although time series data can be stored in a MySQL or PostgreSQL database, that’s not particularly efficient. If you want to store data that changes every minute (that’s more than half a million data points a year!) from potentially thousands of different sensors, servers, containers, or devices, you’re inevitably going to run into scalability issues. Querying or performing aggregation on this data also leads to performance issues when using relational databases.
A time series database (TSDB), on the other hand, is optimized to store time series data points. This is particularly useful in situations like:
- Analyzing financial trends in stock prices.
- Sales forecasting.
- Monitoring the logs and metrics of an API or web service.
- Monitoring the sensor data from a car or a plane for safety purposes.
- Tracking power usage in IoT devices such as a smart power grid.
- Tracking an athlete's vitals and performance during a game.
InfluxDB has created an open source time series database that makes it easier for developers to work with time series data. This article will show you how to set up InfluxDB using Python, working with stock data fetched using the Yahoo Finance API.
You can access all the code written in this tutorial in this repo.
Why use InfluxDB?
InfluxDB comes with a pre-built dashboard where you can analyze your time series data without much groundwork. And let’s not forget that it outperforms Elasticsearch and Cassandra.
It has a free open source version you can run locally, and there’s a cloud version that supports major cloud services such as AWS, GCP and Azure.
Setting up InfluxDB with Python
Before getting started, make sure you have Python 3.6 or later installed on your computer. You’ll also need a virtual environment. This article uses venv, but you can use conda, pipenv or pyenv as well.
Finally, some experience with Flux querying.
This guide uses the module influxdb-client-python to interact with InfluxDB. The library only supports InfluxDB 2.x and InfluxDB 1.8+, and it requires Python 3.6 or later.
All set? Let’s get started installing and connecting the client library.
If you have Docker installed on your computer, you can simply run InfluxDB’s Docker Image using the following command:
docker run --name influxdb -p 8086:8086 influxdb:2.1.0
If you don’t have Docker, download the software for your OS here and install it. If you’re running InfluxDB on a Mac, you can use Homebrew to install it:
brew install influxdb
If you’re running the Docker image, you can directly go to localhost 8086. However, if you downloaded the software and installed it, you will need to enter the following in the command line:
influxd
You should see the following screen on localhost 8086:
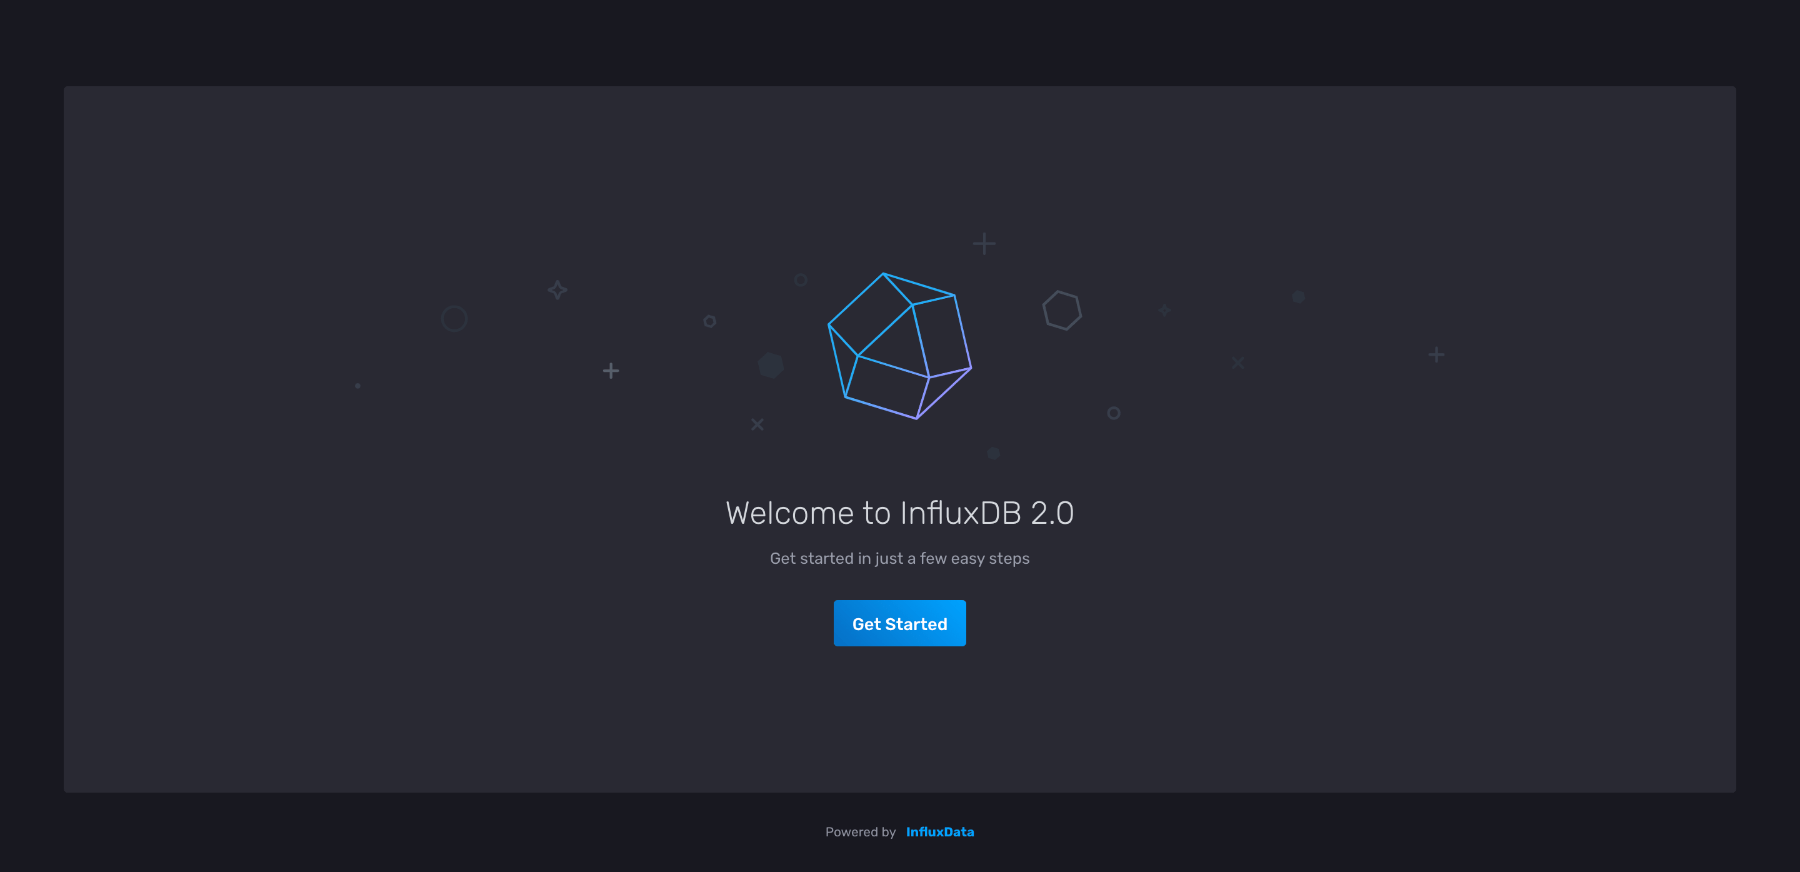
Click Get Started, which redirects you to the following page:
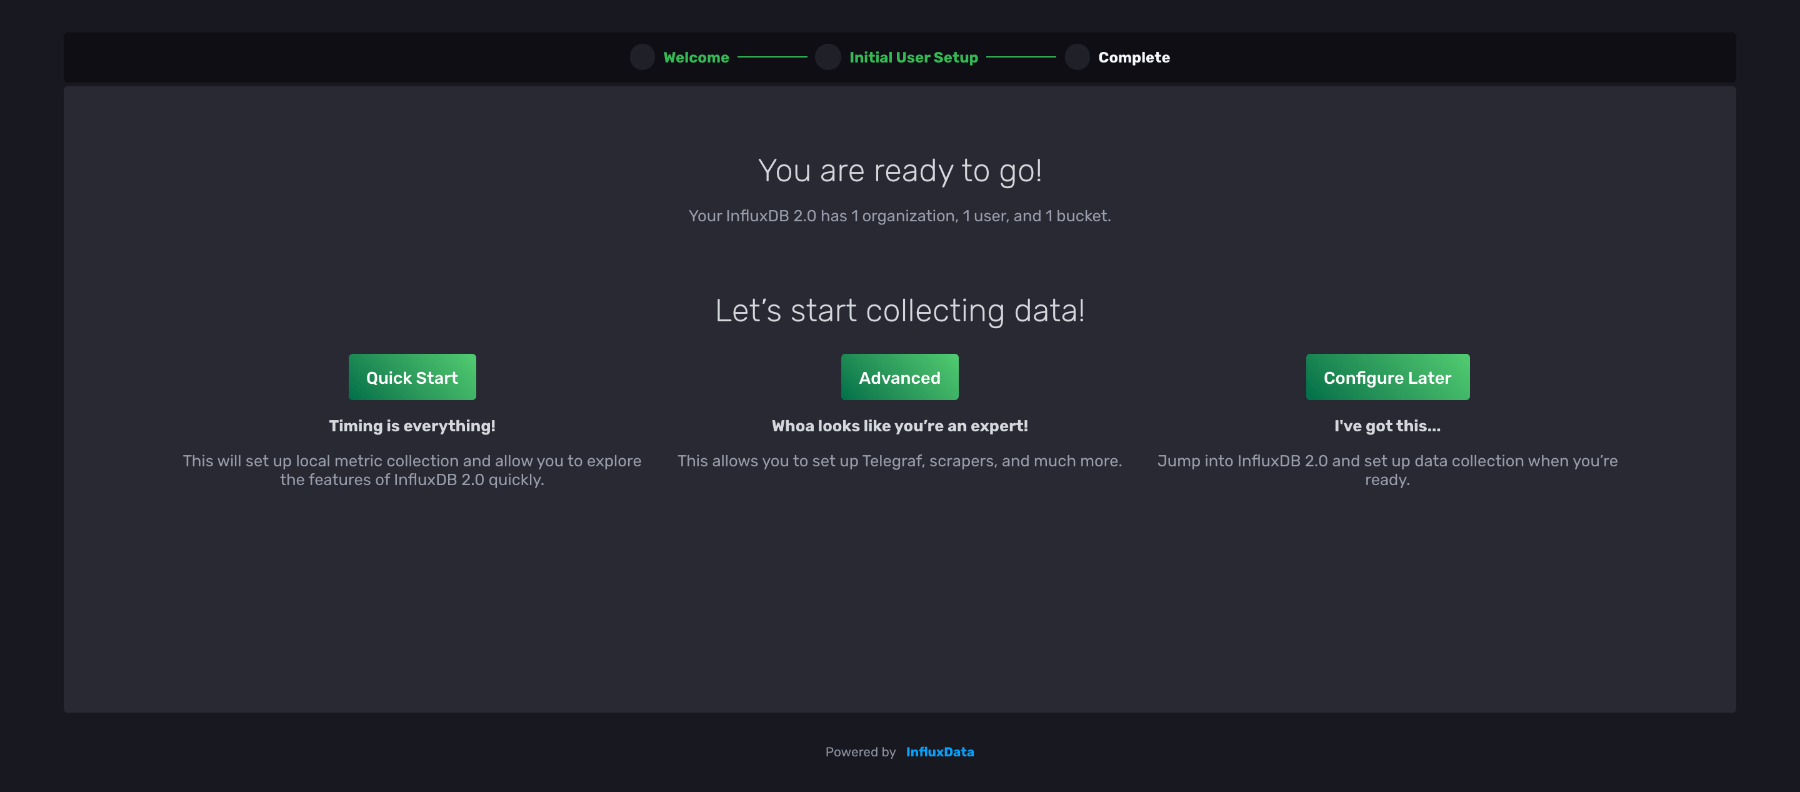
For this tutorial, choose Quick Start and enter your information on this page:

You can create organizations and buckets later on as well, but for now, just pick an easy name for each of these fields.
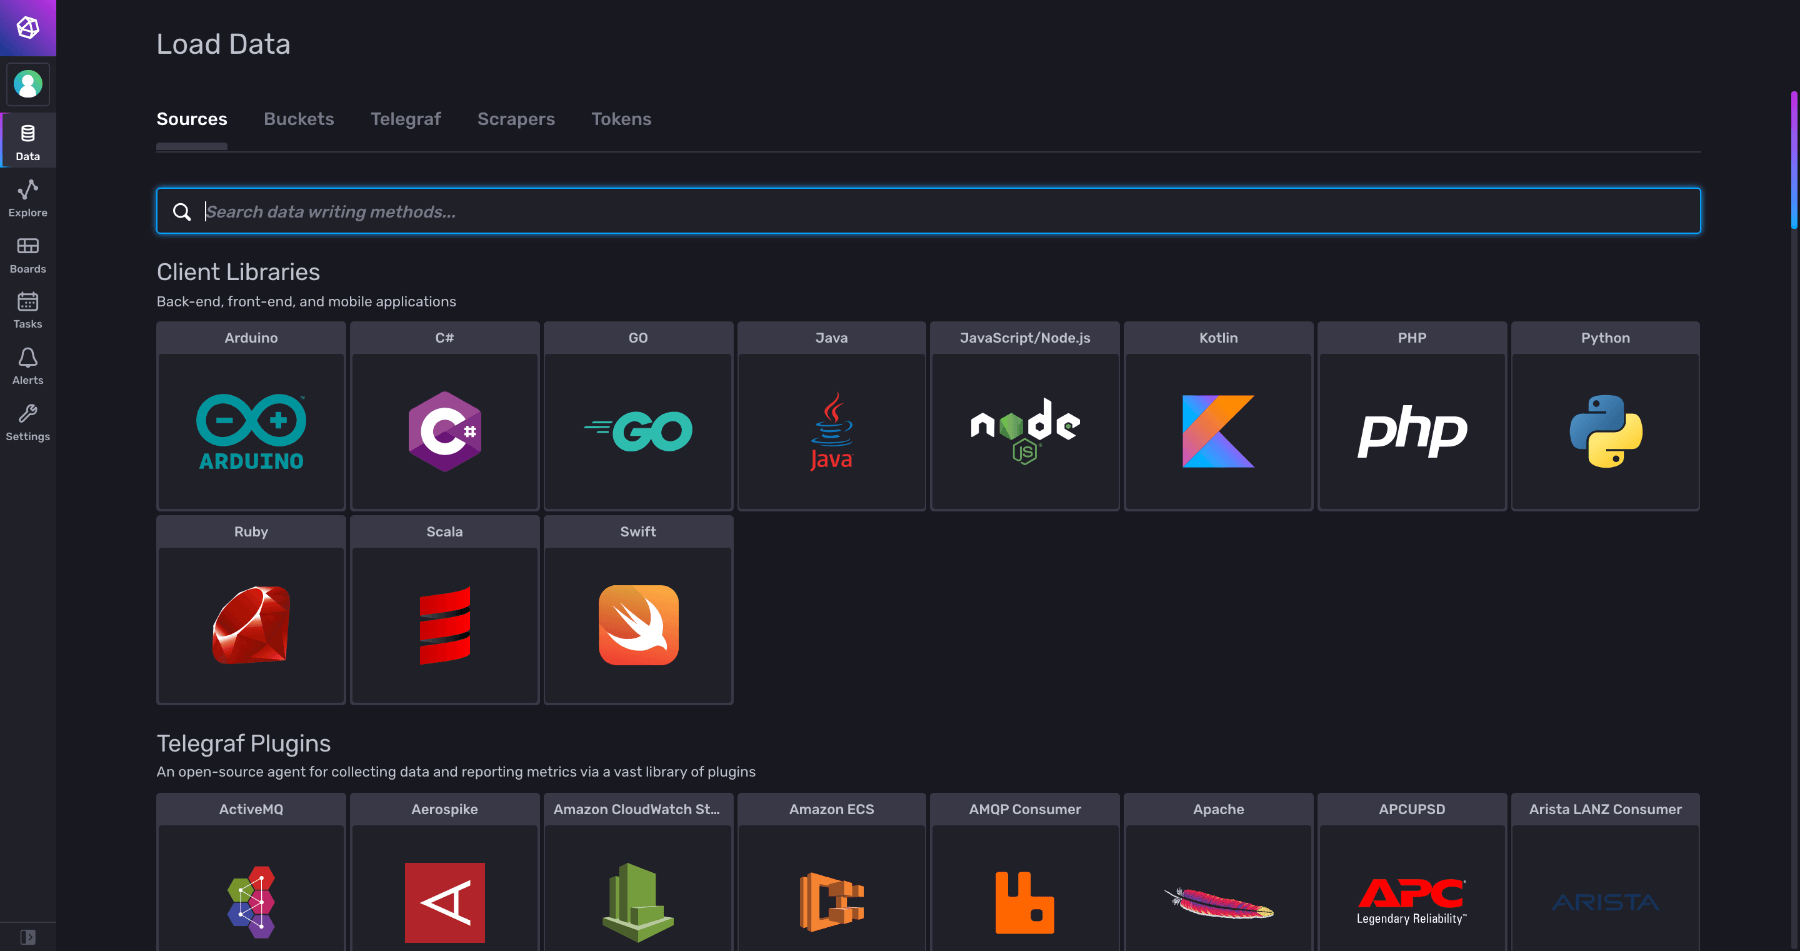
After signing up, you should find yourself on the dashboard page. Click Load your data and then choose the Python client library.
You should now see the below screen:
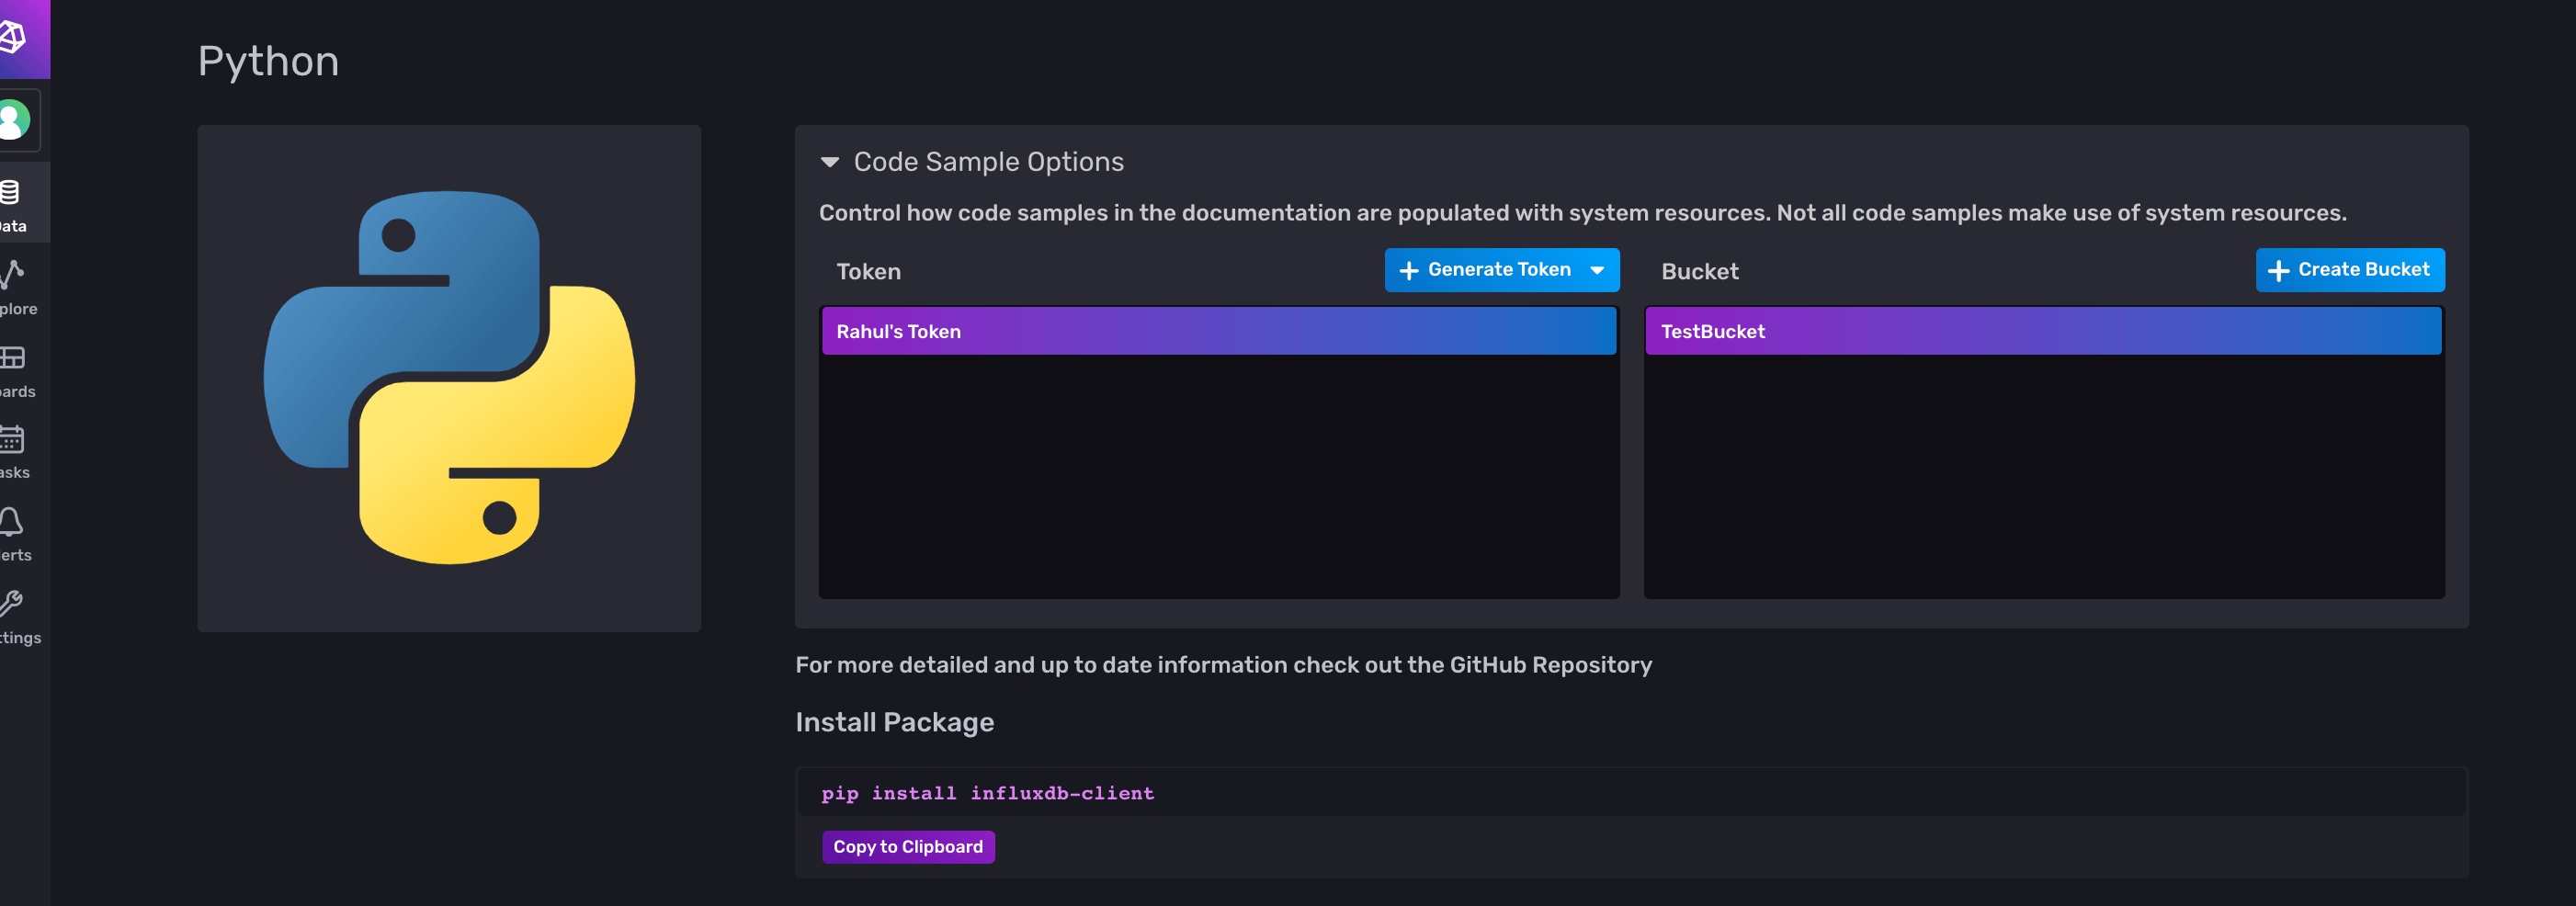
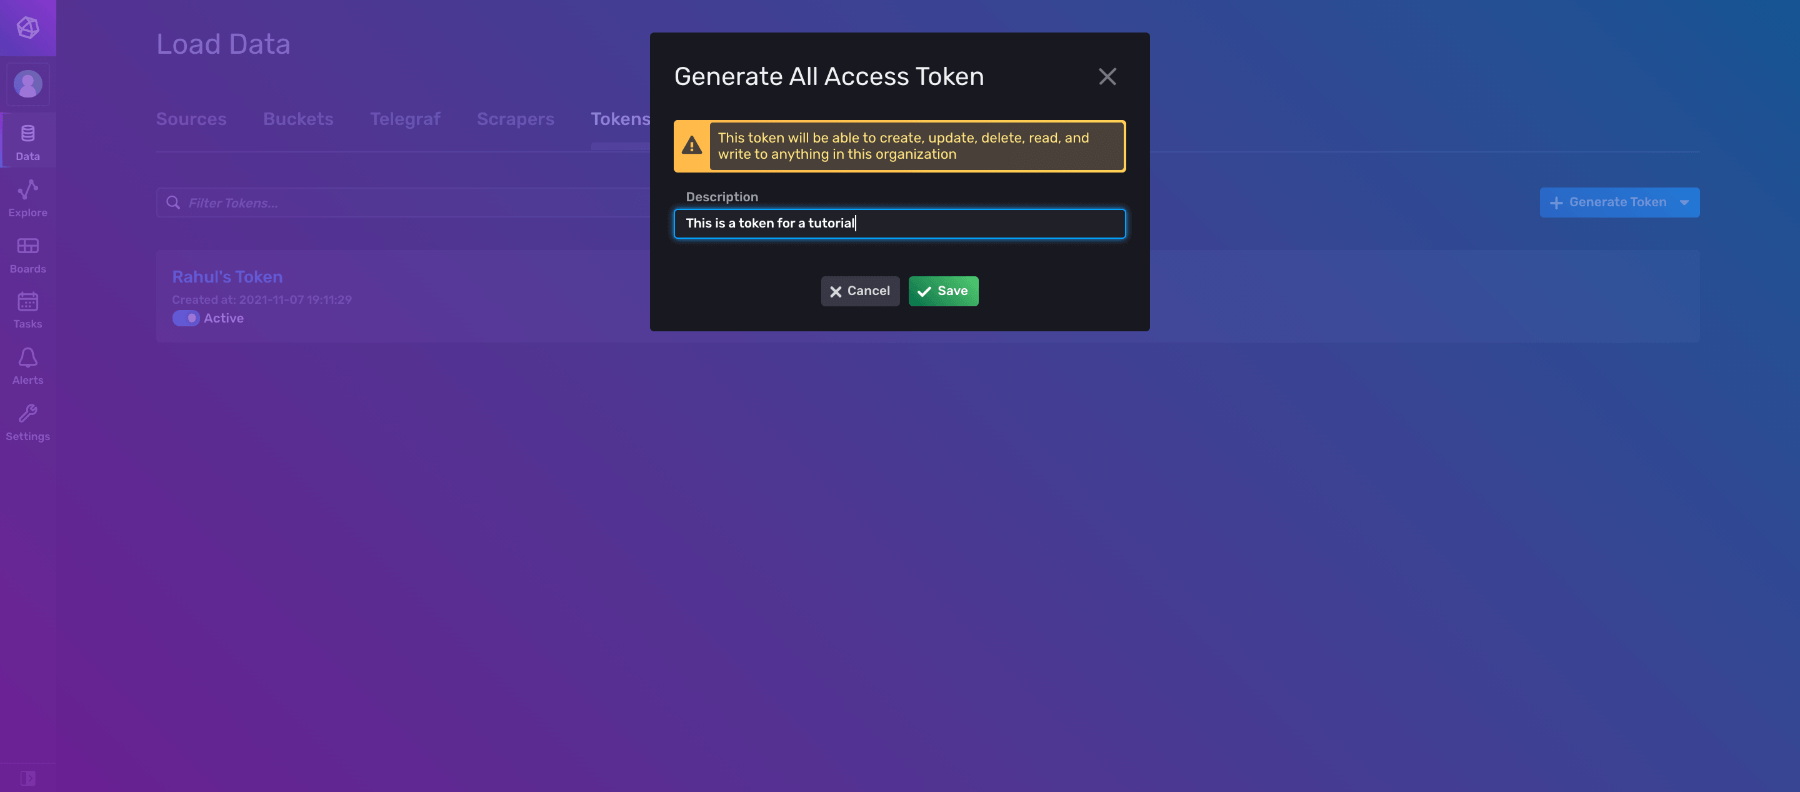
Under Token, there should already be a token listed. However, if you’d like, you can generate a new token for this tutorial. Click Generate Token and select All Access Token since you will be updating and deleting data later in the tutorial.
Note that InfluxDB will raise a warning at this point, but you can ignore it for now.
Now, you’ll have to set up a Python virtual environment. Create a new folder for the tutorial:
mkdir influxDB-Tutorial
Then change your directory into the new folder:
cd influxDB-Tutorial
Create a virtual environment:
python3 -m venv venv
Activate it.
source venv/bin/activate
Finally, install InfluxDB’s client library:
pip install influxdb-client
Create a new file named __init.py__, then go back to the InfluxDB UI:
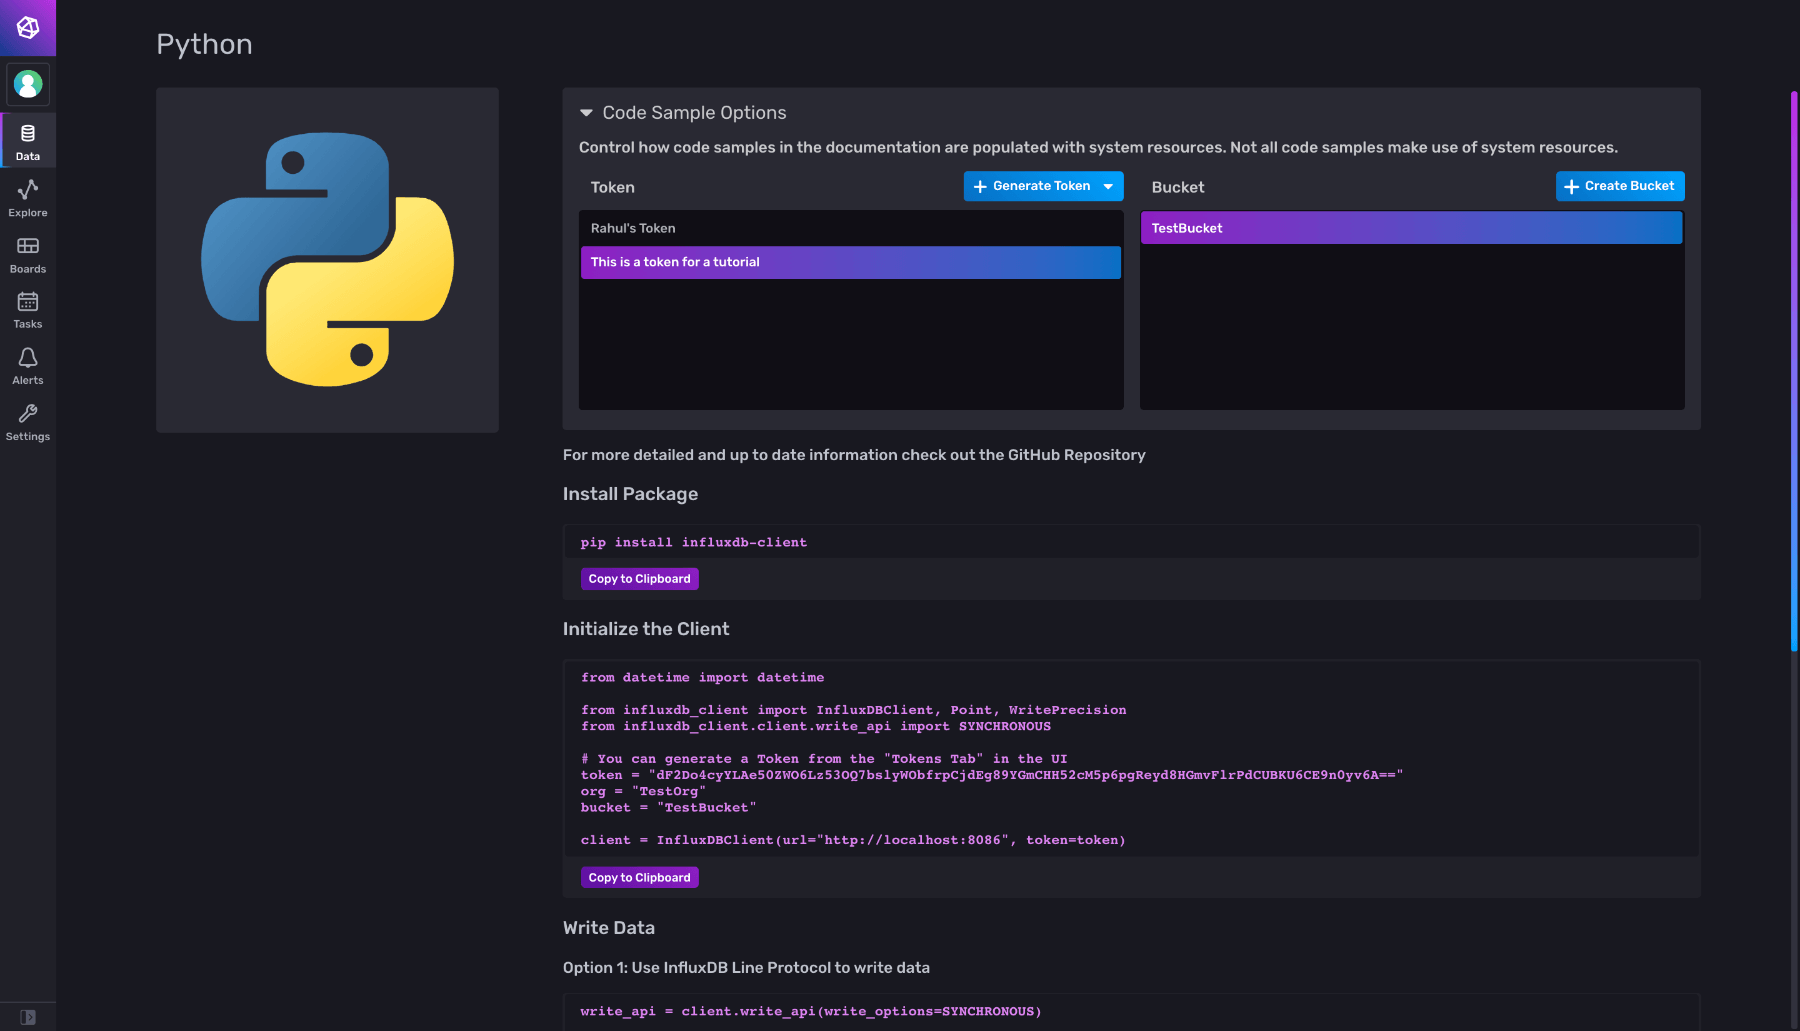
Select the appropriate token and bucket, then copy the code snippet under Initialize the Client and paste it in your Python file. The code snippet will be automatically updated if you change your token/bucket selection.
Next, run your Python file:
python3 __init__.py
If no error messages are shown in the terminal, you have successfully connected to InfluxDB.
To follow best practices, you can store your credentials in an .env file. Create a file named .env and store the following information:
TOKEN = 'YOUR TOKEN'
ORG = 'YOUR ORG NAME'
BUCKET = 'YOUR BUCKET NAME'
Then install the python-dotenv module to read the .env variables:
pip3 install python-dotenv
Finally, update your Python file to load the data from the .env file:
from datetime import datetime
from dotenv import load_dotenv, main
import os
from influxdb_client import InfluxDBClient, Point, WritePrecision
from influxdb_client.client.write_api import SYNCHRONOUS

load_dotenv()
# You can generate a Token from the "Tokens Tab" in the UI
token = os.getenv('TOKEN')
org = os.getenv('ORG')
bucket = os.getenv('BUCKET')

client = InfluxDBClient(url="http://localhost:8086", token=token)
Note that you will need to change the url parameter if you are using an InfluxDB Cloud account. The URL will depend on which cloud region you chose. The cloud URLs can be found in the docs here.
The lines that are importing the DateTime module and the InfluxDB library will be required later on in the tutorial. It’s a good practice to have all your import statements together at the beginning. However, if you choose to, you can import them when necessary as well.
Alternatively, you can store your credentials in a file with the extension .ini or .toml and use the from_config_file function to connect to InfluxDB.
CRUD operations with influxdb-client-python
This article used the yfinance module in Python to gather some historical stock data. Install it using the following command:
pip install yfinance
You can use the following code snippet to get the data:
import yfinance as yf
data = yf.download("MSFT", start="2021-01-01", end="2021-10-30")
print(data.to_csv())
Make sure to pass a filename parameter to the to_csv method; this will store the CSV locally so you can read the data later.
Alternatively, you can get the CSV file from the GitHub repo.
Next, create a class and add the CRUD operations as its methods:
class InfluxClient:
    def __init__(self,token,org,bucket):
        self._org=org
        self._bucket = bucket
        self._client = InfluxDBClient(url="http://localhost:8086", token=token)
If you are using a cloud instance of InfluxDB, you will want to replace the URL parameter with the proper cloud region.
To create an instance of the class, use this command:
IC = InfluxClient(token,org,bucket)
Write data
InfluxDBClient has a method called write_api which is used to write data into your database. Below is the code snippet for this method:
from influxdb_client.client.write_api import SYNCHRONOUS, ASYNCHRONOUS

def write_data(self,data,write_option=SYNCHRONOUS):
    write_api = self._client.write_api(write_option)
    write_api.write(self._bucket, self._org , data,write_precision='s')
InfluxDBClient supports asynchronous and synchronous writes, and you can specify the write type as required.
For more information about asynchronous writes, see How to use Asyncio in influxdb-client.
The data parameter can be written in three different ways, as shown below:
Line Protocol string
# Data Write Method 1
IC.write_data(["MSFT,stock=MSFT Open=62.79,High=63.84,Low=62.13"])
Note that the string has to follow a particular format:
measurementName,tagKey=tagValue fieldKey1="fieldValue1",fieldKey2=fieldValue2 timestamp
There’s a space between the tagValue and the first fieldKey, and another space between the last fieldValue and timeStamp. While parsing, these spaces are used as separators; therefore, you have to format it in the manner shown above. Note also that in this case I assumed that the first field value, fieldValue1, is a string, while fieldValue2 is a number. Therefore, fieldValue1 should appear in quotes.
Note also that the timestamp is optional. If no timestamp is provided, InfluxDB uses the system time (UTC) of its host machine. You can read more about Line Protocol here.
Data point structure
# Data Write Method 2
IC.write_data(
[
Point('MSFT')
.tag("stock","MSFT")
.field("Open",62.79)
.field("High",63.38)
.field("Low",62.13)
.time(int(datetime.strptime('2021-11-07','%Y-%m-%d').timestamp()))
],
)
If you do not want to deal with the format in the Line Protocol String, you can use the Point() Class. This ensures that your data is properly serialized into line protocol.
Dictionary style
# Data Write Method 3
IC.write_data([
{
"measurement": "MSFT",
"tags": {"stock": "MSFT"},
"fields": {
"Open": 62.79,
"High": 63.38,
"Low": 62.13,
},
"time": int(datetime.strptime('2021-11-07','%Y-%m-%d').timestamp())
},
{
"measurement": "MSFT_DATE",
"tags": {"stock": "MSFT"},
"fields": {
"Open": 62.79,
"High": 63.38,
"Low": 62.13,
},
}
],write_option=ASYNCHRONOUS)
In this method, you’re passing two data points and setting the write option to ASYNCHRONOUS. This is Python-friendly, since the data is passed as a dictionary.
All the different ways to write the data are consolidated in the below gist:
# Data Write Method 1
IC.write_data(["MSFT_2021-11-07_Line_Protocol,stock=MSFT Open=62.79,High=63.84,Low=62.13"])

# Data Write Method 2
IC.write_data(
    [
        Point('MSFT_2021-11-07_Point_Class')
        .tag("stock","MSFT")
        .field("Open",65)
        .field("High",63.38)
        .field("Low",62.13)
        .time(int(datetime.strptime('2021-11-07','%Y-%m-%d').timestamp()))
    ],
    )

# Data Write Method 3
IC.write_data([
    {
        "measurement": "MSFT_2021-11-07_Dictionary_Method",
        "tags": {"stock": "MSFT"},
        "fields": {
                "Open": 66,
                "High": 63.38,
                "Low": 62.13,
                },
        "time": int(datetime.strptime('2021-11-07','%Y-%m-%d').timestamp())
    },
    {
        "measurement": "MSFT_DATE",
        "tags": {"stock": "MSFT"},
        "fields": {
                "Open": 67,
                "High": 63.38,
                "Low": 62.13,
                },
    }
],write_option=ASYNCHRONOUS)
Next, insert all the data for the MSFT stock and the AAPL stock. Since the data is stored in a CSV file, you can use the first method – Line Protocol String – to write the data:
import csv
MSFT_file = open('Data/MSFT.csv')
csvreader = csv.reader(MSFT_file)
header = next(csvreader)
rows = []
for row in csvreader:
        date,open,high,low = row[0],row[1],row[2],row[3]
        line_protocol_string = ''
        line_protocol_string+=f'MSFT_{date},'
        line_protocol_string+=f'stock=MSFT '
        line_protocol_string+=f'Open={open},High={high},Low={low} '
        line_protocol_string+=str(int(datetime.strptime(date,'%Y-%m-%d').timestamp()))
        rows.append(line_protocol_string)

IC.write_data(rows)
You can insert the data for the AAPL stock by changing the file path and strings from MSFT to AAPL:
AAPL_file = open('Data/AAPL.csv')
csvreader = csv.reader(AAPL_file)
Reading the data
InfluxDBClient also has a method called query_api that can be used to read data. You can use queries for various purposes, such as filtering your data based on a specific date, aggregating your data within a time range, finding the highest/lowest values in a time range, and more. They are similar to queries you would use in SQL. You’ll need to use queries when reading data from InfluxDB.
The following code is for our class’s read method:
def query_data(self,query):
    query_api = self._client.query_api()
    result = query_api.query(org=self._org, query=query)
    results = []
    for table in result:
        for record in table.records:
            results.append((record.get_value(), record.get_field()))
    print(results)
    return results
Here, it accepts a query and then executes it. The return value of the query is a collection of Flux Objects that match your query. The Flux Object has the following methods:
.get_measurement()
.get_field()
.values.get("<your tags>")
.get_time()
Two query examples are shown below that demonstrate the query_data function in action. The first query returns the high value for MSFT stock since Oct. 1, 2021, and the second query returns the high value for the MSFT stock on 2021-10-29.
'''
    Return the High Value for MSFT stock for since 1st October,2021
'''
query1 = 'from(bucket: "TestBucket")\
|> range(start: 1633124983)\
|> filter(fn: (r) => r._field == "High")\
|> filter(fn: (r) => r.stock == "MSFT")'
IC.query_data(query1)

'''
    Return the High Value for the MSFT stock on 2021-10-29
'''
query2 = 'from(bucket: "TestBucket")\
|> range(start: 1633124983)\
|> filter(fn: (r) => r._field == "High")\
|> filter(fn: (r) => r._measurement == "MSFT_2021-10-29")'
IC.query_data(query2)
Make sure you change the bucket name in the beginning of the query as needed. In my case, my bucket name is TestBucket.
Updating the data
Unlike the Write and Query APIs, InfluxDB does not have an Update API. The statement below is taken from their documentation about how they handle duplicate data points.
For points that have the same measurement name, tag set, and timestamp, InfluxDB creates a union of the old and new fieldsets. For any matching field keys, InfluxDB uses the field value of the new point
To update a data point, you need to have the name, tag set, and timestamp and simply perform a write operation.
Deleting data
You can delete data using delete_api. Below is some code demonstrating how to delete data:
def delete_data(self,measurement):
    delete_api = self._client.delete_api()
    start = "1970-01-01T00:00:00Z"
    stop = "2021-10-30T00:00:00Z"
    delete_api.delete(start, stop, f'_measurement="{measurement}"', bucket=self._bucket, org=self._org)
Delete functions require the measurement value of the data point. The following code shows a simple use case of the delete function:
'''
  Delete Data Point with measurement = 2021-10-29
'''
IC.delete_data("MSFT_2021-10-29")

'''
    Return the High Value for the MSFT stock on 2021-10-29
'''
query2 = 'from(bucket: "TestBucket")\
|> range(start: 1633124983)\
|> filter(fn: (r) => r._field == "High")\
|> filter(fn: (r) => r._measurement == "MSFT_2021-10-29")'
IC.query_data(query2)
InfluxDB’s documentation includes a list of best practices for writing data. There are also some best practices for data layout and schema design, which you should follow for the best results.
Some practical use cases of time series databases
This article examined a simple use case of a TSDB to store stock values, so you could analyze historical stock prices and forecast future values. However, you could also work with IoT Devices, sales data, and any other data series which is time-varying.
Some other practical use cases include:
- Time series forecasting using Tensorflow and InfluxDB
- Integrating InfluxDB with IFTTT to monitor your smart home
- Monitoring your internet speed
Conclusion
Hopefully, this guide empowered you to set up your own instance of InfluxDB. You learned how to build a simple app to perform CRUD Operations using InfluxDB’s Python client library, but if you want to take a closer look at anything, you can find the repo with the entire source code here.
Check out InfluxDB’s open source TSDB. It’s got client libraries for ten programming languages including Python, C++, and JavaScript, and it’s also got a lot of built-in visualization tools so you can see exactly what your data is doing.
About the author:

Rahul is a computer engineering student who likes playing around with different libraries/APIs.
