TL;DR InfluxDB Tech Tips; Creating Buckets with the InfluxDB API
By
Anais Dotis-Georgiou
updated December 14, 2025
Product
Use Cases
Developer
Navigate to:
Whether you’re using InfluxDB Cloud or InfluxDB OSS, the InfluxDB API provides a simple way to interact with your InfluxDB instance. The InfluxDB v2 API offers a unified approach to querying, writing data to, and assessing the health of your InfluxDB instances. In today’s Tech Tips post, we’re learning about how to create and list buckets. Buckets are named locations in InfluxDB where time series data is written to. Buckets are the highest level of organizational structure in the InfluxDB data layout. Each bucket has a retention policy that describes the duration for which data is kept within that bucket.
Note: In today’s tutorial we’ll use the free tier of InfluxDB Cloud. If you’re running InfluxDB 2.0-rc or a previous OSS version, replace the URLs with your http://localhost:8086/ or http://localhost:9999/ respectively. While you could use any API development tool – like Postman – or curl to execute the API calls described in this TL;DR, we’re using Python and the Requests library.
Using the API for efficient IoT application development
Automating the creation and listing of buckets with the API is useful for a variety of tasks. For example, imagine you’re building an IoT application on top of InfluxDB. Specifically let’s assume that you’re collecting ephemeral data and that you’re monitoring the environment of biological cultures. Every time a scientist starts a new experiment, you might want to create a new bucket to write the culture room data to. That’s because we’re assuming that the scientist is only interested in monitoring the environment of the cultures throughout the duration of the experiment. After the experiment is finished, the culture data is no longer useful.
Growing cultures is similar to making a souffle. You want to make sure that your baking temperature is constant while you’re baking. However, if there is a disturbance and your souffle ruins during baking, you’re not interested in keeping the old oven temperature data. Instead, you’ll simply fix the oven and make sure it’s working for the next bake. Writing the data to a new bucket allows the IoT developers to easily expire culture data from old experiments and isolate the culture growth event data in individual measurements within a bucket. Therefore, the scientists are able to compare incubations and make sure that their culture growth is successful throughout their experiment.
Creating a bucket with the InfluxDB v2 API
In order to create a bucket, you’ll need:
- The correct endpoint from the InfluxDB v2 API Documentation.
- An All Access Token – most likely you'll use the one you generated when you registered for your InfluxDB account. You can find your tokens in the Data tab in the navigation bar.

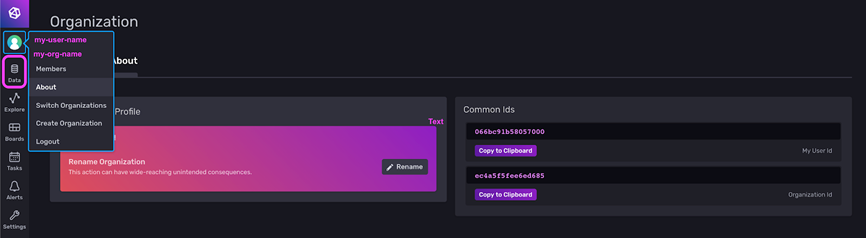
- Your orgID. Click on the Account dropdown in the navbar. This is directly above the Data tab where you can find your tokens. This dropdown will list your username as well as org-name. Click on About to get to your user ID and orgID.
- The payload structure for the POST from the InfluxDB v2 API documentation.
To create a bucket, use the following script which leverages the information you just gathered above:
import requests
# url = 'https://us-west-2-1.aws.cloud2.influxdata.com/api/v2/bucket'
# or if you're using InfluxDB OSSr
# url = 'http://localhost:8086/api/v2/buckets'
headers = {'Authorization': 'Token MdxASmL0yKZZ4bcDP7oRzMDMJ_8h8ugZuG0LfgvX4eD-euBH0blCpxs596bU1EEgcoKsTLvxMjHQfvKq6PGM_Q=='}
payload = {
"orgID": "ec4a5f5fee6ed685",
"name": "mybucket",
"description": "create a bucket",
"rp": "myrp",
"retentionRules":[
{
"type": "expire",
"everySeconds": 86400
}
]
}
# r = requests.get('http://localhost:8086/api/v2/authorizations/', headers=headers)
r = requests.post(url, headers=headers, json=payload)
print(r.text)
When you create the bucket, you can include a description as well as a retention policy. For this bucket, our data will expire every 24 hrs. This is specified in the “retentionRules” portion of the payload. No rules means data never expires. After running the script, you should see the following response:
{
	"id": "eef18cc593a9da5b",
	"orgID": "ec4a5f5fee6ed685",
	"type": "user",
	"description": "create a bucket",
	"name": "mybucket",
	"rp": "myrp",
	"retentionRules": [
		{
			"type": "expire",
			"everySeconds": 86400
		}
	],
	"createdAt": "2020-10-15T17:33:14.958035Z",
	"updatedAt": "2020-10-15T17:33:14.958035Z",
	"links": {
		"labels": "/api/v2/buckets/eef18cc593a9da5b/labels",
		"members": "/api/v2/buckets/eef18cc593a9da5b/members",
		"org": "/api/v2/orgs/ec4a5f5fee6ed685",
		"owners": "/api/v2/buckets/eef18cc593a9da5b/owners",
		"self": "/api/v2/buckets/eef18cc593a9da5b",
		"write": "/api/v2/write?org=ec4a5f5fee6ed685\u0026bucket=eef18cc593a9da5b"
	},
	"labels": []
}
Listing buckets with the InfluxDB v2 API
In order to list buckets with the InfluxDB v2 API, you need the same information as above. This script allows you to list all of your buckets:
import requests
# url = 'https://us-west-2-1.aws.cloud2.influxdata.com/api/v2/bucket'
# or if you're using InfluxDB OSSr
# url = 'http://localhost:8086/api/v2/buckets'
headers = {'Authorization': 'Token MdxASmL0yKZZ4bcDP7oRzMDMJ_8h8ugZuG0LfgvX4eD-euBH0blCpxs596bU1EEgcoKsTLvxMjHQfvKq6PGM_Q=='}
r = requests.get(url, headers=headers)
print(r.text)
After running the script, you should see all of your tokens listed. This is a portion of the response that includes the bucket we just created.
{
	"links": {
		"self": "/api/v2/buckets?descending=false\u0026limit=20\u0026offset=0"
	},
	"buckets": [
		{
			"id": "3624665d39427203",
			"orgID": "ec4a5f5fee6ed685",
			"type": "user",
			"name": "my-bucket",
			"retentionRules": [],
			"createdAt": "2020-10-06T18:23:02.689376Z",
			"updatedAt": "2020-10-06T18:23:02.689376Z",
			"links": {
				"labels": "/api/v2/buckets/3624665d39427203/labels",
				"members": "/api/v2/buckets/3624665d39427203/members",
				"org": "/api/v2/orgs/ec4a5f5fee6ed685",
				"owners": "/api/v2/buckets/3624665d39427203/owners",
				"self": "/api/v2/buckets/3624665d39427203",
				"write": "/api/v2/write?org=ec4a5f5fee6ed685\u0026bucket=3624665d39427203"
			},
			"labels": []
		}]
 }
Next steps for managing buckets with the InfluxDB v2 API
I hope this InfluxDB Tech Tips post inspires you to take advantage of the InfluxDB v2 API to create buckets. It’s also worth noting that you can do even more with buckets and the API. You can assign owners to buckets, manage members within your organization, and give members permission to specific buckets only. If you are creating an IoT application or using the API for another reason, please ask us for help and share your story! Share your thoughts, concerns, or questions in the comments section, on our community site, or in our Slack channel. We’d love to get your feedback and help you with any problems you run into!
