Track Fortnite Player Performance with InfluxDB, Telegraf and Python
By
Adam Silverman
updated December 14, 2025
Product
Use Cases
Developer
Navigate to:
Although I’m not much of a gamer, ever since my middle-school-aged son introduced me to the online game Fortnite, I’ve been having a blast as I improve my skills week by week. It turns out I’m not alone as my old college friends, now with kids of their own, team up with us as we battle other players from around the world while catching up with each other. No wonder why Fortnite, produced by Epic Games, has over 350 million players and is considered one of the most popular online video games ever made.
Although there are plenty of third-party Fortnite trackers, most of them provide current stats with limited time series visualizations. This makes it hard, if not impossible, to view Fortnite match history. By using a time series database, InfluxDB, I set out to build real-time dashboards to visualize and alert on our progress and gain insight into how we perform compared to other players.
Overview of my Fortnite tracker
There are three main components that I focused on to develop this Fortnite player tracking system:
- Data gathering: The first part involved data gathering, which uses Telegraf and Python to retrieve the data and send it to InfluxDB Cloud.
- Dashboards: The second part focused on developing dashboards using Flux queries and query variables in the InfluxDB Script Editor to visualize player performance.
- Alerting: The last component dealt with alerting since I wanted to be notified when my friends and family win matches. The smile my son gave when I congratulated him at dinnertime one evening for winning a solo match made this feature worthwhile!
Although all three dashboards provide useful information to track player performance, my favorite dashboard is the Fortnite - Player Comparison Dashboard, which displays a match-up analysis between any two players, with the winner crowned with a giant celebratory emoji. See how you stack up against your friends, family, or the pros!
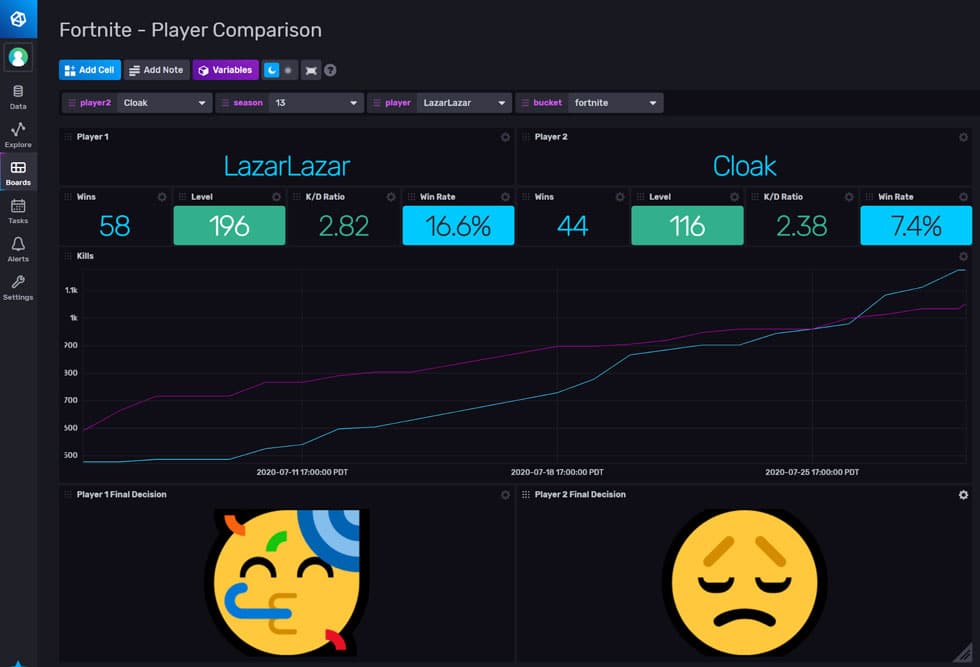 <figcaption> One of the dashboards that we’ll be setting up in your InfluxDB Cloud account</figcaption>
Here’s a detailed, step-by-step tutorial of how to build Fortnite leaderboards using an unofficial Fortnite API and InfluxDB Cloud.
How to use the Fortnite API to show leaderboard stats
First, sign up for a free unofficial Fortnite API account to get a Fortnite API token. The free account is good enough; you don’t need the paid account unless you’re doing over 10,000 requests per day. This limit of 10k requests lets you poll once every ten seconds, which is more than enough to use the free API for Fortnite without getting access denied.
Then, go into Fortnite itself, and make sure the Show on Career Leaderboard option is set to ON in the Account and Privacy section. Each of your friends whose stats you want to track will need to do this, as well.
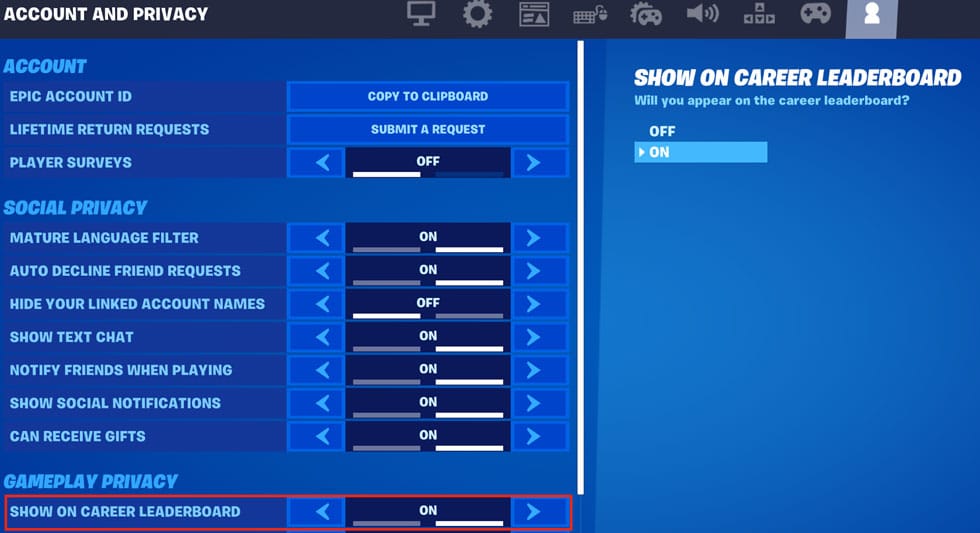 <figcaption> Fortnite Account and Privacy settings</figcaption>
Set up your computer
Just to be clear, this tutorial works if you have a Mac or Linux box. (My apologies to all you Windows users out there!)
Make sure you have the curl terminal command installed on your computer, since we’ll use that to interact with the Fortnite API. Here’s how to install curl on macOS, and how to install curl on Linux.
We’ll be using Python, too, in order to run a Python script. You’ll want the latest version, version 3. Here’s how to install Python 3 on Mac, and how to install Python on Linux.
Download and install Telegraf, our open source data collection agent, available on macOS and Linux (and Windows, though that’s out of scope for this post). Here’s how to install Telegraf. If you’re on a Mac and use Homebrew, just run the following command in Terminal:
brew install telegraf
Once Telegraf is installed, note which directory it is located in. You might want to put that path location into your $PATH as well.
Next, get the InfluxDB v2.0.0-beta CLI, available on macOS or Linux, which you’ll run in a terminal to import the InfluxDB template for Fortnite. To do that:
- Go to https://portal.influxdata.com/downloads/
- Click on the InfluxDB 2.0 button:
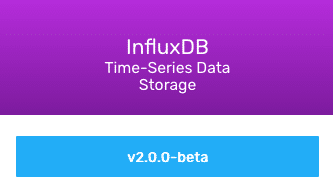
Choose InfluxDB 2.0 - Choose "CLI Only" for Mac or Linux. This gives you access to commands that you can run in a terminal to interact with InfluxDB Cloud, without having to download InfluxDB OSS bits that you won't be using.
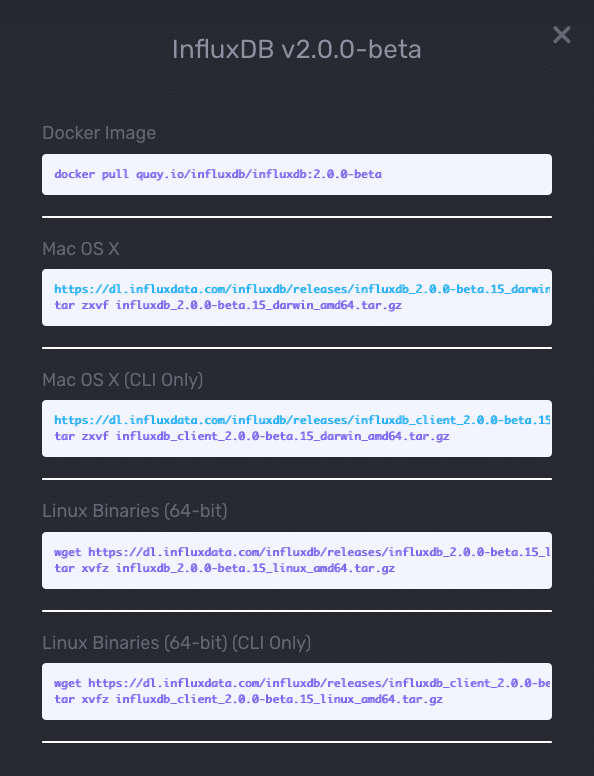 <figcaption> Options for downloading InfluxDB</figcaption>
How to get InfluxDB Cloud
Sign up for a free InfluxDB Cloud account. This will provide you with a time series database that you don’t need to set up or maintain.
Once you’ve done so, create and copy your InfluxDB authentication token from the Data / Tokens section of the InfluxDB Cloud UI. To see the actual token value, click on the token name in the UI.
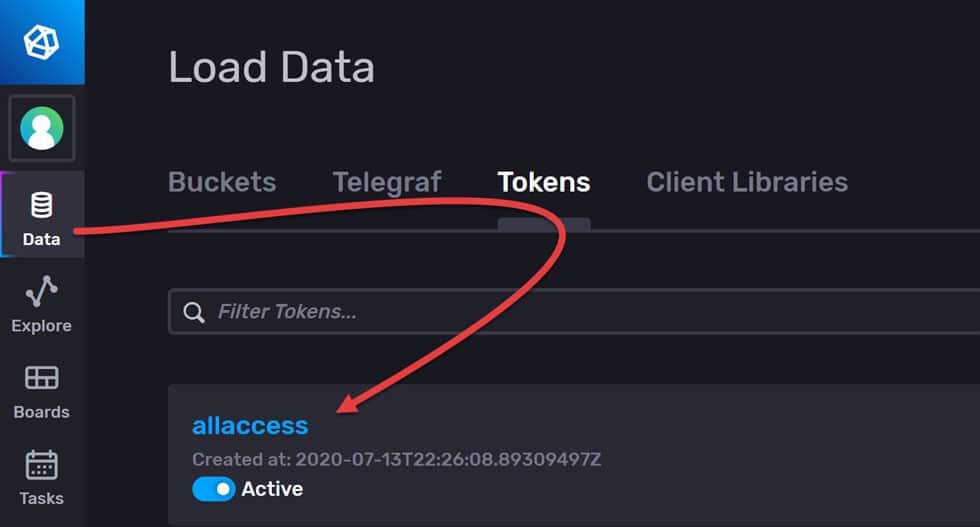 <figcaption> Click on the token name to get the token value</figcaption>
How to get data from Fortnite using curl
First, you need to get the Fortnite player ID. To do this, open a Terminal window (here’s how to do that on Mac, and on Linux) and run the following curl command on the Fortnite API:
curl --request GET 'https://fortniteapi.io/lookup?username=<USERNAME>' \
       --header 'Authorization: <API_KEY>'
For example, if the username is JohnDoe, and your Fortnite API key is 08fd8613a, you’d enter:
curl --request GET 'https://fortniteapi.io/lookup?username=JohnDoe' \
       --header 'Authorization: 08fd8613a'
If the username exists, the output shows:
{"result":true,"account_id":"4735ce913"}
And if the username doesn’t exist, the output shows:
{"result":false,"error":"This account does not exist"}
Next, we need to check whether the account is returning metrics:
curl --location --request GET 'https://fortniteapi.io/stats?account=<PLAYER_ID>&season=<SEASON>' --header 'Authorization: <API-KEY>'
Using the previous example, and the current season, 13, you’d enter:
curl --location --request GET 'https://fortniteapi.io/stats?account=JohnDoe'&season=13' --header 'Authorization: 08fd8613a''
If the account is returning metrics, you’ll see something like:
..."account":{"level":241,"progress_pct":89},"global_stats":{"squad":{"placetop1":75
If the account is not returning metrics, you’ll see:
..."account":{"level":null,"progress_pct":null},"global_stats":null...
As mentioned previously, if the account is not returning metrics, this indicates the player has Show on Career Leaderboard set to OFF in the Account and Privacy section of their profile.
In order to access performance metrics, the Fortnite API expects to be fed the various player IDs that you’re interested in, in the form of a CSV file with the player IDs.
Download players.csv from the community template, and save it on your machine as players.csv (all lowercase) in your /etc/telegraf directory. Then open your local copy of players.csv with a text editor (such as Visual Studio Code, vim, or TextEdit on Macs).
You’ll see players.csv is seeded with several professional Fortnite players and the second field, pro. The reason we have a field called “pro” is that the metrics for professional and amateur players are so divergent. As a Fortnite player, I like to watch my favorite pro players on YouTube and Twitch, and I also have my set of amateur friends/family who I also want to track. But I don’t want to group them together because their metrics differ too much to visualize cleanly on a single graph.
So to be clear: whether an account is considered “pro” or not is for you to determine manually; the Fortnite API doesn’t provide this information.
In subsequent lines, enter the player ID (which you got from the curl command above), whether they are a pro player or not, and their username. Each line should look like this:
4735ce913,yes,Ninja
Putting this all together, you should end up with a CSV file that looks similar to this:
acct_id,pro,player_name
4735ce9132924caf8a5b17789b40f79c,yes,Ninja
827abb1cd9fb4618991425c2d3ba9b76,yes,bugha
8a3a179679194354b1eae7e3a4620ded,yes,LazarLazar
d44eaa65d78c444abccc7129a0a06a79,yes,Cloak
Save this CSV file as players.csv (all lowercase) in your /etc/telegraf directory.
The above CSV file includes some well-known professional Fortnite players Ninja, Bugha, LazarLazar, and Cloak.
How to load the InfluxDB Template for Fortnite
Now that we have our CSV file, use the influxdb CLI, to import all the Fortnite resources in this InfluxDB template for Fortnite. This includes the Telegraf config, InfluxDB dashboards, variables, alerts and Python script. To do that, run the following command from your terminal:
influx apply -u https://raw.githubusercontent.com/influxdata/community-templates/master/fortnite/fn-template.yml --env-ref=fn_bucket=fortnite
This command pulls the Fortnite player leaderboard template from GitHub and into your InfluxDB Cloud instance. It also creates a bucket called fortnite if necessary. If you’d like to use a different bucket, you can change it as well. Keep in mind that if another bucket is used, the bucket name will need to be updated in the InfluxDB Task called wins, and the InfluxDB query variables called player, player2 and season.
Another change you need to make: the Fortnite - All Players dashboard displays a URL drilldown to the Fortnite - Individual Stats dashboard. This URL must be changed in the Friends & Family and Pros cells:
<INFLUX_HOST>/orgs/<INFLUX_ORG_ID>/dashboards/<FORTNITE_INDIVIDUAL_STATS_DASHBOARD_ID>
where:
<INFLUX_HOST>is your InfluxDB Cloud URL<INFLUX_ORG_ID>is your InfluxDB Cloud org ID (not your email; a hexadecimal number)<FORTNITE_INDIVIDUAL_STATS_DASHBOARD_ID>is the ID of the Fortnite individual stats dashboard, which is displayed right after "dashboards" in its URL, like this:
![]()
To get the full link, open the Fortnite - Individual Stats dashboard and copy the URL up to but not including the “?”. Once you’ve done this, you’ll see some Fortnite-related dashboards in InfluxDB but without any data. To get data into those dashboards, read on.
How to get data from Fortnite using Python
The InfluxDB Fortnite template depends on the Python script below, which takes the CSV file you previously copied and edited as an input, and gets stats for each user. To create this script, copy the text of this Python script into a text editor, then save the file as get_fn_stats.py (all lowercase) in your /etc/telegraf directory.
What this Python script does is loop through each ID and retrieve the performance metrics for each player using the API for Fortnite. I’m not going to paste the entire Python script here, since it’s around 100 lines long. The most interesting section is below; read through the comments to see what each line does.
# Open the csv file /etc/telegraf/players.csv
with open('/etc/telegraf/players.csv', newline='') as csvfile:
    reader = csv.DictReader(csvfile)

    # For each row in our csv file...
    for row in reader:
        # Get the account ID field
        acct_id = row['acct_id']

        # Get the pro field
        pro = row['pro']

        # Set up our HTTP request
        response = requests.get(url,
                        	     headers = {'Authorization': FORTNITE_API_TOKEN},
                                params={'account': acct_id,
                                        'season': season
                                       }
                               )
        # Make our HTTP request, and store the response in data
        data = response.json()
        # Access the Python dictionary (list of name/value pairs)
        data_api_dict = parse_data(data)

        # Find the name/value entry for the current account ID
        data_api_dict['acct_id'] = acct_id
        data_api_dict['pro'] = pro

        # Append the stats for the current account ID to our list of stats
        data_api_list.append(data_api_dict.copy())

# Once we call our stats, write it in JSON to the api_output variable.
api_output = json.dumps(data_api_list)
(For those not familiar with Python: be sure to keep the indentation exactly as written above. Unlike other languages, Python treats the amount of indentation to specify different code blocks. The lines of code with eight spaces of indentation all run within our for loop.)
How to run the Python script in Telegraf
Using the Telegraf exec input plugin, you can schedule the above Python script, which you saved at /etc/telegraf/get_fn_stats.py, to run hourly. With this plugin, you can mark account names, IDs, pro status and season as tags for InfluxDB to index for faster queries by putting the following into your Telegraf configuration file, which you can modify with a text editor:
[[inputs.exec]]
          commands = [ "/etc/telegraf/get_fn_stats.py" ]
          data_format = "json"
          interval = "1h"
          tag_keys = [ "name", "acct_id", "pro", "season" ]
Here’s what each line above means:
[[inputs.exec]]tells Telegraf to load the exec plugincommands = [ "/etc/telegraf/get_fn_stats.py" ]tells the exec plugin to run the Python file we just createddata_format = "json"tells the exec plugin to output in JSON formatinterval = "1h"tells the exec plugin to run once an hour. This is equivalent to "60m". You can also use other values like 10m for 10 minutes, 2h for two hours, and so on.tag_keys = [ "name", "acct_id", "pro", "season" ]tells the exec plugin to add the player name, account ID, pro status (yes or no), and season as tags to each row of line protocol sent to InfluxDB.
Save your Telegraf configuration file as /etc/telegraf/telegraf.conf.
How to send data to InfluxDB Cloud
Also in your Telegraf configuration file, you’ll want to specify where your data is going: which InfluxDB Cloud instance, which account, and which bucket. To do that, add the following to your Telegraf config file:
[[outputs.influxdb_v2]]
  urls = ["$INFLUX_HOST"]
  token = "$INFLUX_TOKEN"
  organization = "$INFLUX_ORG"
  bucket = "$INFLUX_BUCKET"
  namepass = ["exec_fortnite"]
  timeout = "20s"
Here’s what each line above does:
[[outputs.influxdb_v2]]tells Telegraf to write to InfluxDB 2.0 (if you're writing to InfluxDB 1.x, use the influxdb output plugin, without the _v2 at the end).urls = ["$INFLUX_HOST"]is the URL of the InfluxDB database you're sending to.token = "$INFLUX_TOKEN"is your InfluxDB access token.organization = "$INFLUX_ORG"is your InfluxDB organization.bucket = "$INFLUX_BUCKET"is the InfluxDB bucket that you're writing to.namepass = ["exec_fortnite"]is useful if you have multiple InfluxDB output plugins in your Telegraf configuration. It directs Telegraf to only send metrics named exec_fortnite. If you only have one InfluxDB output plugin in your Telegraf config, you can safely remove this line.timeout = "20s"tells Telegraf to wait 20 seconds before timing out when writing data.
The dollar signs in front of $INFLUX_HOST, $INFLUX_TOKEN, $INFLUX_ORG and $INFLUX_BUCKET direct Telegraf to look for environment variables with each of those names. Let’s set those up now.
How to set up environment variables for InfluxDB
The Telegraf configuration requires the following environment variables to be set for InfluxDB Cloud 2:
INFLUX_HOST- the URL of your InfluxDB 2 instanceINFLUX_TOKEN- The token with the permissions to read Telegraf configs and write data to the<FORTNITE>bucketINFLUX_ORG- The name of your organization found on the InfluxDB profile page.INFLUX_BUCKET- The name of the bucket to write toFORTNITE_API_TOKEN- The Fortnite API token
Information on using environment variables can be found in the Telegraf configuration documentation. (If you’re not familiar with how to set environment variables, here’s how to set them on Mac, and on Linux.)
How to run Telegraf
In your terminal, type:
/path/to/telegraf --config /etc/telegraf/telegraf.conf
(Replace “/path/to” with the actual path to Telegraf, of course!)
You’ll see output similar to:
2020-08-05T01:34:54Z I! Starting Telegraf 1.15.2
2020-08-05T01:34:54Z I! Loaded inputs: exec
2020-08-05T01:34:54Z I! Loaded outputs: influxdb_v2
If so, your Telegraf agent is running and should be sending data to InfluxDB. To stop Telegraf, hit ctrl-c on your keyboard.
How to run Telegraf as a service
If you’d like Telegraf to be run as a service, even if you close your terminal window, you should run it as a service. To do this, add the following variables to /etc/default/telegraf:
INFLUX_TOKEN=your_influxdb_token
[email protected]
INFLUX_BUCKET=fortnite
FORTNITE_API_TOKEN=your_fortnite_api_token
Then run one of the following sets of commands, depending on whether you’re on Mac or Linux:
To run Telegraf as a service on a Mac, this command will have launchd start telegraf at next login:
ln -sfv /usr/local/opt/telegraf/*.plist ~/Library/LaunchAgents
To load Telegraf now:
launchctl load ~/Library/LaunchAgents/homebrew.mxcl.telegraf.plist
To check the status of your Telegraf service on Mac:
launchctl list | grep telegraf
If Telegraf is running, you’ll see it listed in the output. If it’s not, you won’t see anything. More in the launchctl man pages.
And to run Telegraf as a service on Linux, use the systemctl command, which comes with Linux distros that support systemd, including Ubuntu, Debian, Red Hat, and Centos:
sudo systemctl restart telegraf # (Re)start Telegraf as a service
sudo systemctl enable telegraf  # Run Telegraf as a service at boot
To check the status of your Telegraf service on Linux:
sudo systemctl status telegraf
The Telegraf installation page provides more details.
How to use InfluxDB Dashboards
The great thing about InfluxDB Templates is that they automatically create dashboards (and other assets) for you, saving you hours if not days of time.
For instance, here is the custom metric Flux script to determine the winner of a one-on-one stats matchup:
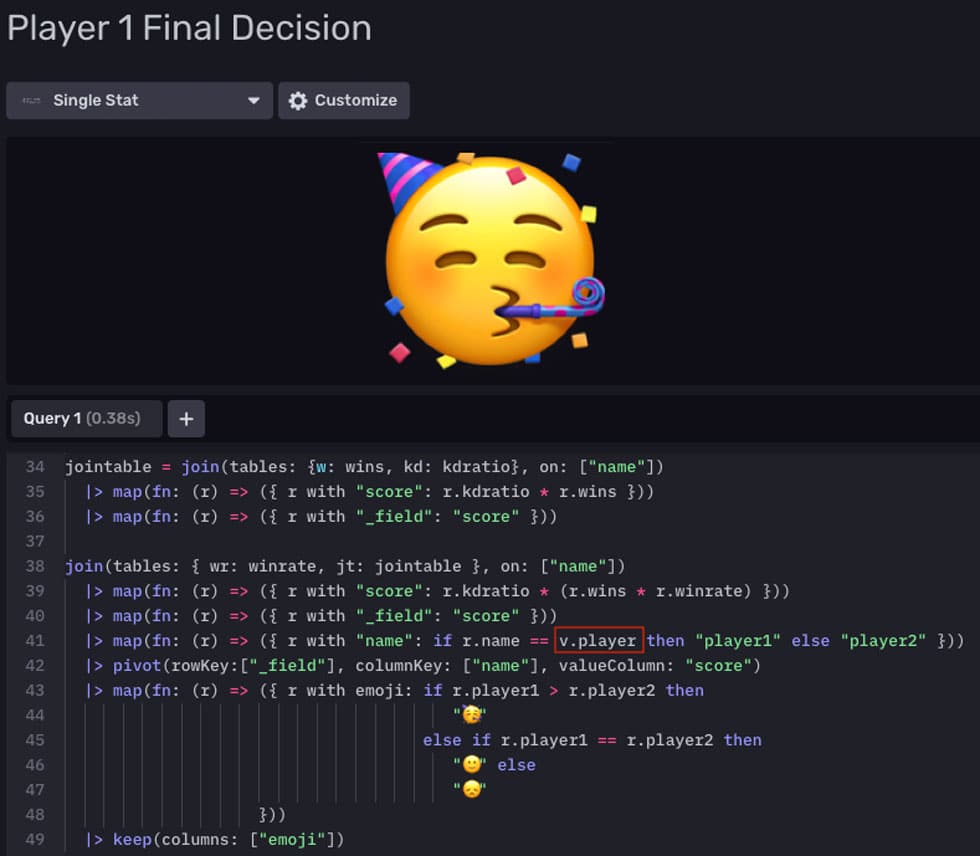 <figcaption> Flux code in InfluxDB query editor</figcaption>
The InfluxDB query variables v.player in the above example is used in the dashboard dropdowns and referenced in Flux scripts across dashboards and cells.
If all is working well, you should see dashboards that look like the following:
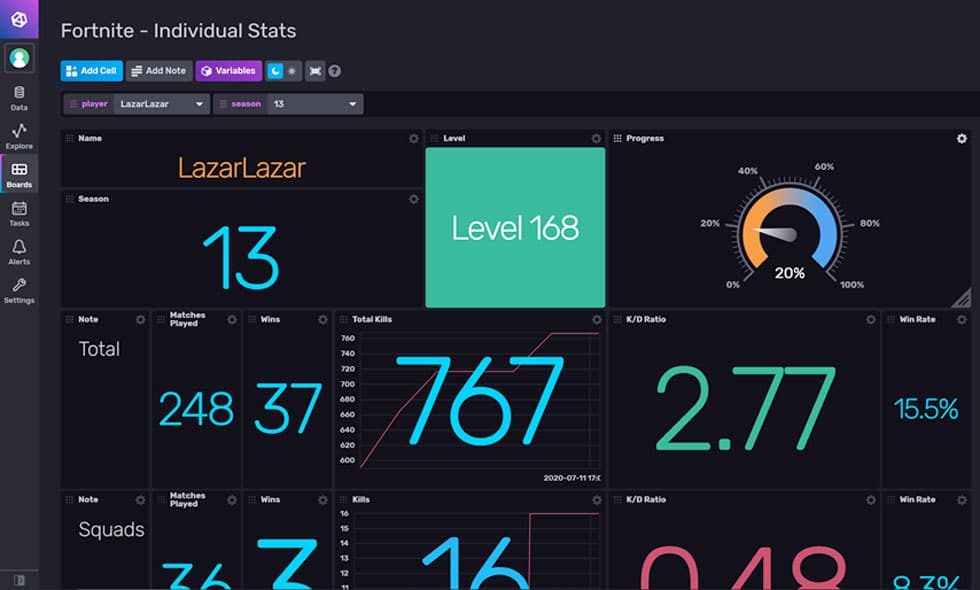 <figcaption> Fortnite dashboard in InfluxDB</figcaption>
Screenshots of all our Fortnite dashboards are in the Fortnite community template readme.
How to securely integrate InfluxDB with Slack
In the InfluxDB Template for Fornite, I created a custom InfluxDB Task with the HTTP Slack endpoint and check built-in. The benefit is that this approach provides you with more control than using an InfluxDB Alert. The tradeoff is that InfluxDB Alerts require less coding knowledge.
To use this InfluxDB task, you need to save the Slack webhook as an InfluxDB secret. An InfluxDB secret is some kind of sensitive information, such as login credentials, account information, or (in this case) a secret URL for your Slack webhook.
You should store your Slack webhook using this InfluxDB CLI command:
influx secret update -k SLACK_WEBHOOK
After running this command you’ll be prompted for a value; enter:
https://hooks.slack.com/services/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
This is our InfluxDB community Slack sandbox, which anyone can use. To access it, go to https://influxcommunity.slack.com, register for Slack if needed, and go to the #notifications-testing channel to see your alerts. You should see something like the following in the Slack UI when your alerts fire:

Granted, your alerts will be mixed in with everyone else’s sandbox alerts. But for simple testing, this should work fine. Please be a good community member, and turn off this alert once you’ve validated that it works.
Once you’ve validated that your Slack notifications are working, you’ll want to set up your own incoming webhooks for your own Slack instance. Because that’s your own secret webhook URL, you’ll definitely want to store it in an InfluxDB secret.
At this point, your Fortnite dashboards and alerts should be populated and running correctly. But let’s go a bit deeper to understand more about how this works.
How to use InfluxDB Tasks to send Slack alerts
Let’s examine the InfluxDB task for alerting. This task was automatically created when you loaded the InfluxDB Template for Fortnite in the step above, using the influx apply CLI command. You can see this code in the template yaml file; just search for “slack_webhook”.
So, you don’t need to do anything to create this task, but it’s instructive to review the Flux code below.
// Retrieve the secret Slack webhook URL
webhook = secrets.get(key: "SLACK_WEBHOOK")

// Define the Slack messaging function
sendSlackMessage = (text) =>
	(slack.message(
		url: webhook,
		token: "",
		channel: "",
		text: text,
		color: "good",
	))

// Retrieve wins from previous period from our fortnite bucket
from(bucket: "fortnite")
	// Look at data starting from 30 to 120 minute ago
	|> range(start: -2h, stop: -30m)
	// Look only for measurements from the Telegraf exec plugin
	// that are related to fortnite.
	|> filter(fn: (r) =>
		(r["_measurement"] == "exec_fortnite"))
	// Look for the fields squad_placetop1, solo_placetop1 & duo_placetop1
	|> filter(fn: (r) =>
		(r["_field"] == "squad_placetop1" or r["_field"] == "solo_placetop1" or r["_field"] == "duo_placetop1"))
	// Ensure that "pro" is properly defined one way or the other
	|> filter(fn: (r) =>
		(r["pro"] == "no" or r["pro"] == "yes"))
	// Group all rows by player name and _field
	|> group(columns: ["name", "_field"])
	// We don't need the start time, stop time, or "is a pro" columns
	|> drop(columns: ["_start", "_stop", "pro"])
	|> difference()
	|> group(columns: ["_time", "name"])
	|> filter(fn: (r) =>
		(r["_value"] == 1))
	// Create a new column with text of Slack message
	|> map(fn: (r) =>
		({r with newColumn: if r["_value"] == 1 then
                            sendSlackMessage(text:
                                "Congratulations to *${string(v: r.name)}* for winning a Fortnite *${strings.trimSuffix(v: r._field, suffix: "_placetop1")}* match! :boom: :boom: :boom:") else
                            100}))
When a player wins a match, the Slack message I showed you above is automatically sent.
The alert condition can be customized so that only friends and family trigger alerts:
|> filter(fn: (r) => (r["pro"] == "no"))
or only one particular player:
|> filter(fn: (r) => (r["name"] == "Ninja"))
When you look in the template yaml file, you’ll see that I’ve set this task to run once an hour:
every: 1h0m0s
Creating the InfluxDB Template
I’ve been tracking and alerting Fortnite since the beginning of Chapter 2 - Season 3 in June and have enjoyed watching how my son and I have been progressing throughout the season. When my Fortnite-playing friends check it out, the first thing they ask is how they can get access, so I decided to create a template that includes everything required for your own Fortnite tracking system. This includes the dashboards, query variables, alerts and Telegraf configuration. Since all assets are labeled fortnite, exporting this as a template is straightforward:
influx export all --filter=labelName=fortnite -f fn-template.yml
You can use this same approach to export your own InfluxDB templates, and easily share your monitoring expertise.
Putting it all together
Here’s a video of how to follow many of the steps above so you can build your own Fortnite player tracking dashboard:
Conclusion
Flux and the InfluxDB UI allowed me to quickly iterate to develop a visualization and alerting solution to track Fortnite player performance over time. If you’d like the same, register for a free InfluxDB Cloud account and install the Fortnite community template so you can start tracking and alerting in no time!
And if you have questions, please ask on our InfluxDB community Slack and community website.
