Using Telegraf on Windows
By
Wojciech Kocjan
updated December 14, 2025
Use Cases
Product
Developer
Navigate to:
Telegraf is an agent that runs on your operating system of choice, schedules gathering metrics and events from various sources and then sends them to one or more sinks, such as InfluxDB or Kafka. For InfluxDB, version 1.x, 2.0 as well as InfluxDB Cloud are supported. Telegraf can collect information from multiple inputs and currently includes over 200 plugins for retrieving information from multiple types of applications. It can also retrieve information about hardware and software from the OS.
One of the questions that gets asked often is: What is the best way to run Telegraf on Windows machines? Our GitHub repository provides documentation on Running Telegraf as a Windows Service. However, in this post, we’re going to go through a step-by-step setup of Telegraf on Windows, including how to securely configure it with credentials for pushing data to various InfluxDB solutions.
We will be doing our installation using an elevated PowerShell process.
In order to run an elevated session of PowerShell, open the Start Menu, find PowerShell, right-click on it and choose the Run as administrator option.
Now, let’s download Windows binaries of Telegraf. Those are available from the https://portal.influxdata.com/downloads/ URL. The example below uses the Invoke-Webrequest PowerShell command for download:
PS> cd ~\Downloads
PS> Invoke-WebRequest https://dl.influxdata.com/telegraf/releases/telegraf-1.80.0_windows_amd64.zip -OutFile telegraf.zip
Next, let’s extract the archive into Program Files folder, which will create C:\Program Files\telegraf folder:
PS> Expand-Archive .\telegraf.zip 'C:\Program Files\'Then create a conf subdirectory and copy the telegraf.conf as conf\inputs.conf:
PS> mkdir 'C:\Program Files\telegraf\conf'
PS> cd 'C:\Program Files\telegraf\conf'
PS> copy ..\telegraf.conf inputs.conf
Copy the telegraf.conf as conf\inputs.conf.
We’re going to separate the outputs section of the file and configure sending data to InfluxDB Cloud specifically. We’ll remove the outputs section from inputs.conf. Edit the file and remove all of the content before the inputs section, leaving the content of the file starting with and including the below lines:
###############################################################################
#                                  INPUTS                                     #
###############################################################################
For editing files, it’s recommended that you start your editor from the elevated PowerShell session the editor started from an elevated process will have access to write the files.
Now, create conf\outputs.conf file that specifies where the data should be sent.
In my case, I want the output to go to my InfluxDB Cloud account, so the file will contain:
[[outputs.influxdb_v2]]
  # URL to InfluxDB cloud or your own instance of InfluxDB 2.0
  urls = ["https://us-west-2-1.aws.cloud2.influxdata.com"]
  ## Token for authentication.
  token = "$INFLUX_TOKEN"
  ## Organization is the name of the organization you wish to write to; must exist.
  organization = "$INFLUX_ORG"
  bucket = "$INFLUX_BUCKET"
For sending data to other instances and/or versions of InfluxDB, the outputs section may differ. Also note that Telegraf can send data to more than one destination, such as InfluxDB 1.x and InfluxDB 2.0.
We recommend that $INFLUX_TOKEN, $INFLUX_ORG and $INFLUX_BUCKET as well as any other connectivity information are replaced with your access token, organization name, the name of the InfluxDB bucket to write data to and any other connectivity information.
At this point it is a good idea to test that Telegraf works correctly:
PS> .\telegraf --config-directory 'C:\Program Files\telegraf\conf' --testThis should output logs indicating telegraf has started, followed by multiple lines of data retrieved from all of the input plugins.
Next, let’s ensure that only the Local System user account can read the outputs.conf file to prevent unauthorized users from retrieving our access token for InfluxDB.
PS> icacls outputs.conf /reset
PS> icacls outputs.conf /inheritance:r /grant system:r
The icacls command is a built-in tool for managing access control lists (ACLs) for objects in Microsoft Windows and is described in more detail here.
The first command removes all ACLs and only inherits permissions from the parent object in our case the C:\Program Files\telegraf\conf directory. The second command does multiple things the /reset flag disables inheritance, effectively removing any ACLs for the file. At this point no user can access the file. The second flag and its value /grant system:r allows the Local System built-in account to read the file.
This way only the Telegraf service will be able to read the configuration on where the data is sent, including the token.
NOTE: All users with administrator access to the Windows machine will be able to change the permissions of the file and read it. However, this prevents non-admin users from retrieving the information.
We can now install Telegraf as a Windows service so that it starts automatically along with our system. To do this, simply run:
PS> cd 'C:\Program Files'
PS> .\telegraf --service install --config-directory 'C:\Program Files\telegraf\conf'
PS> net start
This will create a Telegraf service and start it. The output should include the following message:
The Telegraf Data Collector Service service is starting.
The Telegraf Data Collector Service service was started successfully.
At this point our Telegraf is now ready to run and we have applied best practices for storing and accessing the credentials for sending data to InfluxDB.
NOTE: As part of security best practices, the token created for Telegraf should also have its scope limited only being able to write data to the specified bucket where it should be sent.
As an alternative, it’s also possible to keep $INFLUX_TOKEN, $INFLUX_ORG and $INFLUX_BUCKET in your configuration file. Those values will get read and replaced with environment variables by the Telegraf service.
By default, Windows services use all of the environment variables set by Microsoft Windows as well as system-wide environment variables. It’s also possible to pass environment variables specific to a service by setting them in registry key related to that service.
In order to pass additional environment variables to Telegraf service, run registry editor and go to HKEY_LOCAL_MACHINE\SYSTEM\CurrentControlSet\Services\telegraf key after setting Telegraf as a system service. This is where Windows maintains all of the information for this specific service.
Create a Multi-String Value registry with the name Environment:

Next, edit the values for the registry, setting each line to a Key=Value format, where Key is environment variable name and Value is its value such as:
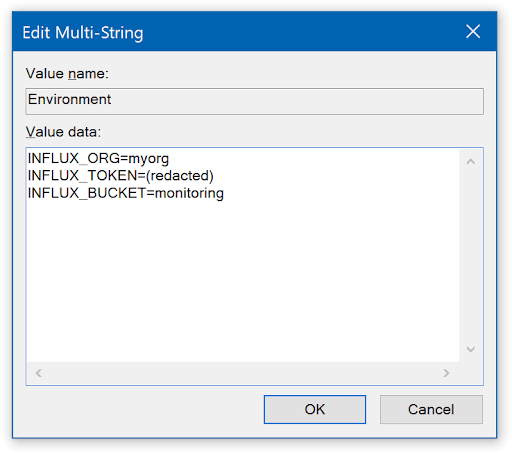
After that the Telegraf service will have the required environment variables set.
The downside of using Environment registry is that it is harder to manage ACLs and prevent unauthorized users from reading the value. Therefore, if possible, we recommend writing credentials in the file system and using ACL for the configuration file as ACLs for files can also be inspected using tools such as Windows Explorer.
At this point, our Windows server, desktop or laptop is now sending its performance metrics and other monitoring data to our InfluxDB database(s) and can be viewed from the Data Explorer. InfluxDB can also show any information using Dashboards.
