Building a Better Telegraf Plugin (Still for Beginners)
By
David G. Simmons
updated December 14, 2025
Product
Use Cases
Developer
Navigate to:
Seems like it was just yesterday that I was writing a blog about How To Build a Telegraf Plugin for Beginners. Wait, that was just yesterday! And yet here I am back again writing another one. If you read yesterday’s post, and read all the way to the end, you’ll remember that I said:
Ultimately I'd like to expand and generalize it a bit so that it's not so specific to my needs—have it parse the readings that it is sent, and put them into the database based on other fields in the JSON
I had no sooner hit ‘publish’ on that post than I decided “why not just do it?” So I did. And I made it even better than I thought! I was only publishing a single value with that other plugin, which really wasn’t that useful. In reality, my little sensor publishes 6 values, so publishing 6 different messages, one for each value, was going to be highly inefficient and too resource intensive. I had to make changes on the device, on the Particle Cloud, and in the Plugin to make it all work so I’ll walk you through them all.
On the Particle Device and Cloud
Previously, using line-protocol, I published all the readings and tags in one go, so I thought I’d repurpose that for this plugin as well. To refresh, here’s how I published it before:
request.body = String::format("influxdata_sensors,id=%s,location=%s temp_c=%f,temp_f=%f,humidity=%f,pressure=%f,altitude=%f,broadband=%d,infrared=%d,lux=%f", myID.c_str(), myName.c_str(), temperature, fTemp, humidity, pressure, altitude, broadband, infrared, lux);
    http.post(request, response, headers);
All the tags and fields and values neatly in one HTTP POST. Turns out, all I had to do, from the device perspective, was re-format the string so that I built a proper JSON out of it, and then publish it to the Particle cloud:
    String data = String::format("{ \"tags\" : {\"id\": \"%s\", \"location\": \"%s\"}, \"values\": {\"temp_c\": %f, \"temp_f\": %f, \"humidity\": %f, \"pressure\": %f, \"altitude\": %f, \"broadband\": %d, \"infrared\": %d, \"lux\": %d}}", myID.c_str(), myName.c_str(), temperature, fTemp, humidity, pressure, altitude, broadband, infrared, lux);
    Particle.publish("sensor", data, PRIVATE);
That publishes a JSON string that, after the Particle cloud is done with it, looks like this:
{"data":"{ "tags" : { "id": "2b123b123123123123123123", "location": "MyLocation" }, "values": { "temp_c": 23.459999, "temp_f": 74.227998, "humidity": 45.628906, "pressure": 1017.543274, "altitude": -35.683643, "broadband": 34, "infrared": 19, "lux": 0 } }", "ttl":60, "published_at":"2017-09-30T17:00:27.832Z", "coreid":"2b003b001047343438323536", "userid":"XXXX", "version":11, "public":false, "productID":5343, "name":"sensor", "influx_db":"influxdata_sensors" }That last field I added with the custom JSON in the Particle.io Integration page like so:
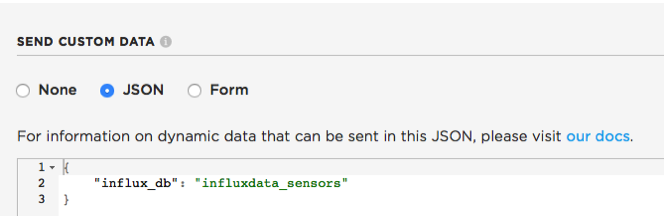
And when we get to the part about the Plugin details, you’ll see why.
The best part of this whole thing is that I reduced the code size on my device by about 80% because I was no longer creating — and tearing down — my own http communications channel every time through my loop. It’s just more efficient to use the built-in calls to the Particle Cloud.
On the Plugin Side
Now that I had the device sending all the readings at once to the Particle Cloud, and I had the Particle Integration set up, I had to fix the Telegraf Plugin to handle all this new data — and the more complicated JSON — it was about to receive. That wasn’t nearly as hard as I thought it was going to be either. The first thing I had to do, since the new JSON had multiple levels, was create a ‘Dummy’ structure that I could unmarshal the incoming JSON into. From there, I’d unmarshal part of that structure into a new structure that had the tags, fields and values.
type DummyData struct { Event string `json:"event"` Data string `json:"data"` Ttl int `json:"ttl"` PublishedAt string `json:"published_at"` InfluxDB string `json:"influx_db"` }I could have pulled out the ProductID, version, and other fields, but I’m not really interested in those. I pulled all the sensor data out into the ‘Data’ element, and I could then go into that and get everything I needed. Note the ‘InfluxDB’ field. That’s the one inserted when I defined the Webhook on the Particle Cloud, and I will use that to insert the data into the InfluxDB database I want.
type ParticleData struct { Event string `json:"event"` Tags map[string]string `json:"tags"` Fields map[string]interface{} `json:"values"` }I was able to use maps for the tags and values because I already sent those in the JSON properly set to what I want them inserted into the database as. That’s what made this so easy. One other thing I wanted to do, since multiple devices were going to be pushing data through this plugin, was to use the time stamp as submitted and not let the plugin time-stamp the data. To do that, I needed to parse the ‘PublishedAt’ field into a proper InfluxDB timestamp like so:
func (d *DummyData) Time() (time.Time, error) { return time.Parse("2006-01-02T15:04:05Z", d.PublishedAt) }So those are the objects I created, and here’s how I used them:
func (rb *ParticleWebhook) eventHandler(w http.ResponseWriter, r *http.Request) { defer r.Body.Close() data, err := ioutil.ReadAll(r.Body) if err != nil { w.WriteHeader(http.StatusBadRequest) return } dummy := &DummyData{} if err := json.Unmarshal(data, dummy); err != nil { w.WriteHeader(http.StatusBadRequest) return } pd := &ParticleData{} if err := json.Unmarshal([]byte(dummy.Data), pd); err != nil { w.WriteHeader(http.StatusBadRequest) return } pTime, err := dummy.Time() if err != nil { log.Printf("Time Conversion Error") } rb.acc.AddFields(dummy.InfluxDB, pd.Fields, pd.Tags, pTime) w.WriteHeader(http.StatusOK) }As you can see, I unmarshal the incoming data into the DummyData struct, and then unmarshal the DummyData’s Data field into the ParticleData struct. I do the parsing of the time stamp, and then I write all the data to the InfluxDB database I chose. But here’s the really cool thing, well 2 of them really. I can just send those maps of the tags and fields, and they all get sorted out correctly, and I can chose, at the Particle Cloud level, which database to use. In my case, I was able to seamlessly transition the devices over to using the Plugin without having to move data around back on my database. And I can point other Particle Products to other databases with just a single definition in the JSON from Particle.
And We're Done — Almost
I’m now done with my Plugin, and I can use it for pretty much any Particle project that I want really easily. But I’m not quite done yet because you can’t use it yet! So the final thing on my to-do list is to complete the unit tests for this plugin and then submit a Pull Request on GitHub so that it can be included in a future release. I’ll push it to my GitHub in the meantime if anyone wants to build it themselves.
