Create Bitcoin Buy and Sell Alerts with InfluxDB
By
Grace Ma
updated December 14, 2025
Use Cases
Product
Developer
Navigate to:
This article was originally published in The New Stack.
Given how volatile Bitcoin price is, an automated alerting system can be valuable for preserving our attention and sanity. We can pay attention to Bitcoin only when the price action is interesting. Momentum, that is buying an asset that has done well in the past, has been one of the most persistently effective trading strategies — see Clif Asness: “Value and Momentum Everywhere” and Tzouvanas (2019). We can use InfluxDB to help us calculate a simple Momentum signal and alert us when this signal is pointing to ‘Buy’ or ‘Sell’.
For this tutorial, I pick a common Momentum signal — the short-term/long-term crossover. The signal will be when the 1-day moving average Bitcoin price (1-day MA) crosses the 5-day moving average (5-day MA). When the 1-day MA crosses the 5-day MA from below, this is a buy signal. When it crosses from above, it is a sell signal.
In terms of steps, we need to first use Telegraf to get Bitcoin price from CoinMarketCap API and store into InfluxDB, then use Flux (InfluxDB’s custom language) to calculate the Momentum signal using stored Bitcoin prices, then set Alerts based on the values of the Momentum signal.
Initial setup
- Log in to InfluxDB Cloud application (or create an account here).
- Create a Bucket (which is the dataset unit) called “crypto_px”. We will store Bitcoin price into this Bucket. [Load Data > Buckets > Create Bucket]
- Create an Influx API token. [Load Data > API Tokens > Generate API Tokens]
- Install Telegraf on your machine. [Instructions]
- Create a CoinMarketCap API token. [Instructions]
Pull Bitcoin price using Telegraf
Telegraf is InfluxDB’s agent to gather data from various different sources, including APIs. It runs locally on our collection machine (i.e. our laptop) via the terminal and sends the data into the central InfluxDB bucket.
Now we can set up our Telegraf agent, which in this case will collect “HTTP” data and store the data into the “crypto_px” bucket we just created. [go to Load Data > Telegraf > Create Configurations]
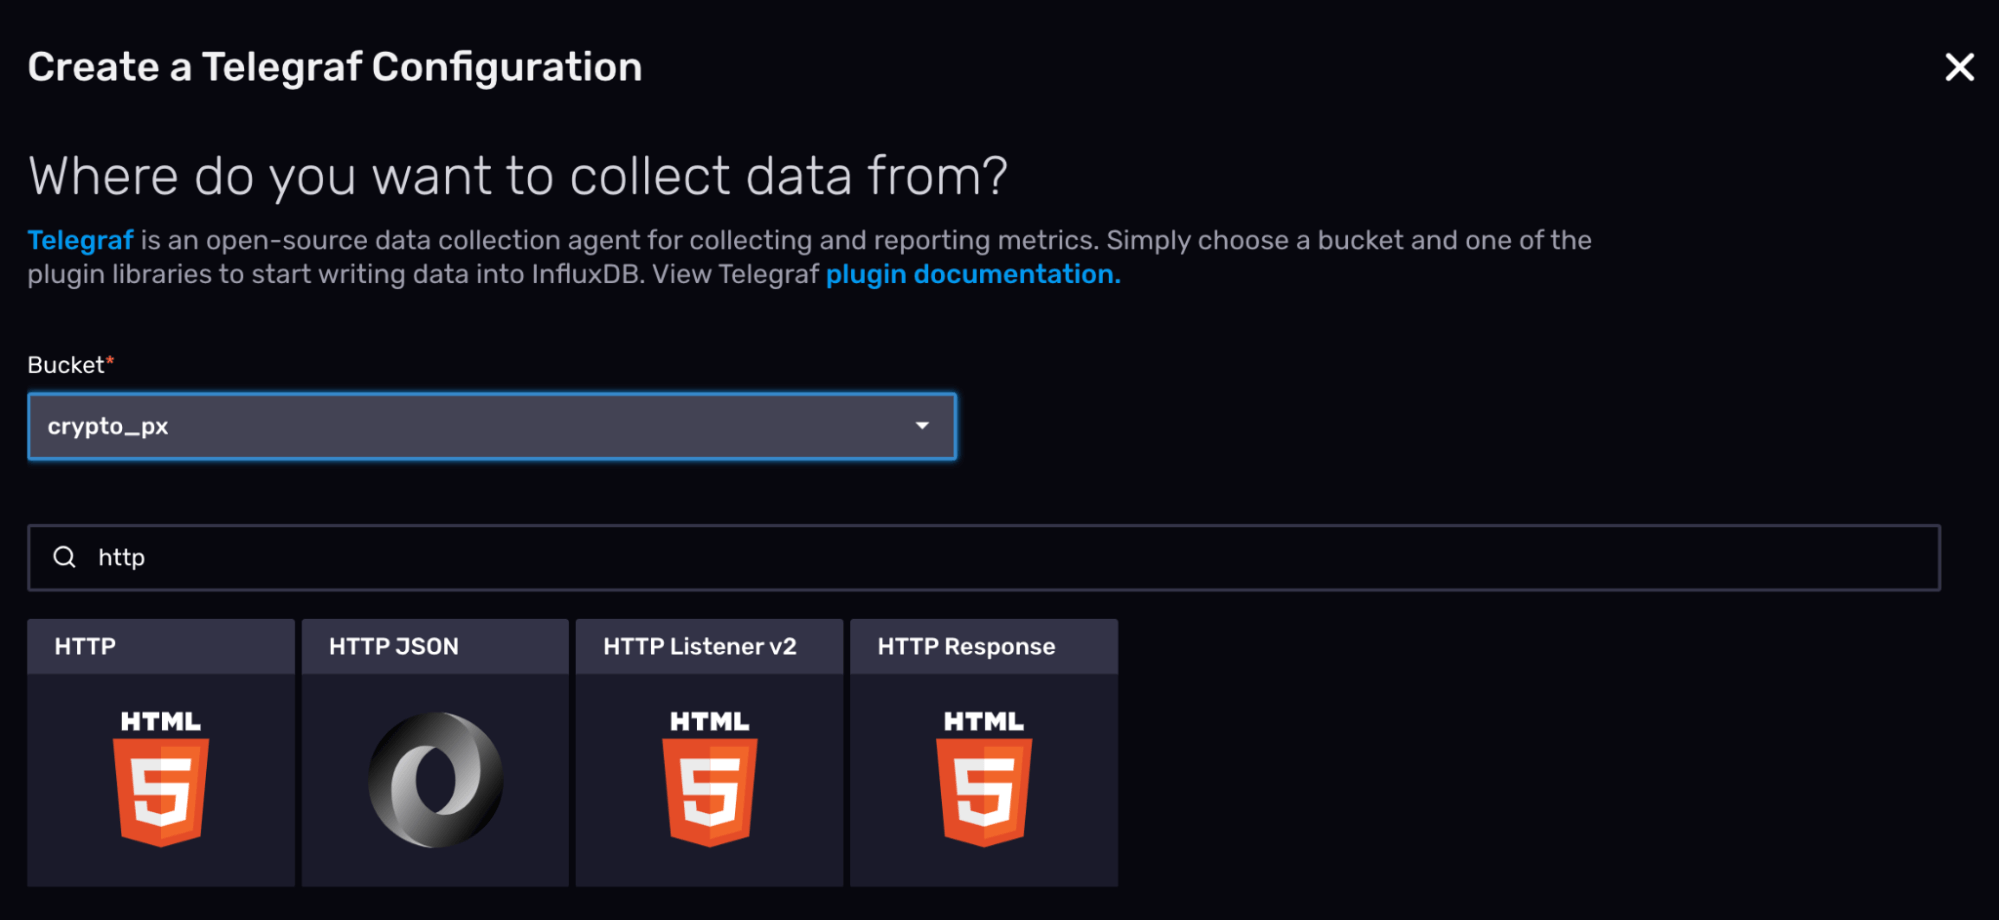
Once you open the Telegraf HTTP template, it can look somewhat daunting. But we actually just need to customize a few sections.
First, in the [agent] section, we want to specify at what interval Telegraf calls on the API. Here, the interval is set to “5m” or 5 minutes.

Next, we need to change the [[inputs.http]] section to point to the right CoinMarketCap API address.
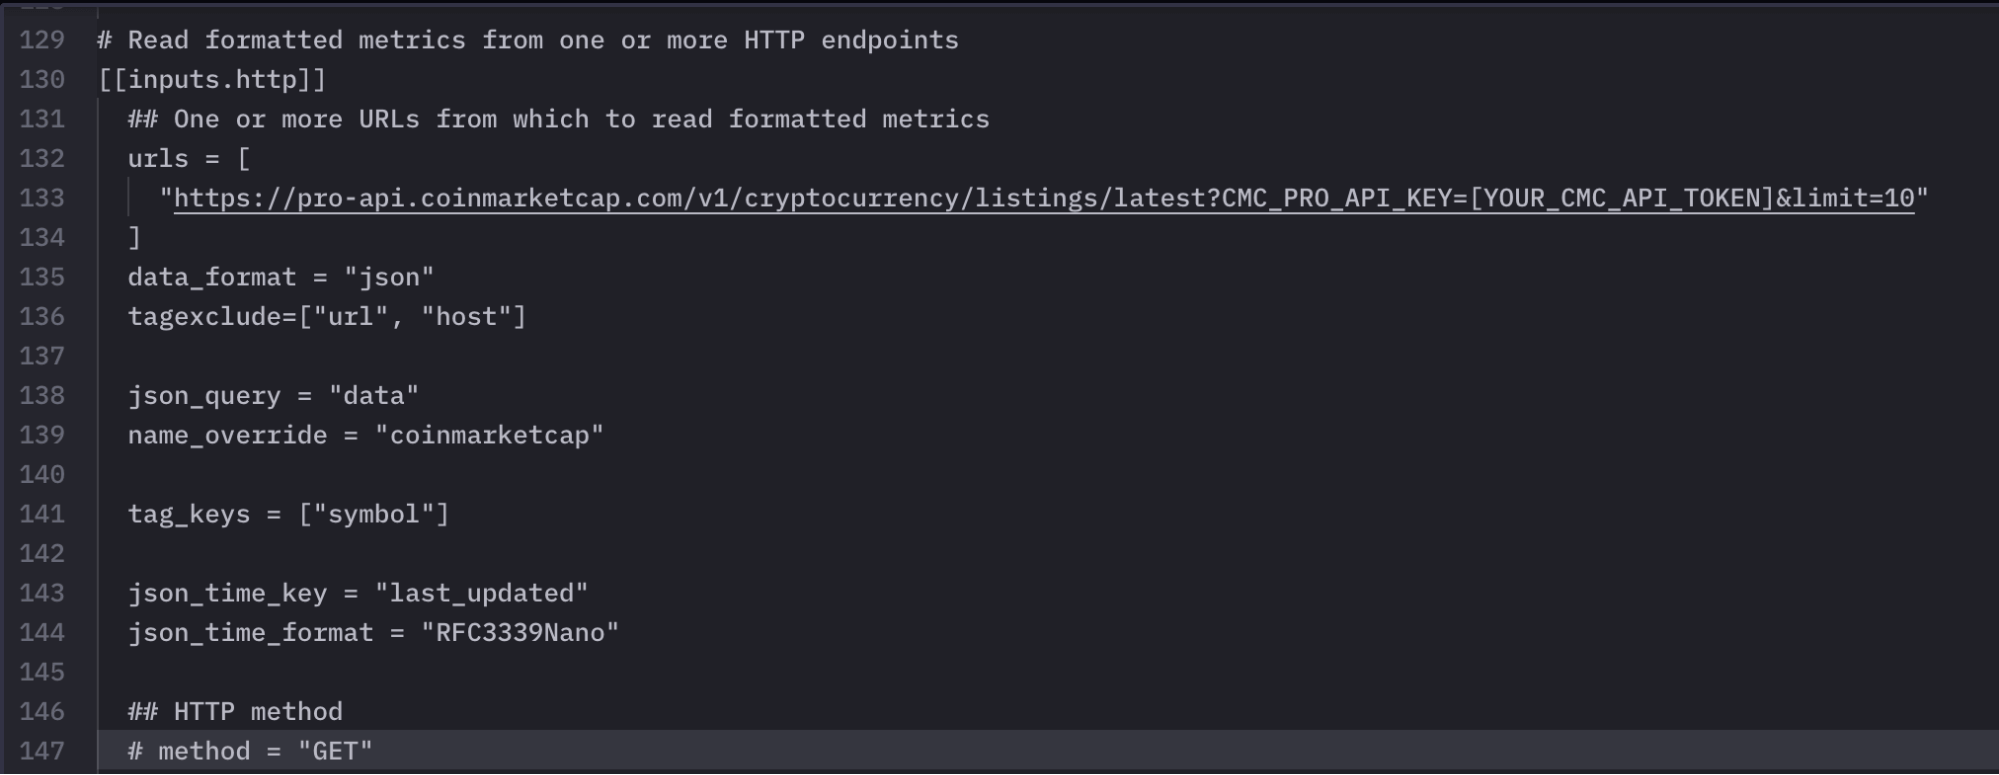
Explanation of input configurations:
urls
The format of CoinMarketCap API url is:
https://pro-api.coinmarketcap.com/v1/cryptocurrency/listings/latest?CMC_PRO_API_KEY=[YOUR_CMC_API_TOKEN]&limit=10
CMC_PRO_API_KEY must be filled with your CoinMarketCap API token.
The limit variable is how many crypto assets to pull prices for. Here, we pull the top 10 crypto coins, which will include Bitcoin.
json_query
Since the CoinMarketCap API returns a nested JSON object, we can use the json_query field to specify and query the JSON key where the crypto price data actually sits. For this JSON object, the key is called “data”.
tag_keys
We can specify tags, similar in concept to a categorical variable. Here, it is useful to have the crypto asset symbol as a tag, so that we can filter to specific crypto assets, such as “BTC”.
The CoinMarketCap API returns JSON, so we change the data_format to “json”.
Since InfluxDB is a time series database, we must have a time series column. For this, the json_time_key is called “last_updated” and its json_time_format is in “RF3339Nano” (you can look up your time’s format here).
Start running the Telegraf agent
Once we have the Telegraf config file properly configured, we can start running Telegraf on our collection machine (in this case, my laptop) using Terminal.
We can run the Telegraf config file from the cloud or a local copy. In this case, I downloaded the Telegraf config file and saved it as “coinmarketcap_api.conf”.
To run Telegraf, type this command into the terminal:
telegraf --config [YOUR_CONFIG_FOLDER]/coinmarketcap_api.conf
– config tells where the config file is located
Note: You can test your config file is correct by running it only once:
telegraf --once --config [YOUR_CONFIG_FOLDER]/coinmarketcap_api.conf
Check that our data has been stored
Now that Telegraf is working, we should be capturing Bitcoin prices at 5-minute intervals and storing that data in our crypto_px bucket. We can check by visualizing the data in the Notebooks tab. (Note that Notebooks function, like Jupyter Notebooks, is a useful place to store and test out Flux code).
We use Flux to query our crypto_px bucket. The price is stored in the _field “quote_USD_price” and we filter our symbol tag to “BTC” to retrieve Bitcoin price.
from(bucket: "crypto_px")
|> range(start: -5d, stop: now())
|> filter(fn: (r) => r["_measurement"] == "coinmarketcap")
|> filter(fn: (r) => r["_field"] == "quote_USD_price")
|> filter(fn: (r) => r["symbol"] == "BTC")
|> yield(name: "PX_Last")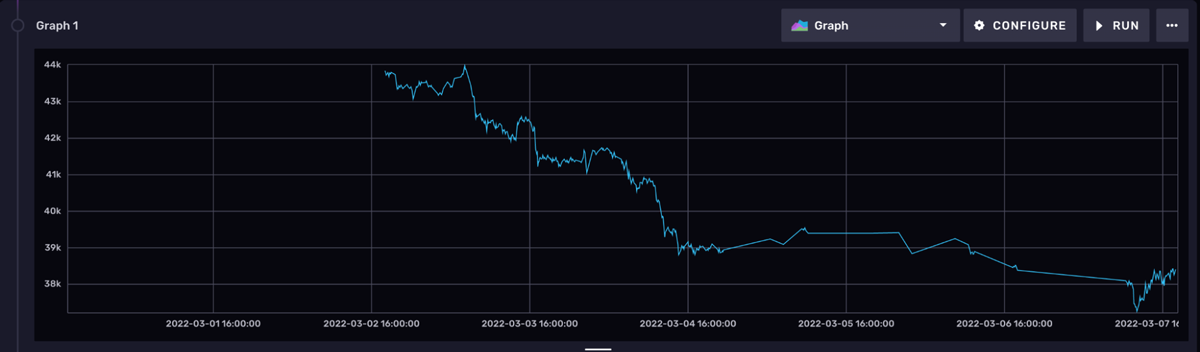
Calculate the Momentum Signal using Flux
The Flux language allows us to do many basic time series transformations. To calculate our Momentum Signal (i.e. 1-Day / 5-Day Moving Average Crossover), we need to calculate moving averages and then take the difference between them.
To quickly visualize what the moving averages will look like, we can add them to our previous query, the one to create the graph.
from(bucket: "crypto_px")
|> range(start: -5d, stop: now())
|> filter(fn: (r) => r["_measurement"] == "coinmarketcap")
|> filter(fn: (r) => r["_field"] == "quote_USD_price")
|> filter(fn: (r) => r["symbol"] == "BTC")
|> yield(name: "PX_Last")

// Add Moving Average Lines
|> timedMovingAverage(every: 1h, period: 1d)
|> yield(name: "PX_MA1D")
|> timedMovingAverage(every: 1h, period: 5d)
|> yield(name: "PX_MA5D")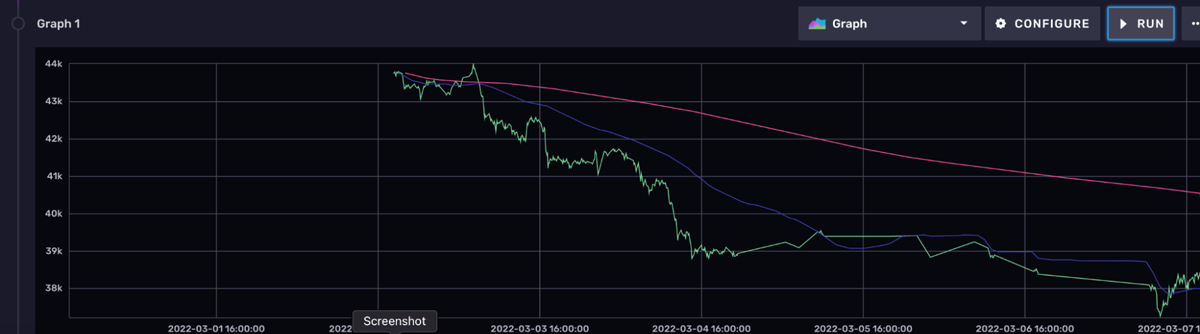
To graph the moving averages, we use the timedMovingAverage function. We are calculating the 1-day average (period: 1d) at an interval of 1 hour (every: 1h).
We can use the yield function to name this calculated line “PX_MA1D” on the graph.
Next, to save these moving averages as new _fields requires a bit more Flux code.
First, we can create another bucket called “px_transformed” to save the new calculated moving averages.
Then we must save our Flux calculations as a recurring task. A task computes these Flux calculations and saves the results to our px_transformed bucket on a regular interval, say every 5 minutes.
We go to Tasks in the Cloud application’s Sidebar and schedule a new Task, and call it “Crypto PX Moving Average Calculations”.
We will schedule it to run every 5 minutes, with a 20s offset (i.e. task starts at mm:20s each time).
Then we put our Flux transformations into the Task code panel.
// Task Options
option task = {name: "Crypto PX Moving Average Calculations", every: 5m, offset: 20s}
option v = {timeRangeStart: -30d, timeRangeStop: now()}

data1 = from(bucket: "crypto_px")
|> range(start: v.timeRangeStart, stop: v.timeRangeStop)
|> filter(fn: (r) => r["_measurement"] == "coinmarketcap")
|> filter(fn: (r) => r["_field"] == "quote_USD_price")
|> filter(fn: (r) => r["symbol"] == "BTC")

|> pivot(
rowKey:["_time"],
columnKey: ["_field"],
valueColumn: "_value")

|> timedMovingAverage(column: "quote_USD_price", every: 5m, period: 1d)
|> rename(columns: {quote_USD_price: "PX_MA1d"})

data2 = from(bucket: "crypto_px")
|> range(start: v.timeRangeStart, stop: v.timeRangeStop)
|> filter(fn: (r) => r["_measurement"] == "coinmarketcap")
|> filter(fn: (r) => r["_field"] == "quote_USD_price")
|> filter(fn: (r) => r["symbol"] == "BTC")

|> pivot(
rowKey:["_time"],
columnKey: ["_field"],
valueColumn: "_value")

|> timedMovingAverage(column: "quote_USD_price", every: 5m, period: 5d)
|> rename(columns: {quote_USD_price: "PX_MA5d"})

data3 = join(
tables: {t1: data1, t2: data2},
on: ["_time", "symbol", "_measurement"],
)
|> keep(columns: ["_time", "_measurement", "symbol", "PX_MA1d", "PX_MA5d"])
|> map(fn: (r) => ({ r with Diff_1d_5d: r.PX_MA1d - r.PX_MA5d }))
|> to(
bucket: "px_transformed",
fieldFn: (r) => ({"Diff_1d_5d": r.Diff_1d_5d, "PX_MA1d": r.PX_MA1d, "PX_MA5d": r.PX_MA5d}),
)
Explanation of Flux code:
We have to save 2 new variables to the same dataset and then take their difference. To do so, we need the pivot function, which pivots each _field into a new column.
We create 2 new moving average fields, called “PX_MA1d” and “PX_MA5d”, and turn them into columns through the pivot function.
Then we merge these 2 columns into a master table using the join function.
Then we can do operations on 2 columns in our dataset using the map function. Here, we create a new column called “Diff_1d_5d” by subtracting “PX_MA1d” and “PX_MA5d”.
Finally, the to function saves the output to the specified bucket.
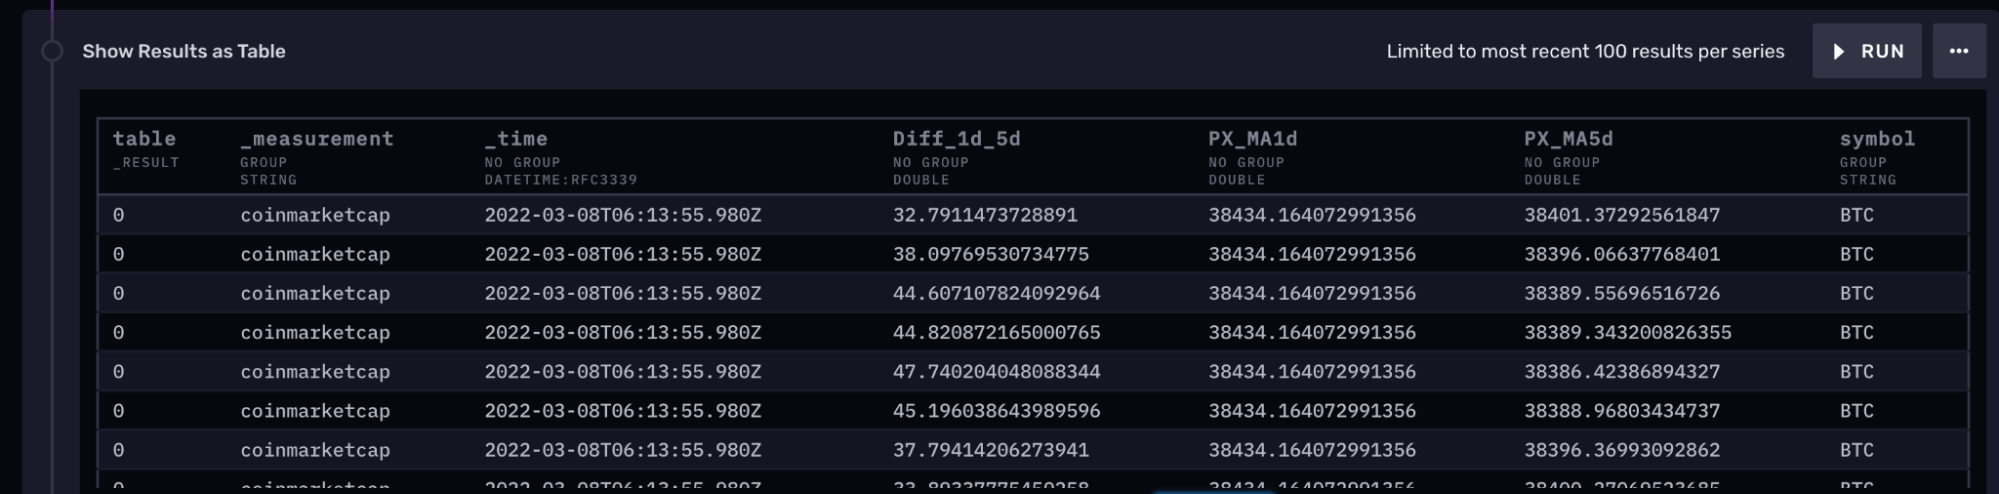
Here is the resulting new px_transformed as a table:
And to verify that the Task was run correctly, we can graph our Momentum signal (i.e. _field “Diff_1d_5d”).
from(bucket: "px_transformed")
|> range(start: -7d, stop: now())
|> filter(fn: (r) => r["_measurement"] == "coinmarketcap")
|> filter(fn: (r) => r["_field"] == "Diff_1d_5d")
|> filter(fn: (r) => r["symbol"] == "BTC")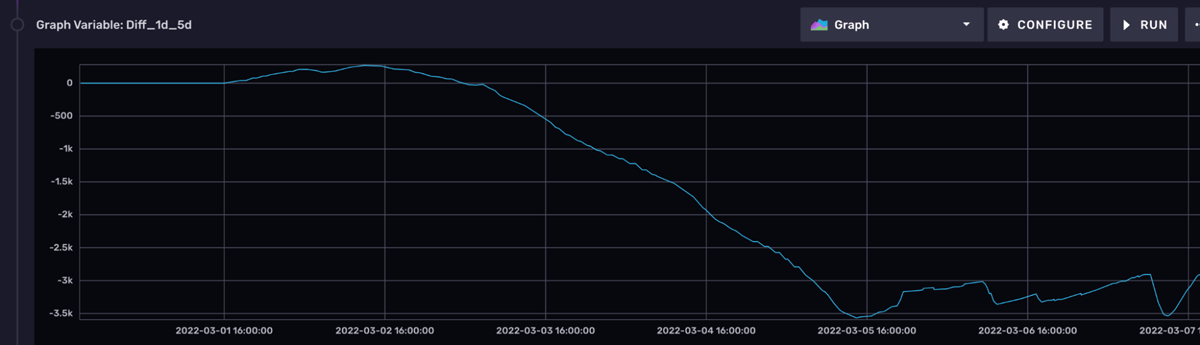
Set up alerts for when 1-D / 5-D crossovers are zero
Our Task has now created the 1-D / 5-D Moving Average Signal as the _field “Diff_1d_5d”, which is saved in the px_transformed bucket. The final step is to alert us when this signal for Bitcoin is zero, which will be the buy or sell signal.
Alerting is basically a specialized Task. Notebooks has the Alert templates in Flux to help us set up alerts.
But first, we need to set up our notification channel. Within the Free accounts, the only option is to notify a Slack channel using Slack’s webhook feature. (You can upgrade to alert to other channels, such as email).
Here are the setup steps [Tutorial offered by Slack is here]:
- Create a Slack App. I called mine “Crypto Alerts”
- Activate Incoming Webhooks on the App
- Click on “Add New Webhook to Workspace” to generate a webhook url
A webhook url should look like this:
https://hooks.slack.com/services/T00000000/B00000000/XXXXXXXXXXXXXXXXXXXXXXXX
Now we will create an Alert (as mentioned, a specialized Task) to post alert messages to the Notification Endpoint (i.e. our Slack channel) we had just created.
Going back to the Notebook we had been working on, we add some modifications for alerting:
import "interpolate"

from(bucket: "px_transformed")
|> range(start: -15m, stop: now())
|> filter(fn: (r) => r["_measurement"] == "coinmarketcap")
|> filter(fn: (r) => r["_field"] == "Diff_1d_5d")
|> interpolate.linear(every: 30s)
The first modification is that the time range to query should be changed to pull in data in the last 15 minutes, to capture only the latest data points. We then interpolate the data to smooth out the jumps in data.
Now we can add a new panel for Alert to the query we just built.
Add Another Panel > Alert
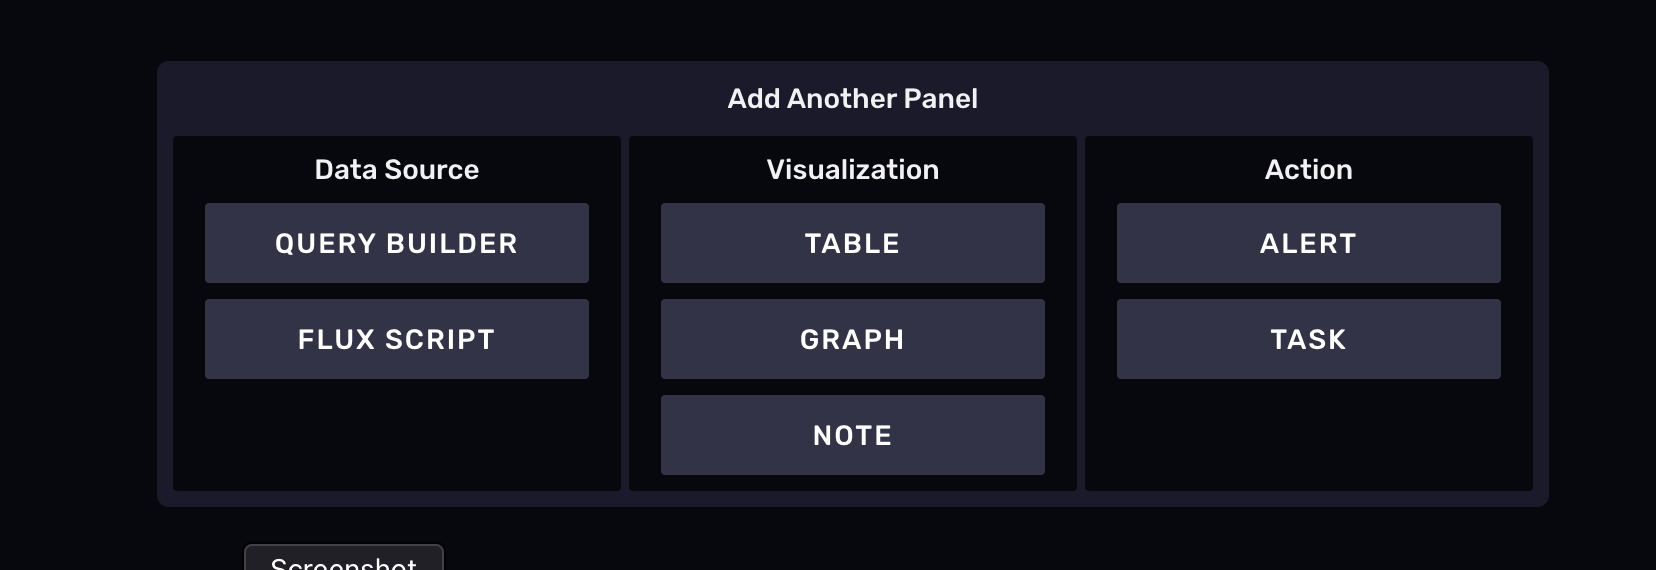
This opens up the Alert template:
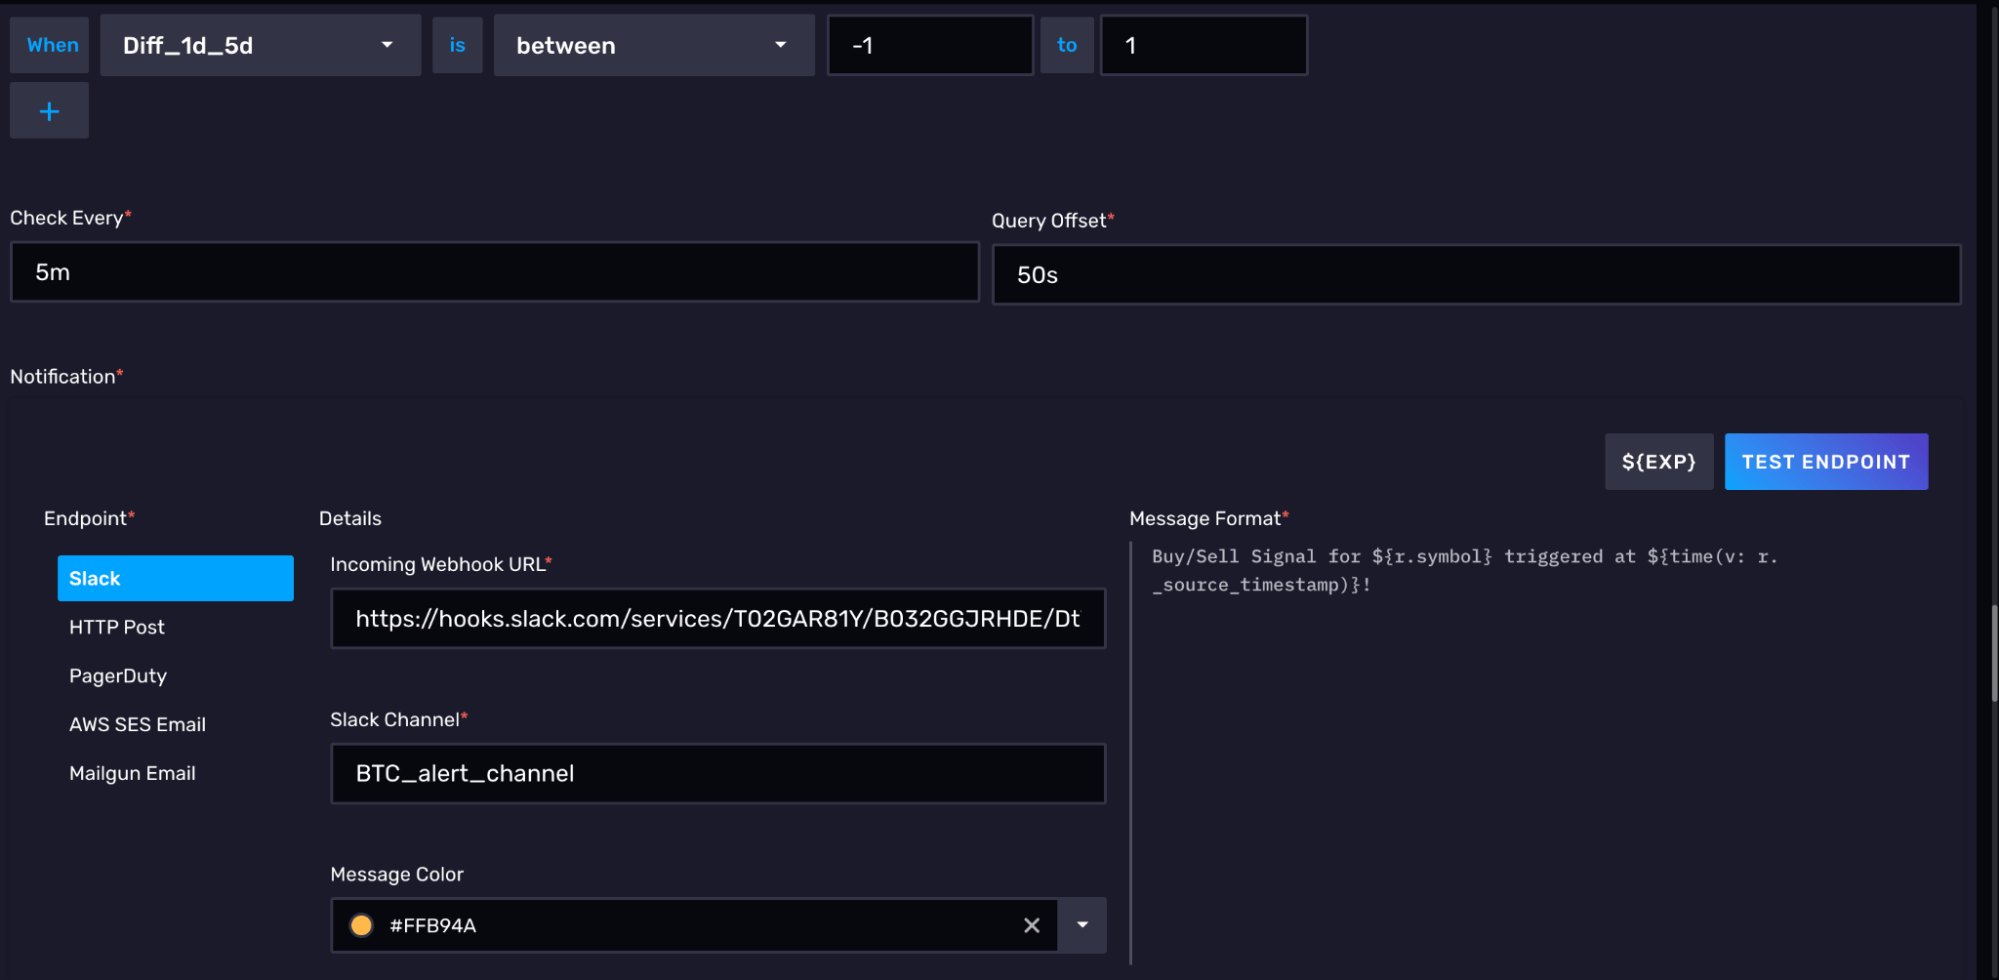
We will set this Alert Task to check whether the _field “Diff_1d_5d” is between -1 to 1; i.e., when it is close to 0. We are checking if the 1-Day Moving Average crosses the 5-Day Moving Average. [Note: since “Diff_1d_5d” will rarely equal exactly 0, checking for a range is more robust.]
The alert will check every 5 minutes, with an offset of 50s (after our Crypto PX Moving Average Calculations Task has run).
Then put in the Slack webhook url you had generated, as well as the Slack Channel name that the webhook points to. You might need to create a new Slack Channel for this. I called mine “BTC_alert_channel”.
You can test this channel by clicking “Test Endpoint”.
You can modify the Message Format. Here it is:
"Buy/Sell Signal for ${r.symbol} triggered at ${time(v: r._source_timestamp)}!"
Finally, export the alert.
And now we should be set up for automatic alerts on Slack when it is time to Buy (or Sell) Bitcoin!
Slack alert message:

Further ideas
And of course, this is just the beginning. It would be very simple to extend the current setup to more coins, such as Ethereum or Solana. It is also possible to build more sophisticated trading rules for Bitcoin using Flux, such as RSI (relative strength index), volatility-adjusted momentum (dividing by price standard deviation), mean-reversion indicators (buying when price is low), or many other time series forecasting methods. And finally, we can set up alerts for stocks by pulling in stock prices using other APIs (Yahoo Finance for example).
