Getting Started with Infrastructure Monitoring
By
Charles Mahler
Use Cases
Developer
Oct 11, 2023
Navigate to:
This article was originally published on The New Stack and is reposted here with permission.
By taking advantage of monitoring data, companies can ensure their infrastructure is performing optimally while reducing costs.
While building new features and launching new products is fun, none of it matters if your software isn’t reliable. One key part of making sure your apps run smoothly is having robust infrastructure monitoring in place. In this article you will learn about the following:
- The different components of infrastructure monitoring.
- Popular tools used for infrastructure monitoring.
- How to set up monitoring for an application.
If you prefer video, you can also check out this presentation, which covers some of the themes discussed in this article.
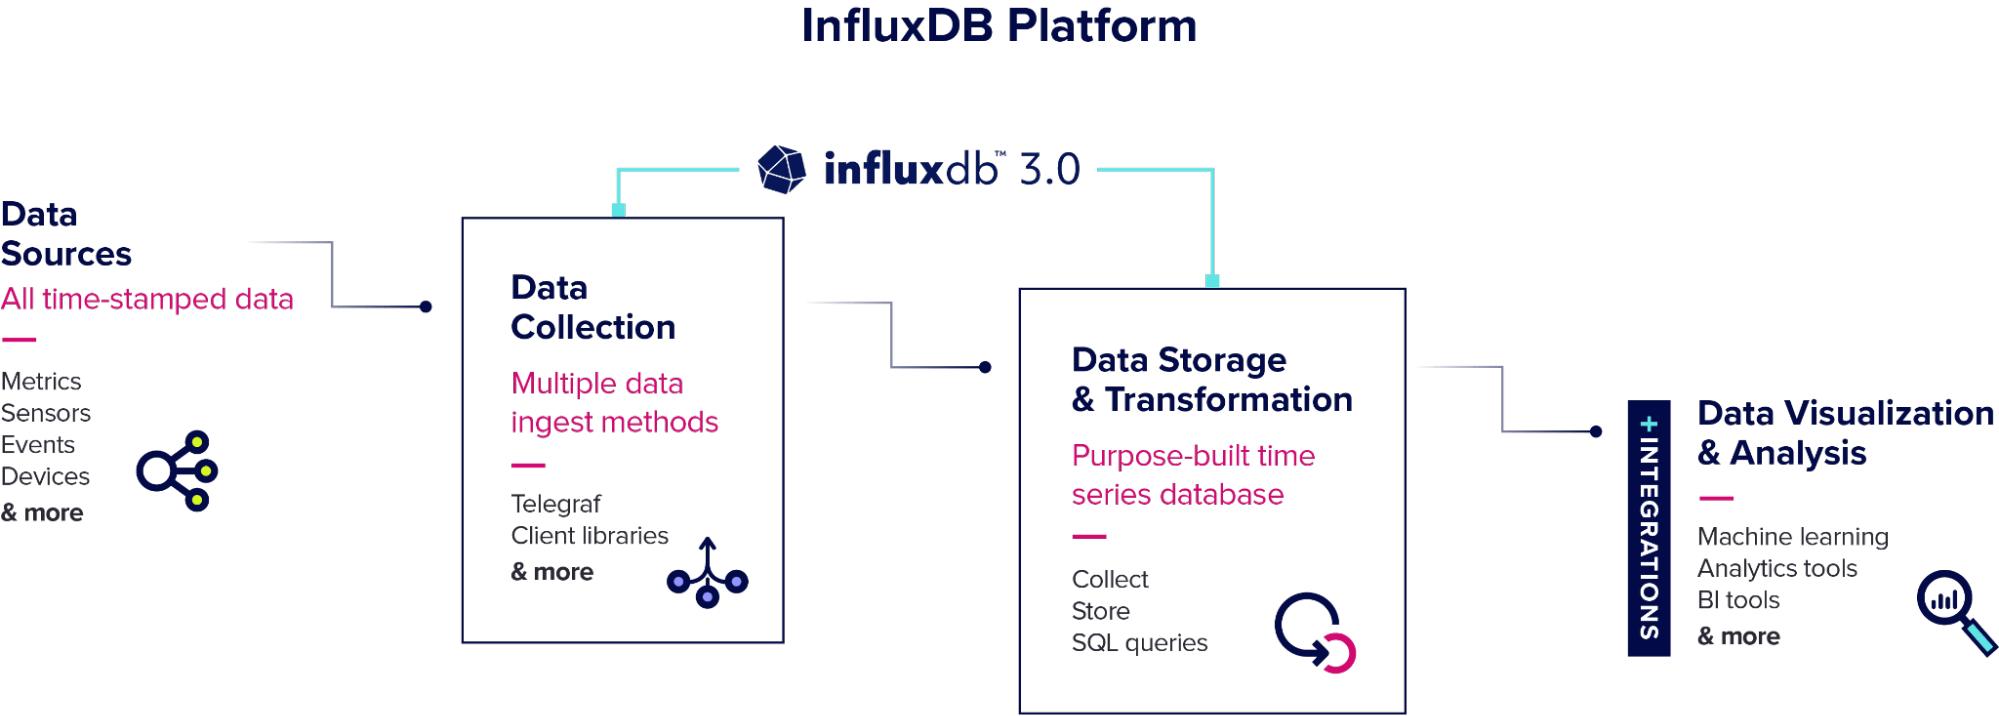
Components of infrastructure monitoring
Infrastructure monitoring consists of a number of different architecture components that are needed to serve a modern application. To ensure software is reliable, all of these components need to be properly monitored.
- Network monitoring — Network monitoring focuses on hardware-like routers and switches and involves tracking things like bandwidth usage, uptime and device status. It is used to identify bottlenecks, downtime and potentially inefficient network routing.
- Server monitoring — Server monitoring is focused on monitoring the performance and health of physical and virtual server instances. Metrics like CPU, RAM and disk utilization are common. Server monitoring is important for capacity planning.
- Application performance monitoring (APM) — APM is focused on software and is used to track how an application is performing at every layer from the UI to how data is stored. Common metrics are things like error rates and response times.
- Cloud infrastructure monitoring — Cloud monitoring, as the name implies, is about monitoring cloud infrastructure like databases, different types of storage and VMs. The goal is to track availability and performance, as well as resource utilization to prevent over or under provisioning of cloud hardware.
Each of these types of monitoring act as a different lens for teams to view and manage their infrastructure. By taking advantage of all of this data, companies can ensure their infrastructure is performing optimally while reducing costs.
Tools for infrastructure monitoring
Choosing the right tools for the job is critical when it comes to creating an infrastructure monitoring system. There are a number of open source and commercial options available. You also have the option of choosing a full-service solution or creating your own custom solution by combining specialized tools. Regardless, there are three main questions to consider: How are you going to collect your data, how to store the data and what will you do with the data? Let’s look at some of the tools available for accomplishing each one.
Data collection tools
One of the biggest challenges with infrastructure monitoring is collecting data that may be coming from many different sources, often with no standardized protocol or API. The key goal here should be to choose a tool that saves you from having to reinvent the wheel, doesn’t lock you in and is extensible so you can scale or modify data collection as your app changes.
Telegraf
Telegraf is an open source server agent that is ideal for infrastructure monitoring data collection. Telegraf solves most of the problems mentioned above. It has over 300 different plugins for inputs and outputs, meaning you can easily collect data from new sources and output that data to whichever storage solution works best for your use case.
The result is that Telegraf saves you a ton of engineering resources by not having to write custom code for collecting data and prevents vendor lock-in because you can change storage outputs easily. Telegraf also has plugins for data processing and transformation, so in some use cases it can simplify your architecture by replacing stream-processing tools.
OpenTelemetry
OpenTelemetry is an open source set of SDKs and tools that make it easy to collect metrics, logs and traces from applications. The primary advantage of OpenTelemetry is that it is vendor agnostic, so you don’t have to worry about getting locked into an expensive APM tool with high switching costs. OpenTelemetry also saves your developers time by providing tools to make instrumenting applications for data collection easy.
Data storage tools
After you start collecting data from your infrastructure, you’ll need a place to store that data. While a general-purpose database can be used for this data, in many cases you will want to look for a more specialized database designed for working with the types of time series data collected for infrastructure monitoring. Here are a few available options:
InfluxDB
InfluxDB is an open source time series database designed for storing and analyzing high volumes of time series data. It offers efficient storage and retrieval capabilities, scalability and support for real-time analytics. With InfluxDB, you can easily capture and store metrics from various sources, making it a good fit for monitoring and analyzing the performance and health of your infrastructure.
Prometheus
Prometheus is an open source monitoring and alerting toolkit built for collecting and storing metrics data. It is specifically designed to monitor dynamic and cloud native environments. Prometheus provides a flexible data model and powerful query language, making it well-suited for storing infrastructure monitoring data. With its built-in alerting and visualization capabilities, Prometheus enables you to gain insight into the performance and availability of your infrastructure.
Graphite
Graphite is a time series database and visualization tool that focuses on storing and rendering graphs of monitored data. It is widely used for monitoring and graphing various metrics, making it a suitable option for storing infrastructure monitoring data. Graphite excels at visualizing time series data, allowing you to create interactive and customizable dashboards to monitor the performance and trends of your infrastructure. Its scalable architecture and extensive ecosystem of plugins make it a popular choice for monitoring and analyzing infrastructure metrics.
Data analysis tools
Once you’ve got your data stored, it’s time for the fun part, actually doing something with it to create value. Here are a few tools that you can use for analyzing your data.
Grafana
Grafana is a powerful open source data visualization and analytics tool that allows users to create, explore and share interactive dashboards. It is commonly used for analyzing infrastructure monitoring data by connecting to various data sources such as databases, APIs and monitoring systems. With Grafana, users can create visualizations, set up alerts and gain insights into their infrastructure metrics, logs and traces.
Apache Superset
Apache Superset is a modern enterprise-ready business intelligence web application that enables users to explore, visualize and analyze data. It provides a user-friendly interface for creating interactive dashboards, charts and reports. When it comes to analyzing infrastructure monitoring data, Apache Superset can be used to connect to monitoring systems, databases or other data sources to explore and visualize key metrics, generate reports and gain insights into the performance and health of the infrastructure.
Jaeger
Jaeger is an open source, end-to-end distributed tracing system that helps users monitor and troubleshoot complex microservices architectures. It can be used for analyzing infrastructure monitoring data by providing detailed insights into the interactions and dependencies between different components of the infrastructure. Jaeger captures and visualizes traces, which represent the path of requests as they travel through the system, allowing users to identify bottlenecks, latency issues and performance optimizations in the infrastructure.
Infrastructure monitoring tutorial
Now let’s look at an example of how to implement a monitoring system for an application. This tutorial will focus on a combination of open source tools known as the TIG stack: Telegraf, InfluxDB and Grafana. The TIG stack allows developers to easily build an infrastructure monitoring solution that is scalable and extensible in the long term.
Architecture overview
The example application for this tutorial is a chat app powered by an AI model that returns responses based on user input. The app has a hybrid architecture with the backend hosted on AWS, and the AI model is run on dedicated GPUs outside the cloud. The primary challenge is ensuring reliability of the service while also scaling infrastructure due to rapid user growth. Doing this requires collecting large amounts of data to track resource utilization in real time for monitoring and also for future capacity planning based on user growth.
Infrastructure monitoring setup
Now let’s look at how to set up and configure monitoring for this application. The first step will be configuring Telegraf to collect the data we want from each part of our infrastructure. We’ll take advantage of the following Telegraf plugins:
- SNMP input — The SNMP plugin is used to collect the metrics needed for network monitoring.
- CPU, Disk, Nvidia SMI, DiskIO, mem, swap, system input — These plugins are used to collect server monitoring metrics.
- OpenTelemetry input — OpenTelemetry is used to collect application performance metrics like logs, metrics and traces.
- AWS Cloudwatch input — The AWS CloudWatch plugin makes it easy to collect all the cloud infrastructure metrics we need from AWS.
- InfluxDB V2 output — The InfluxDB output plugin will send all of these collected metrics to the specified InfluxDB instance.
And here’s an example of a Telegraf configuration TOML file for this setup:
[global_tags]
  # dc = "us-east-1" # will tag all metrics with dc=us-east-1
  # rack = "1a"
  # user = "$USER"

[agent]
  interval = "10s"
  round_interval = true

  metric_batch_size = 1000
  metric_buffer_limit = 10000
  collection_jitter = "0s"

  flush_interval = "10s"
  flush_jitter = "0s"
  precision = ""

  # debug = false
  # quiet = false
  # logtarget = "file"
  # logfile = ""
  # logfile_rotation_interval = "0d"
  # logfile_rotation_max_size = "0MB"
  # logfile_rotation_max_archives = 5

  hostname = ""
  omit_hostname = false

[[inputs.snmp]]
  agents = ["udp://127.0.0.1:161"].
  timeout = "15s"
   version = 2
   community = "SNMP"
  retries = 1

  [[inputs.snmp.field]]
    oid = "SNMPv2-MIB::sysUpTime.0"
    name = "uptime"
    conversion = "float(2)"

  [[inputs.snmp.field]]
    oid = "SNMPv2-MIB::sysName.0"
    name = "source"
    is_tag = true

[[inputs.cpu]]
  percpu = true
  totalcpu = true
  collect_cpu_time = false
  report_active = false

[[inputs.disk]]
  ignore_fs = ["tmpfs", "devtmpfs", "devfs", "iso9660", "overlay", "aufs", "squashfs"]

[[inputs.diskio]]
[[inputs.mem]]
[[inputs.processes]]
[[inputs.swap]]
[[inputs.system]]
[[nvidia-smi]]

[[inputs.opentelemetry]]
service_address = "0.0.0.0:4317"

  timeout = "5s"

 metrics_schema = "prometheus-v2"

  tls_cert = "/etc/telegraf/cert.pem"
   tls_key = "/etc/telegraf/key.pem"

[[inputs.cloudwatch_metric_streams]]

  service_address = ":443"

[[inputs.cloudwatch]]
  region = "us-east-1"

[[outputs.influxdb_v2]]
  urls = ["http://127.0.0.1:8086"]

  ## Token for authentication.
  token = ""

  ## Organization is the name of the organization you wish to write to.
  organization = ""

  ## Destination bucket to write into.
  bucket = ""

  ## The value of this tag will be used to determine the bucket.  If this
  ## tag is not set the 'bucket' option is used as the default.
  # bucket_tag = ""

  ## If true, the bucket tag will not be added to the metric.
  # exclude_bucket_tag = false

  ## Timeout for HTTP messages.
  # timeout = "5s"

  ## Additional HTTP headers
  # http_headers = {"X-Special-Header" = "Special-Value"}

  ## HTTP Proxy override, if unset values the standard proxy environment
  ## variables are consulted to determine which proxy, if any, should be used.
  # http_proxy = "http://corporate.proxy:3128"
This Telegraf configuration takes care of both the data collection and data storage steps by collecting all the designated data and sending it to InfluxDB for storage. Let’s go over some ways you can use that data.
Data visualization
One of the first steps for many companies is to create dashboards and data visualizations for their infrastructure monitoring system. These dashboards can be used for everything from high-level reports to detailed analysis by engineers monitoring things in real time. Here’s an example of a Grafana dashboard built using the data collected for this tutorial:

Alerting
While dashboards are nice, it’s impossible to manually track everything happening with your infrastructure at scale. To help with this problem, setting up automated alerting is a common feature of infrastructure monitoring systems. Here’s an example of how Grafana can be used to set value thresholds for metrics and create automated alerts if those thresholds are violated.
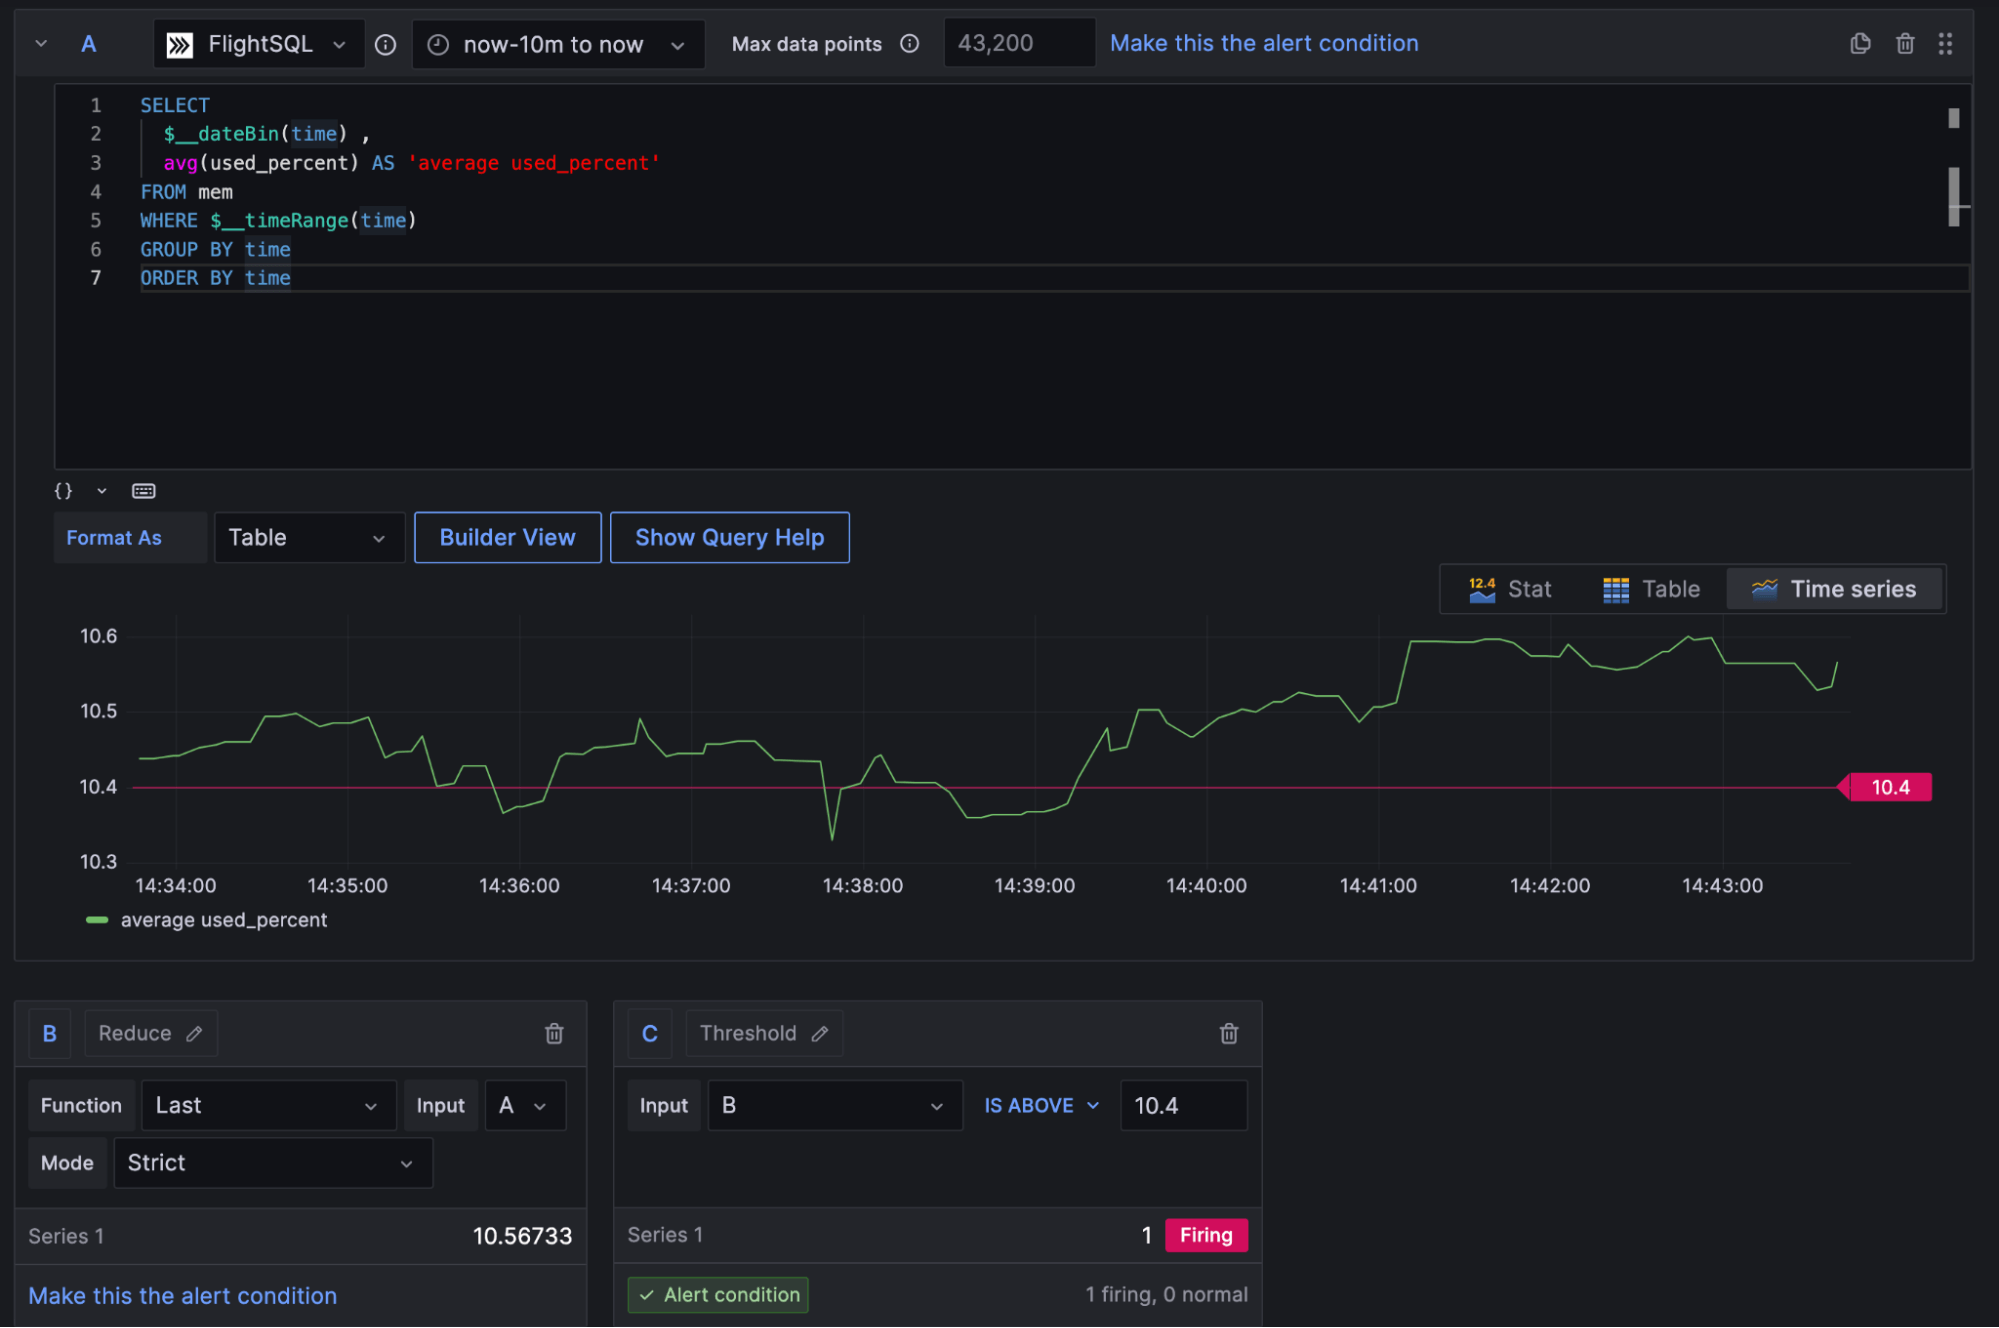
Grafana integrates with third-party tools like PagerDuty and Slack so engineers can be notified if something goes wrong. In some cases, alerting like this could be used to completely automate certain actions, like automatically scaling cloud capacity if hardware utilization hits a certain level.
Predictive analytics and forecasting
Predictive analytics and forecasting are probably the ideal end goal for many engineering teams. While alerting is a reactive approach that only works after something has gone wrong, predictive analytics and forecasting allow you to take action before the issue occurs. Creating accurate forecasts is obviously easier said than done, but it has huge benefits when done right.
Next steps
Hopefully this article helped you to better understand infrastructure monitoring and some of the tools that are available for building your own system. If you want to play around with some real data you can check out the following resources:
