Getting Started with the InfluxDB Go Client
By
Anais Dotis-Georgiou
updated December 14, 2025
Product
Use Cases
Developer
Getting Started
Navigate to:
There are several ways to write and query InfluxDB v2 (either open source or Cloud). You can use the HTTP API, Telegraf and any of 200+ plugins, or a client library. However, if you’re specifically looking to build an application with a fast way to fetch data concurrently with an easy binary deploy then - you guessed it - you’d probably want to use the InfluxDB Go Client.
Important note: InfluxDB v1.8 includes both the Flux engine for queries and InfluxDB v2 HTTP write APIs as well. This means that if you aren’t quite ready to use InfluxDB v2 today and you are planning to leverage the new client libraries, you can! These read and write compatibility options allow you to future-proof your code!
Installation of the Go Client
Go 1.13 or later is required. Installation and setup are simple:
- Add package
github.com/influxdata/influxdb-client-go/v2to the project dependencies:go get github.com/influxdata/influxdb-client-go/v2.
If you’re new to InfluxData, I recommend installing and configuring Telegraf with the System Input Plugin before trying to use the client. However, this example will walk you through writing a point before querying, so you don’t need data.
Authorization parameters
InfluxDB v2
In order to use the client with InfluxDB v2, you’ll need to gather the following parameters:
- Bucket Name or ID: Follow this documentation to create a bucket. To view your buckets, either use the user interface (UI) or execute
influx -t <your-token> -o <your-org> bucket find - Token: Follow this documentation to create a token. To view your tokens, either use the UI or execute
influx auth find - Org: To view your orgs, either use the UI or execute
influx org find
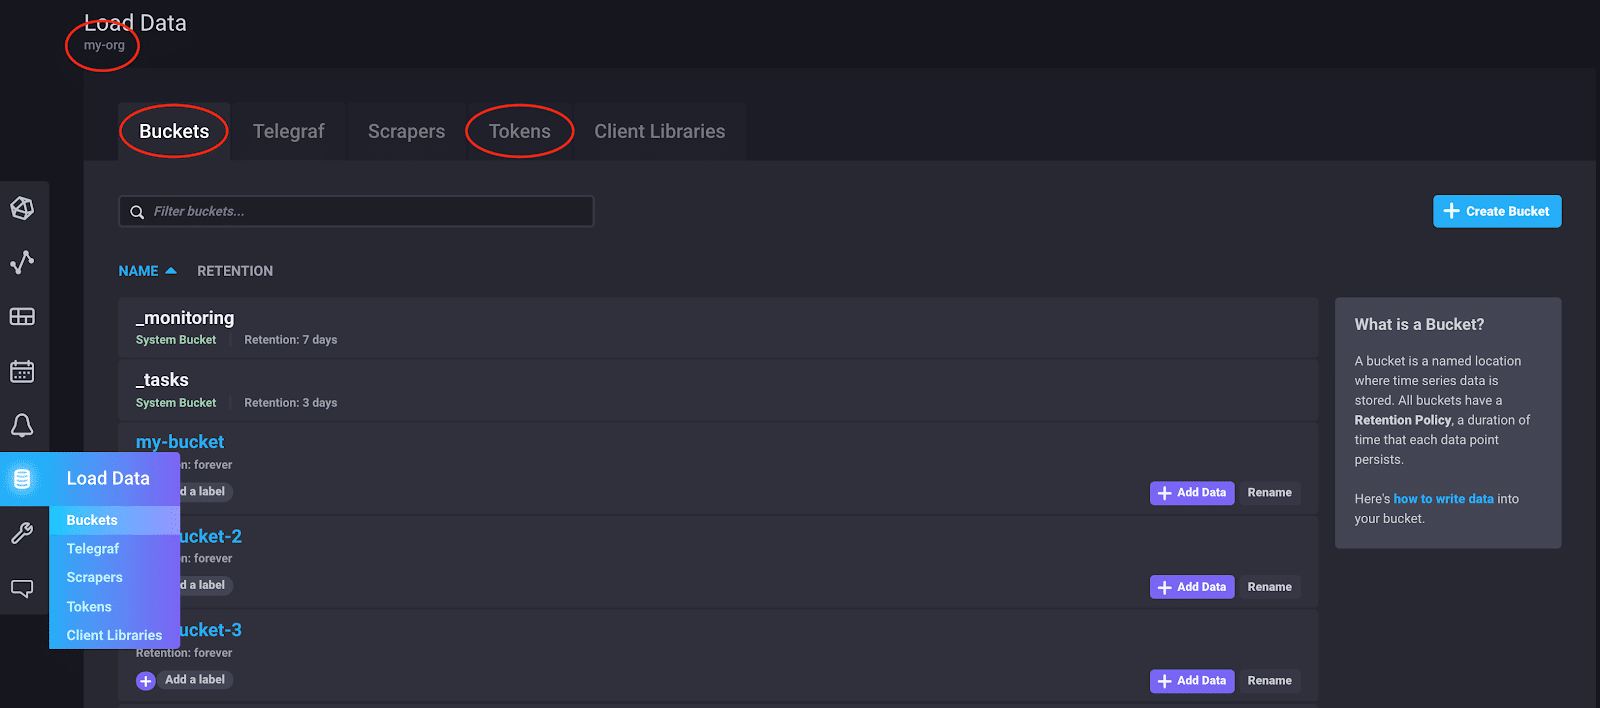 <figcaption> Example of the InfluxDB v2 UI. Buckets and Tokens can be found under the Load Data tab. Org names, like “my-org”, can be found in the top left corner underneath the Load Data header.</figcaption>
InfluxDB v1.8 and above
If you plan to use this new client library with InfluxDB 1.8 or greater, here are some important tips about gathering the required authorization parameters:
- Bucket Name: There is no concept of Bucket in InfluxDB v1.x. However, a bucket is simply the combination of the database name and its retention policy. So, you can specify this by providing the InfluxDB 1.x database name and retention policy separated by a forward slash (/). If you do not supply a retention policy, the default retention policy is used.
For example: a bucket name telegraf/1week allows you to write the InfluxDB 1.x database named “telegraf” with a retention policy named “1week”. Similarly, telegraf/ or telegraf allows you to write to the InfluxDB 1.x database named “telegraf” and the default retention policy (typically autogen).
- Token: In InfluxDB v2, API Tokens are used to access the platform and all its capabilities. InfluxDB v1.x uses a username and password combination when accessing the HTTP APIs. Provide your InfluxDB 1.x username and password separated by a colon (:) to represent the token. For example:
username:password - Org: The org parameter is ignored in compatibility mode with InfluxDB v1.x and can be left empty.
Import packages
Before beginning, you need to import the necessary packages and specify the entry point of our executable program.
package main

import (
    "context"
    "fmt"
    "time"
    "github.com/influxdata/influxdb-client-go/v2"
)
Writing to InfluxDB v2 with the InfluxDB Go Client
The following example writes three time series points with the synchronous, blocking write client with default client settings. It writes two time series data points with the WritePoint() method and one time series data point with the WriteRecord() method:
func main() {
// create new client with default option for server url authenticate by token
client := influxdb2.NewClient("http://localhost:9999", "my-token")
// user blocking write client for writes to desired bucket
writeAPI := client.WriteAPIBlocking("my-org", "my-bucket")
// create point using full params constructor
p := influxdb2.NewPoint("stat",
map[string]string{"unit": "temperature"},
map[string]interface{}{"avg": 24.5, "max": 45},
time.Now())
// write point immediately
writeAPI.WritePoint(context.Background(), p)
// create point using fluent style
p = influxdb2.NewPointWithMeasurement("stat").
AddTag("unit", "temperature").
AddField("avg", 23.2).
AddField("max", 45).
SetTime(time.Now())
writeAPI.WritePoint(context.Background(), p)
// Or write directly line protocol
line := fmt.Sprintf("stat,unit=temperature avg=%f,max=%f", 23.5, 45.0)
writeAPI.WriteRecord(context.Background(), line)
// Ensures background processes finish
client.Close()
}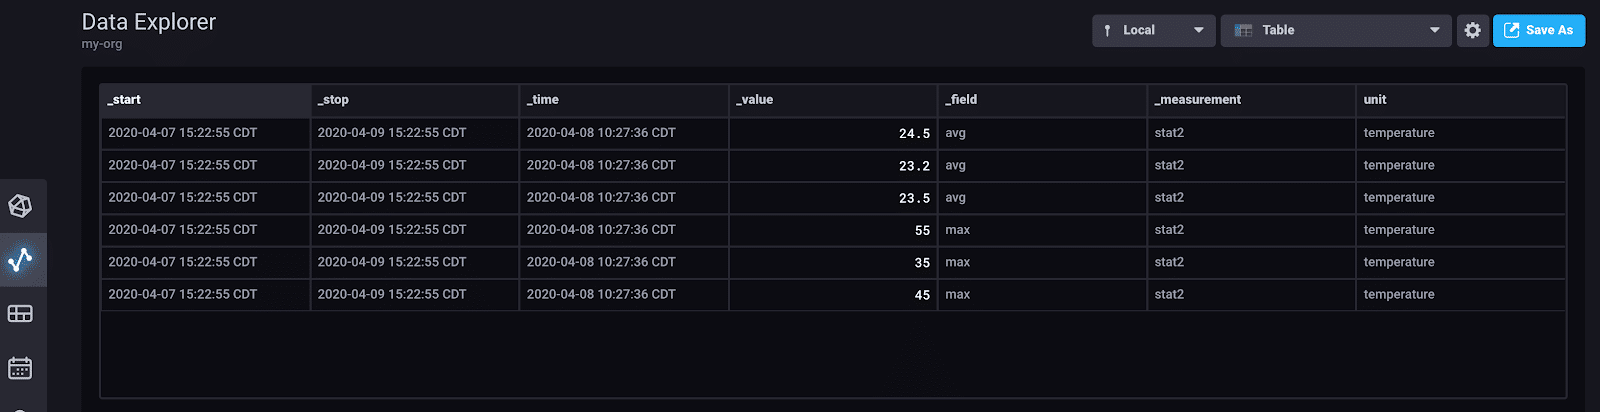 <figcaption> 3 time series data points with two fields written with the InfluxDB Go Client visualized with the Table visualization</figcaption>
Write Client options
There are many ways to write to InfluxDB v2 with the Go Client, but ultimately you must determine whether you need:
- to use the client with default settings or to define the client settings
- to write points synchronously with a blocking write client or to write points asynchronously with a non-blocking write client.
To help you decide how to use the client, let’s take a look at all of our options.
There are two client constructors:
- NewClient(): creates InfluxDBClient for connecting to given server URL with a provided authentication token, with default options
- NewClientWithOptions(): creates InfluxDBClient for connecting to given server URL with provided authentication token and configured with custom options
There are two write APIs:
- WriteAPIBlocking(): returns the synchronous, blocking, write client. Batching is defined by the user. Batches are generated from the given number of points.
- WriteAPI(): returns the asynchronous, non-blocking, write client. It provides implicit batching. Time series data is added to the buffer until it reaches the batch size at which point it's written to InfluxDB. Flush() flushes all pending writes. Please look at this example of how to use the non-blocking write client.
Those clients each have two methods for writing time series data into your InfluxDB instance:
WritePoint(): writes data pointsWriteRecord(): writes line protocol records
Points can be created by one of two methods:
- NewPoint(): creates an empty Point. Use AddTag and AddField to fill point with data
- NewPointWithMeasurement(): creates a Point from measurement name, tags, fields, and a timestamp
Querying InfluxDB with the InfluxDB Go Client
Querying your InfluxDB v2 server is much more straightforward. To query your instance, you get the query client and iterate over the table results.
func main() {
    // Create client
    client := influxdb2.NewClient("http://localhost:9999", "my-token")
    // Get query client
    queryAPI := client.QueryAPI("my-org")
    // Get QueryTableResult
    result, err := queryAPI.Query(context.Background(), `from(bucket:"my-bucket")|> range(start: -1h) |> filter(fn: (r) => r._measurement == "stat")`)
    if err != nil {
        panic(err)
    }
    // Iterate over query response
    for result.Next() {
        // Notice when group key has changed
        if result.TableChanged() {
            fmt.Printf("table: %s\n", result.TableMetadata().String())
        }
        // Access data
        fmt.Printf("value: %v\n", result.Record().Value())
    }
    // check for an error
    if result.Err() != nil {
        fmt.Printf("query parsing error: %s\n", result.Err().Error())
    }
    // Ensures background processes finishes
    client.Close()
}
There are only two query client options:
- Query(): The example above employs this method for easy parsing of Flux annotated CSV query response.
- QueryRaw(): This returns raw, unparsed, query result string and processes it on your own. Control the returned CSV format with DefaultDialect(). Please look at this example for how to use
QueryRaw().
Easy to get started with the InfluxDB v2 Go Client
I hope this tutorial helps you get started with InfluxDB. As always, if you run into hurdles, please share them on our community site or Slack channel. We’d love to get your feedback and help you with any problems you run into.
