Revisiting The Things Network: Connecting The Things Network V3 to InfluxDB
By
Jay Clifford
updated December 14, 2025
Product
Use Cases
Developer
Navigate to:
Back in 2019, David Simmons created an awesome blog introducing LoRaWAN devices and The Things Network. He also showed you how easy it was to connect The Things Network V2 to InfluxDB. Since then, a few things have changed and I thought it was time to revisit the Things Network with a new project.
So what has changed?
Since January 2021, The Things Network now deploys The Things Stack Community Addition. In short, there were a few added benefits for The Things Network moving to The Things Stack:
- Developer-friendly - The Things Stack was designed to upskill developers in LoRaWAN technology. It abstracts you away from the LoRaWAN Network itself and allows you to focus on building end applications.
- Accessibility and scalability - The Things Stack supports all LoRaWAN classes (A,B,C) and LoRaWAN versions. The Things Stack supports passive roaming allowing for easy connection to one of the community-run LoRaWAN Gateways.
- Advanced features - Developers can now access their data via protocols such as MQTT, HTTP and gRPC. They also provide direct connectivity to Enterprise solutions such as AWS IoT, Azure IoT Hub and LoRa Cloud.
- To understand more, I highly recommend checking out the Technology Stack documentation.
A new project
Instead of reinventing the wheel, I decided to port one of our well-known IoT projects to The Things Network. Plant Buddy is the love child of Rick Spencer and allows you to monitor the health of your house plant using some simple analogue and digital sensors. I highly recommend checking out the blog series if you want to learn more. You can also find the community repo here.
So what will our architecture look like?
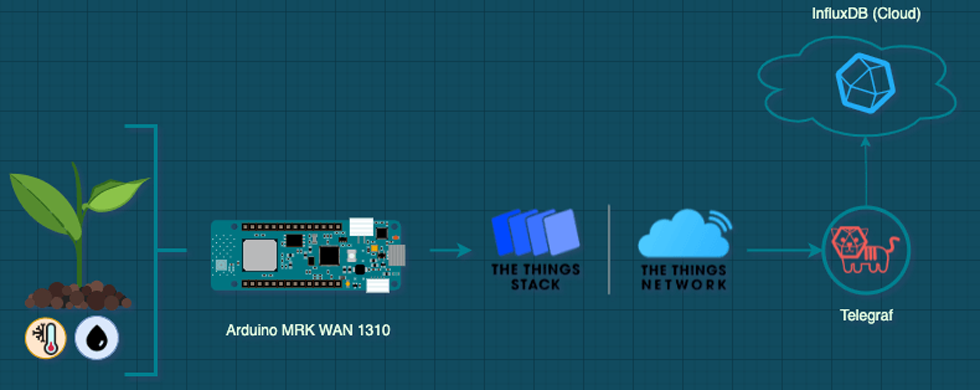
Note: The Git repository for this project can be found here.
Hardware setup
Let’s start with setting up our LoRaWAN device. I opted to purchase an Arduino MKR WAN 1310. This all-in-one microcontroller allows for easy connectivity to a LoRaWAN network while maintaining the Arduino simplicity you know and love for prototyping.
First, let’s tackle the sensor wiring. Here is a list of the sensors you will need:
- DS18B20 Temperature Sensor (Waterproof)
- Soil Moisture Sensor v1.2
- Photoresistor module
- DH11 Temperature Humidity Sensor
Below is the wiring diagram for the sensors and the MKR WAN 1310 (I highly recommend using a breadboard while prototyping):
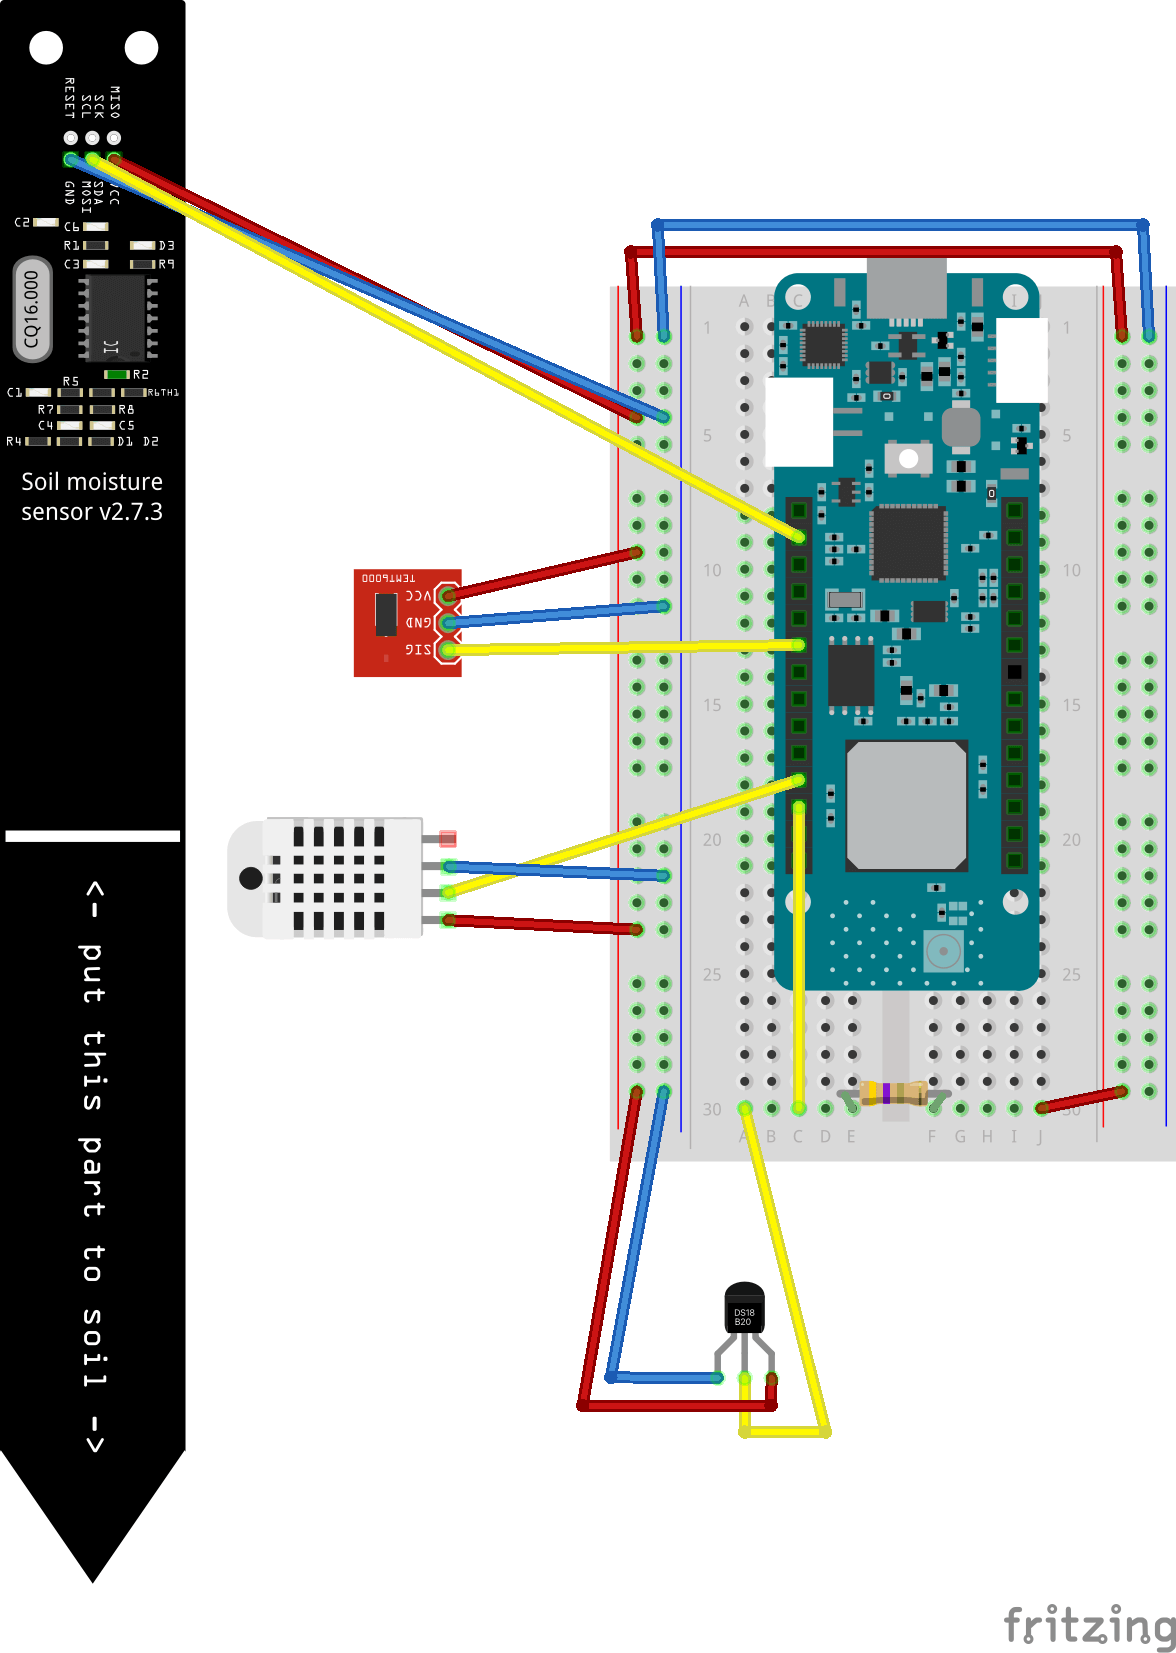
Once you have finished wiring up the sensors make sure to also attach the included Antena. You can now plug the MDR WAN 1310 into your computer using a MicroUSB cable.
Device provisioning
Now that we have our device connected to our PC it’s time to flash the device with our plant monitoring program. Arduino comes with a purpose-built IDE for flashing their devices as well as other embedded controllers. For simplicity, the following instructions will be done using the IDE:
-
-
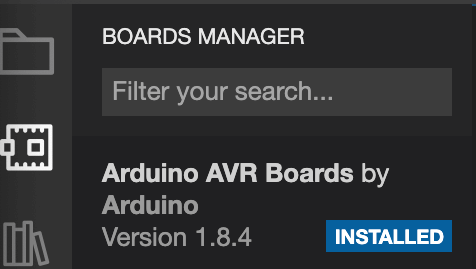
- Open the Arduino IDE and select Boards Manager. Install Arduino AVR Boards.
- Next, we will install the LoRaWAN network library. Select board manager and install MKRWAN_V2.

- Let's make sure our device firmware is up to date. Head to Files -> Examples -> MKRWAN_v2 and open MKRWANFWUpdate_standalone. Upload this to your device to begin the update.
- Next, let's head over to the Things Network Community console. If you have not already, create an account.
- Go to applications. Click Add application. Fill out the forum details and click Create Application.

- Next, enter your application and navigate to End Devices. Click Add end device.
- Choose an end device from the device library. Here is an example selection for the Arduino MKR WAN 1310. Note: your region will change depending on where you're located.
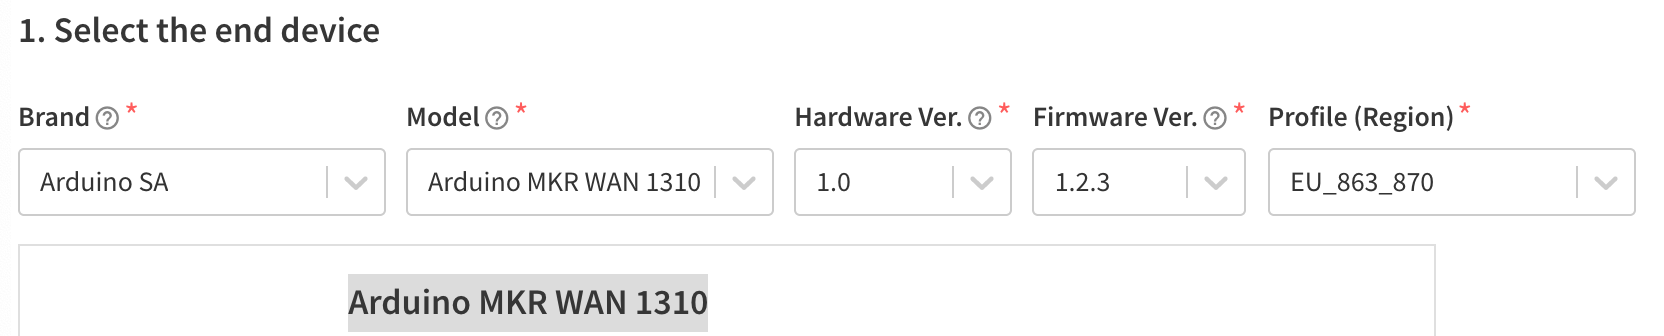
- Next, we select an appropriate Frequency plan (more information on spread factors can be found here). We can also auto-generate an AppEUI and AppKey
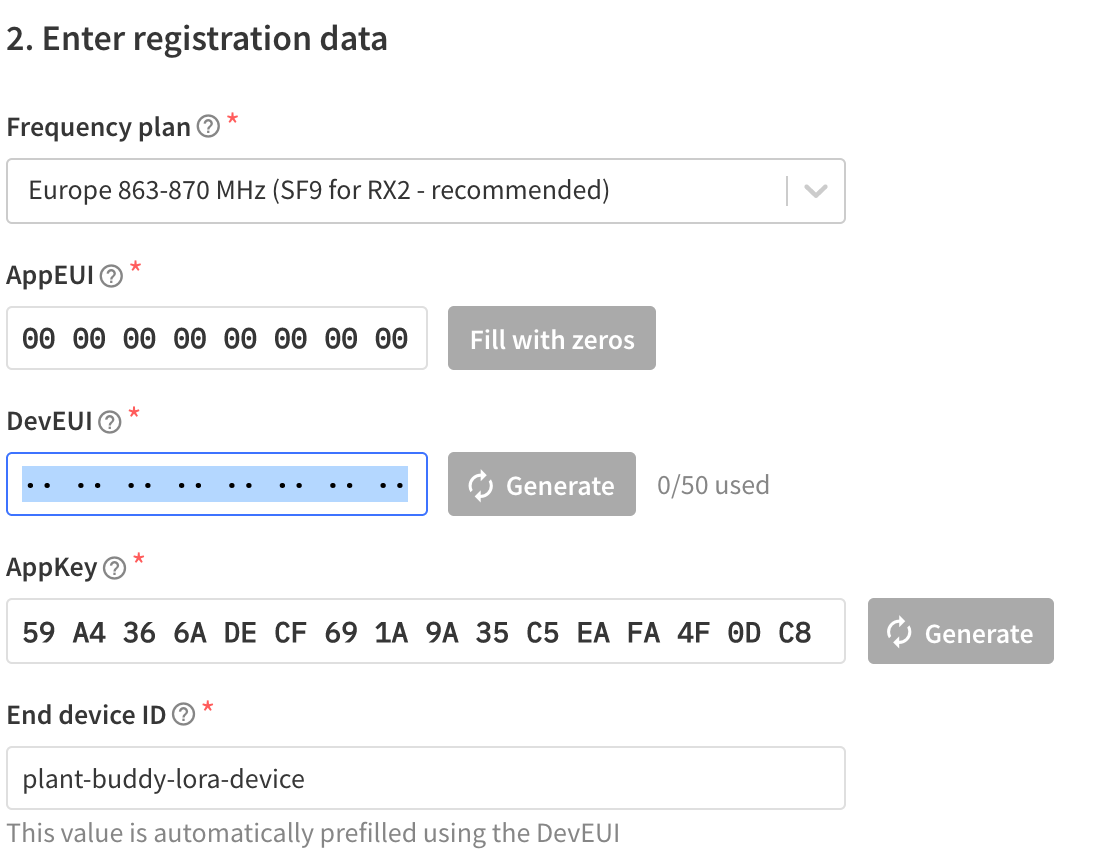
- Next, return back to our Arduino IDE and Head to Files -> Examples -> MKRWAN_v2 and open FirstConfiguration. Upload this project and open the serial monitor. Copy the device EUI from the console and paste it into your device registration forum back in the Things Network console. Click Register end device.
- (Optional) You can follow the rest of the serial monitor steps through to test connectivity.
- Download the plant_buddy_arduino_MKR_1310.ino file and open it in the Arduino IDE. Note as well as MKRWAN_v2. You will also require the following packages:
- DHT sensor library by Adafruit
- OneWire by Jun Studt
- DallasTemperature by Miles Burton
- Arduino_JSON by Arduino
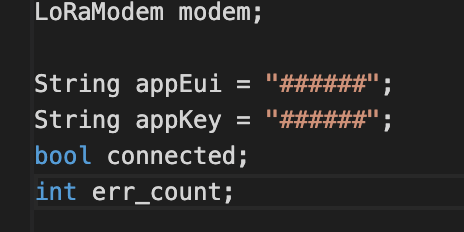
- Next, you will want to update the appEui and appKey.
- Upload the project and check the Serial Monitor. You should now start to see sensor data.
Your module version is: ARD-078 1.2.3
Your device EUI is: a8610a32333c8c0dSending: {"soil_moisture":3,"air_temperature":21,"humidity":48,"soil_temperature":22,"light":20}
- Open the Arduino IDE and select Boards Manager. Install Arduino AVR Boards.
-
Payload size
It is still important to note that payload size reigns king when working with LoRaWan devices. This means sending JSON messages as we have outputted to the serial console is a big no-no. I highly recommend encoding your message for example in base64. I also recommend checking out Working with Bytes for further reading.
Since data encoding is not the purpose of this tutorial, we will keep our encoding extremely basic:
String sensorString = String(moistureSenorReading) + "-" + String(airTemperatureReading) + "-" + String(humidityReading) + "-" + String(soilTemperatureReading) + "-" + String(lightReading);

  char payload[sensorString.length()+1];
  sensorString.toCharArray(payload, sensorString.length() +1);
We can then use the payload formatter in the Things Stack to reformat our message.

Here is the formatting code:
function Decoder(bytes, port) {
 var result = "";
 for (var i = 0; i < bytes.length; i++) {
   result += String.fromCharCode(parseInt(bytes[i]));
 }
 result = result.replace(/\0/g, "");
 var sensors = result.split("-");

   return { payload: {"soil_moisture": parseFloat(sensors[0]),
                      "air_temperature": parseFloat(sensors[1]),
                      "humidity": parseFloat(sensors[2]),
                      "soil_temperature": parseFloat(sensors[3]),
                      "light": parseFloat(sensors[4])}, };}
Connecting to InfluxDB
Next, we will stream our sensor data from the Things Stack to InfluxDB. Luckily this is made pretty easy using Telegraf and the MQTT Consumer Plugin:
-
- Sign up for a free InfluxDB Cloud account or download InfluxDB OSS.
- Download and Install Telegraf onto your PC or gateway device (Raspberry PI works great).
- Download the telegraf-mqtt-thing-network.conf.
- Next in the Things Stack console head to integrations -> MQTT. Generate a new password by clicking Generate new API key.
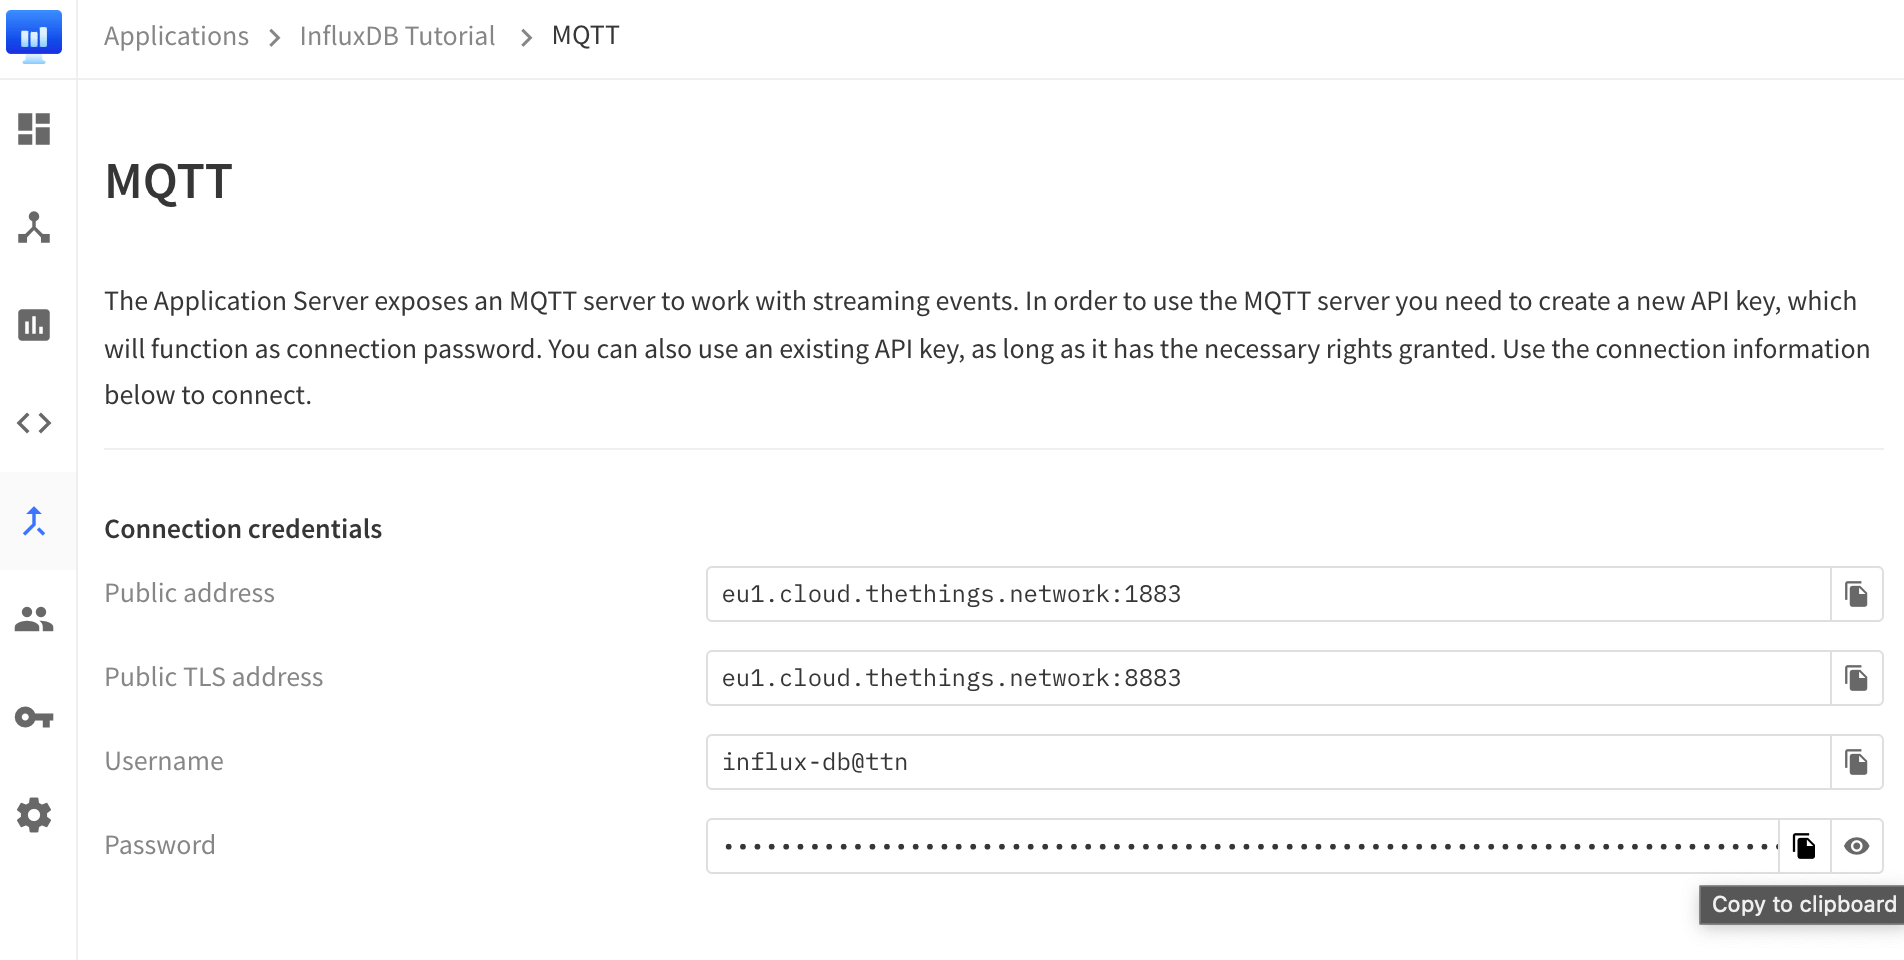
- Copy the username and password into your Telegraf config:
username = "${THING_USERNAME}" password = "${THING_API_KEY}" - (Optional) Test your config with the following command:
telegraf --debug –test --config ./mqtt/telegraf-mqtt-thing-network.conf - (Optional) Load the Things Network template. (This will auto-generate dashboards and buckets).
- Start Telegraf as a service with the new config.
If you have loaded the Things Network template, you should now start seeing the dashboard populate.
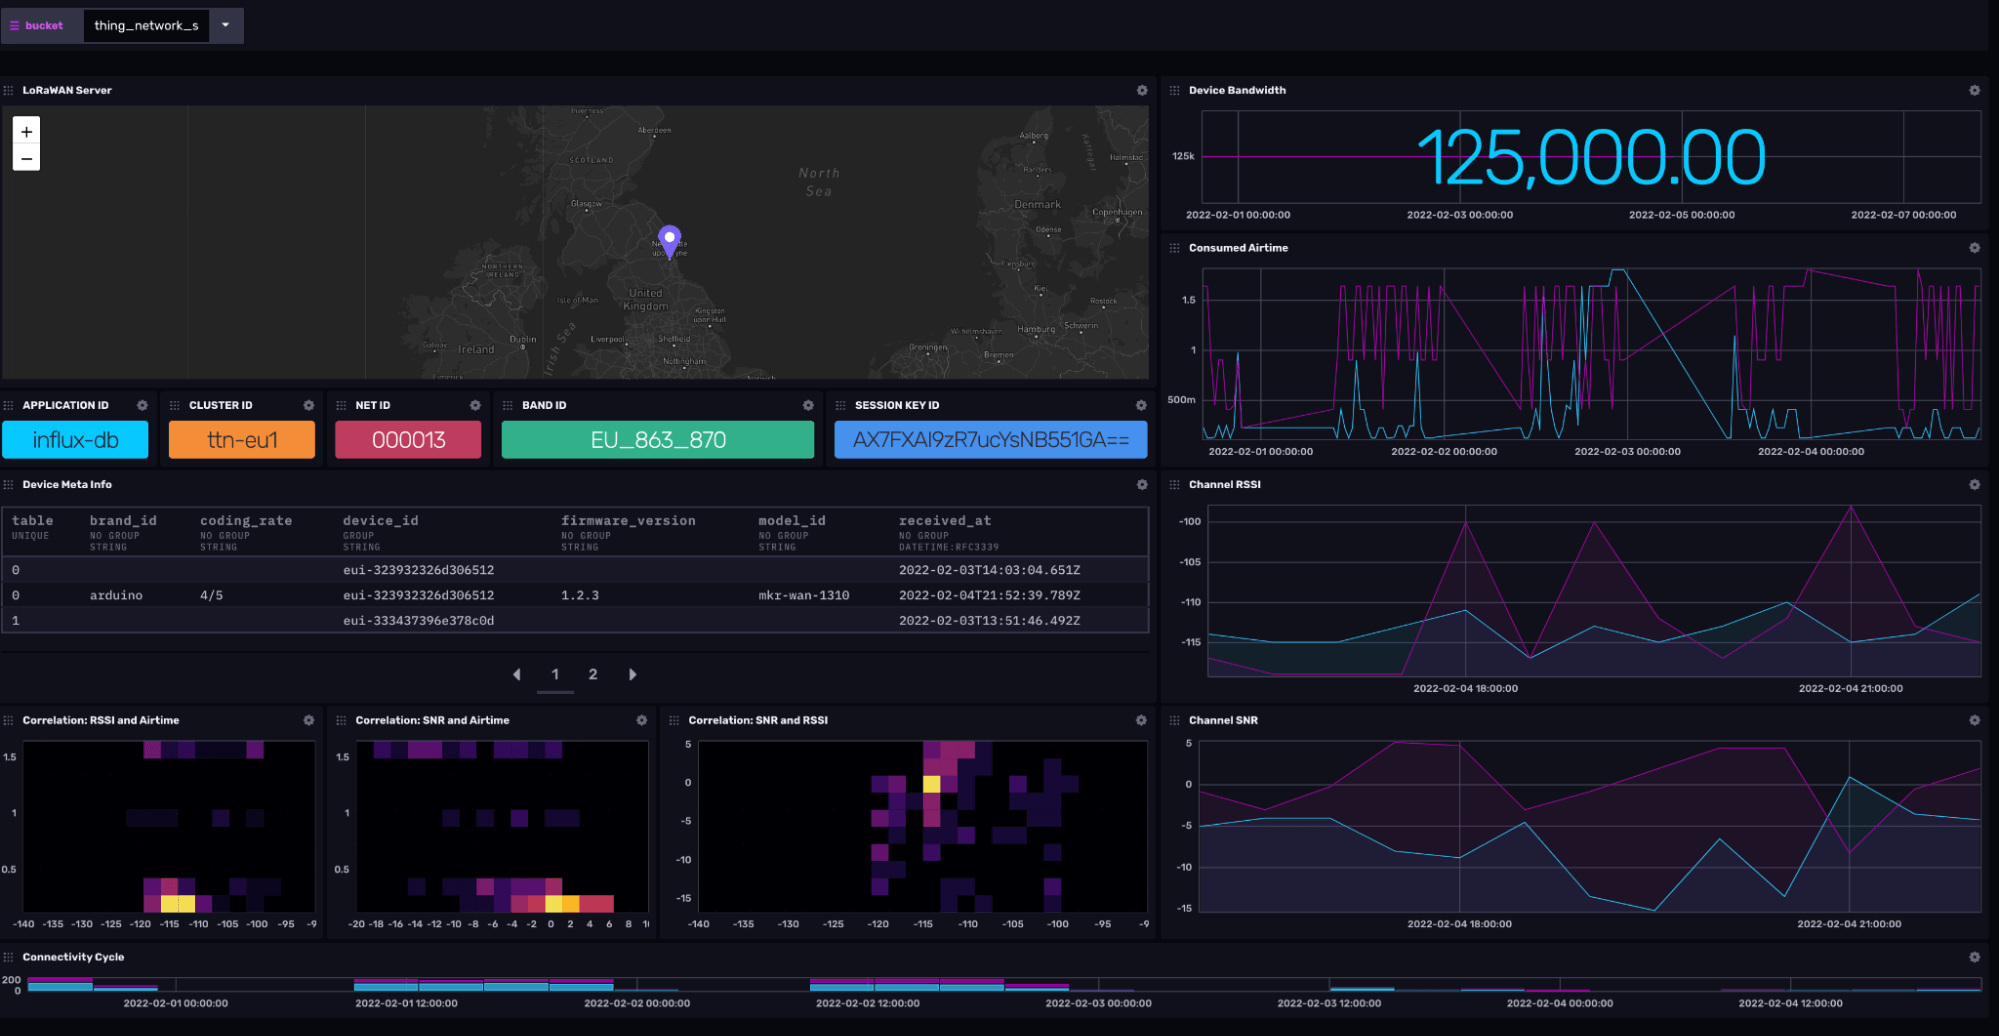
From this template, we can monitor a variety of metrics:
- LoRaWAN router location: Maps the location of the Things Network router your devices are talking to.
- Device Bandwidth: The bandwidth frequencies your devices are using.
- ID: application, cluster, NET, Band, session:
- Application: ID of the application your devices are talking to
- Cluster: ID of your Things Stack cluster. Most likely to be cloud.thethings.network when using the community edition.
- NET: network identifier your device is connecting to.
- Band: The geo-specific frequency band your device is transmitting data on.
- Session: The current session key identifier between your device and the Things Network.
- Device Meta information: brand, code rate, device ID, firmware version, model ID, last known message:
- Brand: Device brand name (Arduino, ST)
- Code Rate: The coding rate refers to the proportion of transmitted bits that actually carry information.
- Device ID: Unique identifier of the device.
- Firmware Version: Current firmware version installed on the device.
- model ID: Devices model version (linked to brand)
- Last known message: Time of the last message reported from the device. Useful for checking activity.
- Consumed Airtime: Graph depicting how long a device payload has traveled from sender to receiver.
- Channel RSSI: Received Signal Strength Indicator, the relative quality of a received signal to a client device. RSSI max value varies among manufacturers but the rule of thumb is the higher the value, the better the signal quality.
- Channel SNR: Signal-to-noise ratio, measures desired signal against background noise. Typical LoRa SNR values are between -20 dB and +10 dB. A value closer to +10 dB means that the received signal is less corrupted.
- Correlation: SNR to Airtime, RSSI to Airtime, SNR to RSSI: Heat maps comparing trends between SNR, Airtime and RSSI.
- Connectivity cycles: The estimated cycle of device connectivity. This is relative to Telegraf delivering messages to InfluxDB. It is useful for spotting patterns of downtime during the day.
Conclusion
The Things Network is a testament to the power of community-led projects. For the everyday IoT hobbyist, LoRaWAN provides a cost-effective and scalable solution to monitoring remote or hard to reach areas. Using the Influx Data stack we can transform, normalize and visualize our raw sensor data and also monitor the health of our sensor connectivity. This is not to say LoRaWAN will fit all IoT use cases, the limitations around bandwidth and payload size alienate more intensive IoT projects. Once you get up and running, reach out to me on the InfluxData Slack and Community forums (just make sure to tag me @Jay Clifford). Let’s continue the chat!
